Spatial Analysis 4.
Digital elevation modeling
Béla Márkus
Spatial Analysis 4.: Digital elevation modeling
Béla Márkus Lector: János Tamás
This module was created within TÁMOP - 4.1.2-08/1/A-2009-0027 "Tananyagfejlesztéssel a GEO-ért"
("Educational material development for GEO") project. The project was funded by the European Union and the Hungarian Government to the amount of HUF 44,706,488.
v 1.0
Publication date 2011
Copyright © 2010 University of West Hungary Faculty of Geoinformatics Abstract
The aim of the module is to give theoretical and practical introduction to the problems of digital elevation modeling. In the module there is a classification of interpolation methods. Different algorithms are discussed for both regular and structural (irregular) models. There is a brief summary of elementary and basic functions of DEM software modules. Finally error handling and accuracy measures are argued.
The right to this intellectual property is protected by the 1999/LXXVI copyright law. Any unauthorized use of this material is prohibited. No part of this product may be reproduced or transmitted in any form or by any means, electronic or mechanical, including photocopying, recording, or by any information storage and retrieval system without express written permission from the author/publisher.
Table of Contents
4. Digital elevation modeling ... 1
1. 4.1 Introduction ... 1
2. 4.2 Interpolation methods ... 3
2.1. 4.2.1 Local – global ... 4
2.2. 4.2.2 Exact – approximate ... 4
2.3. 4.2.3 Gradual - abrupt ... 5
2.4. 4.2.4 Deterministic – stochastic ... 6
3. 4.3 Elementary DEM operations ... 7
3.1. 4.3.1 Bilinear interpolation ... 7
3.2. 4.3.2 Dynamic surfaces ... 8
3.3. 4.3.3 Spline ... 10
3.4. 4.3.4 TIN ... 11
3.5. 4.3.5 Local triangles ... 11
3.6. 4.3.6 Slope and curvature ... 12
4. 4.4 Elementary operations ... 13
4.1. 4.4.1 Line of Sight ... 13
4.2. 4.4.2 Contours ... 14
4.3. 4.4.3 Longitudinal section ... 14
4.4. 4.4.4 3D length of an arc ... 15
4.5. 4.4.5 3D area ... 15
4.6. 4.4.6 Cut-and-fill ... 16
4.7. 4.4.7 Hillshade ... 16
4.8. 4.4.8 3D view ... 17
5. 4.5 Error handling ... 18
5.1. 4.5.1 Error detection and refinement ... 18
5.2. 4.5.2 Accuracy measures ... 21
6. 4.6 Summary ... 22
Chapter 4. Digital elevation modeling
1. 4.1 Introduction
We used several times in the course the term "spatial" (spatial operations, spatial analysis) although the real world was basically modeled by a plane (x,y), and . In this module, you will learn about modeling the third dimension (z). For the practical implementation ArcGIS „3D Analyst” Extension will be used.
In the scientific literature there is no common usage of the terms Digital Elevation Model (DEM), Digital Terrain Model (DTM) and Digital Surface Model (DSM). In the most cases the term Digital Terrain Model represents the earth's surface and includes all objects on it. In contrast to a DTM, the Digital Elevation Model represents the bare ground surface without any objects like plants and buildings. The Digital Surface Model represents any of the „z” surfaces (temperature, wind speed, underground water level etc.)
A DEM can be represented as a raster (a grid of squares, also known as a heightmap when representing elevation) or as a triangular irregular network (TIN). The TIN DEM dataset is usually referred as a primary (measured) DEM, whereas the Raster DEM is often referred as a secondary (computed) DEM, because it is in most of the cases derived from a primary DEM using a spatial interpolation method.
DEMs are commonly built from land surveying, photogrammetry or topography, but in the last decades they may also be built using remote sensing techniques. DEMs are used often in geographic information systems, and are the most common basis for digitally-produced relief maps. The DEM could be acquired through techniques such as LiDAR, IfSAR, etc. While a DTM may be useful for landscape modeling, city modeling and visualization applications, a DSM is often required for flood or drainage modeling, land-use studies, geological applications, and much more.
Fig.4.1. The Digital Elevation Model reflects the physical surface of the Earth
Fig.4.2. The Digital Terrain Model represents the earth's surface and includes all objects on it
Fig.4.3. The Digital Surface Model mirrors any natural or artificial surface (Source:
http://www.thewebfairy.com/killtown/wtc7/gallery.html)
Modeling terrain relief via DEM is a powerful tool in GIS analysis and visualization. DEM can be stored in a GIS database in several ways:
• a rectangular grid of equal-spaced corner/point heights,
• a set of contour lines, or
• an irregularly spaced set of points.
Fig.4.4. Regular (left) and (Structural) Irregular DEM (right)
In the modeling, ensure that the boundaries of the model shall extend beyond the area of the information needs.
We speak about interpolation, if the new point is in the territory of the model. Székesfehérvár in the next figure is the subject of interpolation, in the case of Sopron that is extrapolation.
Fig.4.5. Interpolation can be done only in the modeled area
The DEM operations are usually classified into the following three categories:
1. Elementary operations, answering the „What is here?” question around a given point (elevation, slope, slope direction, curvature)
2. Basic operations, these are an important elements of the professional DEM subsystems (definition of extreme points; construction of contour lines, longitudinal and cross sections; calculation of surface area and volume;
3D visualization; slope category and exposure maps; shaded relief maps, etc.)
3. Complex applications (surface analysis, visibility studies, definition of catchment boundaries, earthwork planning, etc.)
In Chapter 2 „z” can be any numerical data (temperature, water depth, etc., although mostly think of elevation).
The second part of the module is dealing with digital elevation modeling.
After learning the module you will be able to:
• define and describe the types of spatial interpolation,
• explain the interpolation algorithms performed for regular and irregular models,
• discuss and compare each of the basic surface analysis methods,
• give orientation to the practical implementation of the DEM.
2. 4.2 Interpolation methods
The spatial interpolation is an operation, which is used to calculate the height everywhere in the modeled area, based on the measured points.
A wide variety of spatial interpolation techniques exist. You may already be familiar with some of these techniques, for example, contouring and Thiessen polygons. Others, such as Delaunay triangles, and spatial moving averages are likely to be new. The primary objective of this section is to explain the concepts which underpin the interpolation process. You will be introduced, in detail, only to those interpolation techniques which you are likely to find in commercially available GIS software.
All of the methods are grounded on the first law of geography1 according to Waldo Tobler is "Everything is related to everything else, but near things are more related than distant things." This observation is embedded in the gravity model of trip distribution. It is also related to the law of demand, in that interactions between places are inversely proportional to the cost of travel between them, which is much like the probability of purchasing a good is inversely proportional to the cost. It is also related to the ideas of Isaac Newton's Law of universal
1 Tobler W., (1970) "A computer movie simulating urban growth in the Detroit region". Economic Geography, 46(2): 234-240.
gravitation and is essentially synonymous with the concept of spatial dependence that forms the foundation of spatial analysis (Source: Wikipedia).
One of the most common methods used to classify the many different methods of interpolation is to group them according to the spatial entities on which they can operate; points, lines or areas. In this module we will discuss only the point interpolation methods, categorized into the following four headings:
• local or global,
• exact or approximate,
• gradual or abrupt,
• deterministic or stochastic.
An individual interpolation method will fit several of these categories, for instance it may be local, exact, abrupt and deterministic (such as Thiessen polygons). Before we can expect you to be able to recognize what type of interpolation methods you are using, we had better look at the ideas behind the terminology.
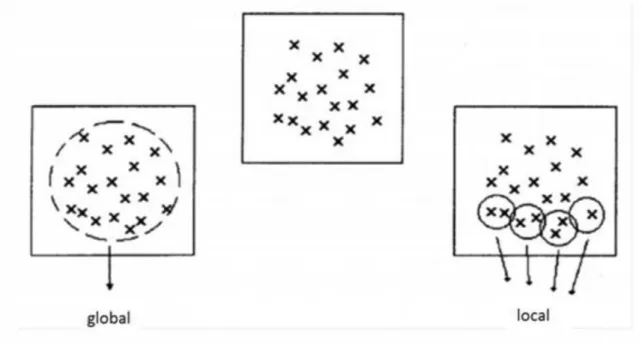
2.1. 4.2.1 Local – global
The terms local and global describe how an interpolation technique uses the measured data collected for a set of geographically spread sampling points. Global interpolation techniques apply a single function to all the points in a study area. In such cases, a change in one observed value would affect the entire interpolation process.
Global interpolators tend to produce a surface with few abrupt changes, because, in general, they employ the principle of averaging. This reduces the influence of extreme values. Such methods are most appropriate when the surface being modeled is known to have an overall trend.
Where there is little or no knowledge about the overall trend in the surface you are trying to model then local interpolators are more appropriate. Local interpolation techniques apply the same function repeatedly to a small portion of the total set of sample points for which data have been observed. Then a surface is constructed by linking these regional observations together.
Figure 4.6. illustrates the distinction between local and global methods of interpolation. Examples of local interpolation techniques will be given in the following sections include Delaunay triangles and moving averages. Global interpolators to be considered include line threading and trend surface analysis.
Fig.4.6. Global and local interpolation (Source: UNIGIS)
2.2. 4.2.2 Exact – approximate
Exact interpolation techniques must honor all the points for which measured or observed data are available.
They are most appropriate when there is a high degree of certainty attached to measurements. Altitude, for example, is usually known with a high degree of certainty.
Approximate interpolators, on the other hand, do not have to honor all the points for which observed data are available. These techniques are most appropriate when there is some uncertainty about the ability to reproduce the observed value at a given sample point.
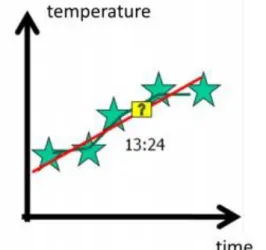
Figure 4.7. shows a 2D example. If the goal is prediction, or forecasting, linear regression can be used to fit a predictive model to an observed data set of y and X values. After developing such a model, if an additional value of X is then given without its accompanying value of y, the fitted model can be used to make a prediction of the value of y.
In our case linear regression (red) is an approximate interpolation. If we construct a traverse through every measured points (green) our prediction would be exact.
Fig.4.7. Linear regression is an approximate interpolation.
Consequently line threading is an exact interpolation. Smoothing the contour lines results approximate interpolation.
Fig.4.8. Line threading - exact, line smoothing - approximate
2.3. 4.2.3 Gradual - abrupt
Gradual or abrupt interpolators are distinguished by the continuity of the surface they produce. Gradual interpolation techniques will produce a smooth surface with gradual changes occurring between observed data points.
Abrupt interpolators will produce a surface which is stepped in appearance. An example of an abrupt interpolation method are buffering and Thiessen polygons which you looked at in an earlier module.. These define discrete territories associated with specific points.
Fig.4.9. Cross section of an abrupt surface
In terrain modeling, for example, you may wish to represent the presence of a cliff or in climatic modeling the presence of a weather front. For such features there has to be a definable step function which can be used with a gradual surface.
Fig.4.10. Natural abrupt surfaces (Source: http://www.parents-stories.co.uk/info.htm)
2.4. 4.2.4 Deterministic – stochastic
The most desirable situation to be in when faced with interpolating new values from a known data set is where there is sufficient knowledge about the phenomena to allow its behavior to be described by a mathematical function. This is known as deterministic modeling.
Figure 4.11 shows how knowledge of the laws of physics and measurements of actual velocity would allow the calculation, from seven sample points, of the trajectory of a bouncing ball.
Fig.4.11. Deterministic trajectory of a bouncing ball (Source: UNIGIS)
In addition, deterministic modeling allows extrapolation beyond the range of our sample data set. However, this is only possible if the context of the data values is understood. Unfortunately, few geographical phenomena are understood in sufficient detail or obey such precise rules to permit a deterministic approach to interpolation or extrapolation. There is a great deal of uncertainty about what happens at unsampled locations. To handle this problem stochastic models are frequently used. Stochastic models incorporate the concept of randomness suggesting that the interpolated surface, point line or area values are only one of an infinite number that might have been produced from the known data points. Figure 4.12 shows a series of random trajectories for our bouncing ball all of which could in theory occur if the behavior of our ball was assumed to be random.
Fig.4.12. Random trajectories for a bouncing ball
After the review of basic types of spatial interpolation we will move to the interpolation methods used in digital elevation modeling.
3. 4.3 Elementary DEM operations
This chapter gives an overview of the most widely used interpolation techniques first for regular later for irregular models.
3.1. 4.3.1 Bilinear interpolation
In mathematics, bilinear interpolation is an extension of linear interpolation for interpolating functions of two variables (x and y) on a regular grid. The interpolated function should not use the term of x2 or y2, but xy, which is the bilinear form of x and y.
The key idea is to perform linear interpolation first in one direction, and then again in the other direction.
Although each step is linear in the sampled values and in the position, the interpolation as a whole is not linear but rather quadratic in the sample location.
Two solutions are presented below.
The principle of the first algorithm illustrated in the following figure.
1. Let us select the measured points (00,10,11,01) around the new, unknown point (P).
2. Linear interpolation on 00-10, and 01-11 will result point 1 and 2.
3. Linear interpolation between 1and 2 will result the elevation for point P.
Fig.4.13. The principle of the bilinear interpolation
The second solution is to use if in the cell more than one point interpolation should be carried out. In such cases, it is appropriate to carry out a surface fitting, and the new points will be calculated from the surface equation.
There are four given points around P, consequently for exact interpolation we need a surface with four unknowns. It is a hyperbolic paraboloid. The hyperbolic paraboloid (not to be confused with a hyperboloid) is a doubly ruled surface shaped like a saddle. In a suitable coordinate system, a hyperbolic paraboloid can be represented by the equation z=a00+a01y+a10x+a11xy.
If the origin is moved to point 00, than the unknowns can be achieved in a very simple and quick way (see below).
Fig.4.14. Interpolation by a hyperbolic paraboloid
The method is exact and gradual.
After the methods for regular models now switch to the interpolation engines developed for irregular models.
3.2. 4.3.2 Dynamic surfaces
Dynamic surface interpolation techniques apply the same function repeatedly to a small portion of the total set of sample points for which data have been observed.
For illustration the following five methods are presented.
Nearest Neighbor
The nearest neighbor algorithm selects the value of the nearest point, and does not consider the values of neighboring points at all, yielding a piecewise-constant interpolant. The algorithm is very simple to implement.
Fig.4.15. Nearest Neighbor interpolation
The method is exact and abrupt.
Moving average
The most common method used in GIS is the Spatial Moving Average. This process involves calculating a new value for each known location based upon a range of values associated with neighboring points. The new value will usually be a weighted average of all the points within a predefined neighborhood (usually a circle).
Fig.4.16. Measured point is the neighborhood
The elevation can be calculated from the following equation
where
• Zp – the elevation in the new point,
• zi – the elevation of the given points.
• pi – weight (after Tobler, most often 1/ti2),
The basic problem with spatial moving average techniques is the number of variations that exist. It is, therefore, highly probable that the spatial moving average functions available in one proprietary GIS system will produce significantly different results from those in another GIS. This is because different systems will allow you to select different distance decay models, select the number of points used in the model, and apply different procedures for handling those points which fall on the edge of a neighborhood.
This method Inverse Distance Weighted (IDW) in ArcGIS 3D Analyst.
The method is approximate and gradual.
Moving plane
Using inclined plane, the height approximation is given by:
where
• aij – unknowns of the plane,
• x and y – relative coordinates (origin is in point P).
The method is approximate and gradual. Minimum three measured points needed. The slope and slope direction could be calculated.
Second order polynomial
If you need the terrain curvature, you can use second order polynomial for interpolation
The method is approximate and gradual. Minimum six measured points needed. Beyond the slope and slope direction, the curvature could also be calculated.
Natural neighbor
Using Natural Neighbor method the calculation is similar to IDW, but the selection of the involved points is based on the Thiessen polygon of the new point. Every neighbor is used, which has an Thiessen polygon overlap. The weight is proportional with the overlapped area (see the following figure).
Fig.4.17. The concept of Nearest Neighbor interpolation
The method is approximate and gradual.
3.3. 4.3.3 Spline
Spline interpolates a surface from points using a minimum curvature spline technique. The basic form of the minimum curvature Spline interpolation imposes the following two conditions on the interpolant:
• The surface must pass exactly through the data points.
• The surface must have minimum curvature—the cumulative sum of the squares of the second derivative terms of the surface, taken over each point on the surface must be a minimum.
The basic minimum curvature technique is also referred to as thin plate interpolation. It ensures a smooth (continuous and differentiable) surface, together with continuous first-derivative surfaces. Rapid changes in gradient or slope (the first derivative) may occur in the vicinity of the data points; hence this model is not suitable for estimating second derivative (curvature).
The method is exact and gradual. The spline interpolation, we be used in the following module.
3.4. 4.3.4 TIN
Triangulated Irregular Network (TIN) Model was developed by Tom Poiker in the early 1970’s. The TIN is a simple way to construct a surface from a set of known points. It is a particularly useful technique for irregularly spaced points. In the TIN model, the known data points are connected by lines to form a series of triangles.
Every point having a common Thiessen edge should be connected.
Fig.4.18. Relationship between Thiessen polygons and TIN
Because the value at each node of the triangle is known and the distance between nodes can be calculated, a simple linear equation can be used to calculate an interpolated value for any position within the boundary of the TIN.
Fig.4.19. Interpolation within a triangle
The TIN approach is a global, exact and gradual interpolation method.
3.5. 4.3.5 Local triangles
Fig.4.20. The concept of the local triangles
The method of the local triangles as opposed to TIN builds only one triangle. The algorithm is as follows:
1. Select the measured point within a circle.
2. Select the nearest point.
3. Select second nearest point, where the 1-P-2 angle ( ) lager, than 600.
4. Select the nearest point within the 1-P and 2-P bounded sector.
The interpolation within the triangle is thin the case of TIN. The interpolation is an exact and gradual interpolation method.
3.6. 4.3.6 Slope and curvature
Let us extend the „What is here?” question from the elevation to the slope and curvature.
If the height approximation is given by an inclined plane
than the slope ( ) and slope direction ( ) can be calculated from the first derivatives
= ,
= arctan ( ) .
If a second order polynomial is used for interpolation
than the curvature can be found from the second derivatives, as given below
Hesse-matrix
H = ,
maximal and minimal curvature
G max,min = ,
where
S = spur H = 2a20 + 2a02 , and
D = det H = a20 a02 – a112 .
4. 4.4 Elementary operations
The elevation of the terrain surface can lead to a variety of information. This chapter deals with elementary DEM operations.
Fig.4.21. Slope, aspect and hillshade derived from elevations
4.1. 4.4.1 Line of Sight
Line Of Sight calculates intervisibility between pairs of points given their position in 3D space and a surface. It also determines what is visible along the lines between these points as they are profiled on the surface.
Fig.4.22. The concept of Line of Sight (Source: ESRI)
The white bars indicate the visible sections on the figure kezdőpontról, red bars shows the sections in shadow.
This tool takes two inputs, a surface and a polyline feature class. The surface may be a raster, TIN, or Terrain.
The polyline feature class may contain one or more records. Each record represents a separate line-of-sight calculation. The first and last vertices of each polyline are used as observer and target points. Other vertices are ignored. With input 3D polyline feature classes the observer and target positions in 3D space are used directly.
2D polylines will have observer and target heights interpolated from the surface with a default offset of 1 applied to the observers to raise them above the surface. The tool will look to see if fields named OffsetA and OffsetB exist in the feature class. If so, the values of the offsets will be applied, OffsetA to the observer and OffsetB to the target.
4.2. 4.4.2 Contours
The output of this operation results a polyline, where horizontal plane passing through the DEM surface.
Fig.4.23. Contours derived from a TIN (Source: NCGIA)
General mistake to smooth the polyline, because the line smoothing will not respect topographic surface. If you want smooth contours, you should generate smooth surface first (e.g. spline).
Fig.4.24. Smooth the surface, instead of a 2D contour line
4.3. 4.4.3 Longitudinal section
Longitudinal section is a section that is cut along the long axis of an engineering structure (e.g. road).
Fig.4.25. Longitudinal section
Construction of longitudinal and cross sections is one of the basic operations in road design and landscaping.
4.4. 4.4.4 3D length of an arc
The length of an arc in 3D is the sum of elementary slope lengths. Better resolution results better approximation.
Fig.4.26. 3D length
4.5. 4.4.5 3D area
On a hilly district the 3D area of a polygon could be much larger than the horizontal one. For the calculation, cover the area with a raster (see the next figure) and define the slope angle ( ) in the middle of the cell. The 3D area of the cell (f) can be calculated from the following equation
where t is the horizontal area of the cell.
Fig.4.27. For the 3D area calculation, cover the area with a raster
The total 3D area is the sum of the elementary pieces:
4.6. 4.4.6 Cut-and-fill
Volume calculation is a frequent engineering task. A cut-and-fill operation is a procedure in which the elevation of a surface is modified by the removal or addition of surface material.
The Cut/Fill tool in ArcGIS summarizes the areas and volumes (V) of change from a cut-and-fill operation. By taking surfaces of a given location at two different time periods, the function will identify regions of surface material removal, surface material addition, and areas where the surface has not changed.
Fig.4.28. The concept of the cut-and-fill operation
4.7. 4.4.7 Hillshade
The hillshade function obtains the hypothetical illumination of a surface by determining illumination values for each cell in a raster. It does this by setting a position for a hypothetical light source and calculating the illumination values of each cell in relation to neighboring cells. It can greatly enhance the visualization of a surface for analysis or graphical display, especially when using transparency.
To calculate the shade value, first the altitude and azimuth of the illumination source is needed. These values will be processed along with calculations for slope and aspect to determine the final hillshade value (
) for each cell in the output raster.
Fig.4.34. The concept of hillshading
Fig.4.35. Hillshade can greatly enhance the visualization of a surface (Source: ESRI)
4.8. 4.4.8 3D view
Viewing data in three dimensions gives you new perspectives. Three-dimensional viewing can provide insights that would not be readily apparent from a planimetric map of the same data. For example, instead of inferring the presence of a valley from the configuration contour lines, you can actually see the valley and perceive the difference in height between the valley floor and a ridge.
Fig.4.36. 3D view draped with a topographic map
Fig.4.37. 3D view draped with a satellite image
5. 4.5 Error handling
WYSIWYG is an acronym for what you see is what you get. The term is used in computing to describe a system in which content displayed during editing appears very similar to the final output.
5.1. 4.5.1 Error detection and refinement
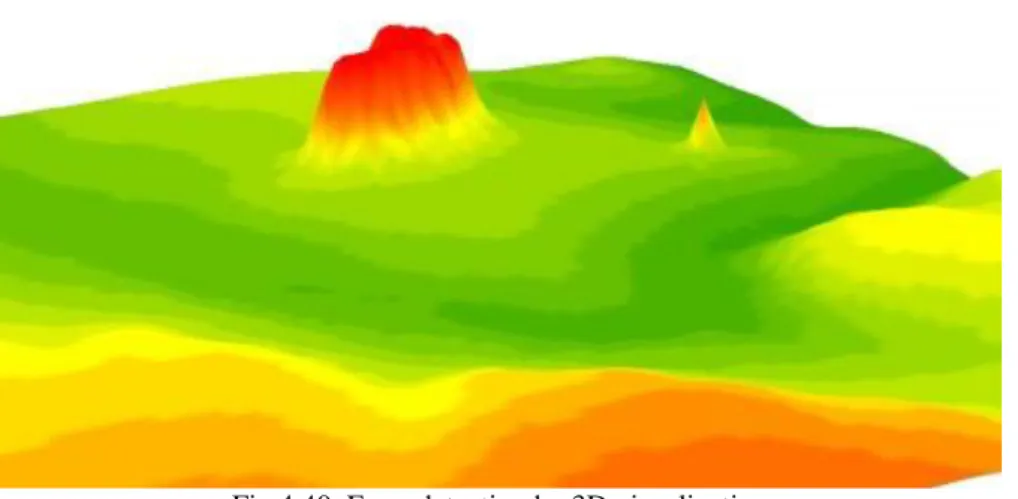
Before you start spatial analysis you should see (!) the digital elevation model. Check its correctness. The visual interpretation is one of the most effective methods, as you see in the following figures.
Fig.4.38. Error detection by colour band visualization
Fig.4.39. Error detection by slope visualization (green smaller than 25%, red larger than 100%)
Fig.4.40. Error detection by 3D visualization
If you are using IDW (Inverse Distance Weighted) the surface could be scaly. Zooming into the surface (upper- right part of the following picture) you can detect flakes around the measured points.
Fig. 4.41. IDW can result flakes around the measured points
If you would like to derive slope values, maybe the effect is more striking feature. You can see (Fig. 4.42) that around the measured point the slope is small (black), it is enlarging between the points (violet-red-yellow) until the middle, and decreasing again.
Fig.4.42. Slope map
What is the reason for this? The answer can be found in the following figure. As soon as we see the value of the function in the immediate vicinity of the points is increased dramatically. To reduce this effect, it is useful to introduce a weight tolerance. It will reduce the „flake” effect.
Fig.4.43. Weight tolerance
Contours are a common source of digital elevation data. In general all the vertices of the contour lines are used as mass points for triangulation. In many cases this will cause the presence of flat triangles in the surface.
Flat triangles are created whenever a triangle is formed from three nodes with the same elevation value
Flat triangles are frequently generated along contours when the sample points occur along the contour at a distance that is less than the distance between contours. When these "excess" vertices are not removed , the Delaunay triangulation discovers that the closest sample points are those along the same contour, causing the generation of flat triangles.
The flat triangles have a slope of 0 and do not have defined aspect. They might cause problems when the surface is used for modeling.
Fig.4.44. Flat triangles
The above mentioned interpolation errors could cause „terrace” effect along the contours, and on valleys and ridges. This effect seems well, if you construct a frequency diagram.
As soon as we see in the following figure, there are frequency peaks at the place of contour lines.
Fig.4.45. „Terrace” effect can be detected at the place of contour lines.
How to improve the model? One option is to remove the flat triangles adding terrain specific points and lines to the model. The other option is the weeding along the contour lines, eliminating the unnecessary points. The results are shown in Fig. 4.49.
Fig.4.46. Corrected model – frequency diagram
5.2. 4.5.2 Accuracy measures
In addition to the error detection, of course, it is very important to quantify the accuracy.
The quality of a DEM is a measure of how accurate elevation is at each pixel (absolute accuracy) and how accurately is the morphology presented (relative accuracy). Several factors play an important role for quality of DEM-derived products:
• terrain roughness;
• sampling density (elevation data collection method);
• grid resolution or pixel size;
• interpolation algorithm;
• vertical resolution;
• terrain analysis algorithm;
There are many methods to reflect the accuracy. Two solutions introduced here.
The first method is based on the difference between interpolation surface and the measured value. If an approximate interpolation is used we can calculate the accuracy for the point in question
where f – number of points used in the interpolation, v – the difference and p – the weight of the measured point.
The other solution is determined by the control measurements in the field. It is much more impressive. The accuracy is relevant for the modelled area, or a given part of it:
where Zi – measured elevation at x,y location, zi – interpolated elevation at x,y location, k – number of control points.
6. 4.6 Summary
The aim of the module was to give theoretical and practical introduction to the problems of digital elevation modeling. In the module there is a classification of interpolation methods. Different algorithms were discussed for both regular and structural (irregular) models. After a summary of elementary and basic functions of DEM software modules, error handling and accuracy measures were argued.
After learning the module you are able to:
• define and describe the types of spatial interpolation,
• explain the interpolation algorithms performed for regular and irregular models,
• discuss and compare each of the basic surface analysis methods,
• give orientation to the practical implementation of the DEM.
Review questions
1. Explain Tobler's law. Give examples.
2. Describe the concept of DDM, DTM and DSM! Give examples.
3. Give an overview of DEM operations.
4. Classify the interpolation methods.
5. Introduce the first approaches used in DDM interpolation.
6. Introduce the interpolation algorithms for regular models.
7. Explain the nearest neighbor and the natural neighbor methods.
8. Analyze the moving average interpolation.
9. Explain the use of dynamic surfaces.
10. Describe the TIN method.
11. How is the slope and exposure calculated?
12. Explain the use of the curvature characteristics.
13. Describe the principle of visibility analysis.
14. How to be calculated the 3D length and 3D area?
15. Describe the methods of the volume calculation!
16. How does the hillshade operation work?
17. Give an overview of methods for the DDM debugging!
18. Describe the accuracy measures of the interpolation.
Bibliography:
Márkus B.: Térinformatika, NyME GEO jegyzet, Székesfehérvár, 2010, Heywood, I. – Márkus B.: UNIGIS jegyzet, NymE GEO Székesfehérvár, 1999
Cornelius, S. - Heywood, I.: Spatial operations, UNIGIS, Manchester, 1998
ArcGIS Desktop Help 9.3, http://webhelp.esri.com/
ESRI: 9.3 ArcGIS Desktop Tutorials, Redlands, 2010,
Sárközy F.: Térinformatika, http://www.agt.bme.hu/tutor_h/terinfor/tbev.htm
NCGIA Core Curriculum: Bevezetés a térinformatikába (szerk. Márton M., Paksi J.), EFE FFFK, Székesfehérvár, 1994
Smith, M. J., Goodchild, M. F., Longley, P. A.: Geospatial Analysis, The Winchelsea Press, Leicester, 2007, http://www.spatialanalysisonline.com/output/