Fixture Design System with Automatic
Generation and Modification of Complementary Elements for Modular Fixtures
Attila Rétfalvi
Subotica Tech, Marka Oreškovića 16, 24000 Subotica, Serbia; ratosz@vts.su.ac.rs
Abstract: Modular fixtures are usually built from standard elements that can be found in the modular element set of a certain manufacturer. But in some cases the user besides using these elements modifies some semi-finished elements that can also be found in the modular element set, or even the user produces some brand new elements. The motivation behind this can be to simplify the fixture, or to make the locating or clamping of a workpiece possible or more precise. This paper presents the methods of automatic generation, and if required, automatic modification of such new or semi-finished elements.
Keywords: Modular fixture; automatic element modification; CAFD (Computer Aided Fixture Design)
1 Introduction
Constructing an appropriate fixture that ensures the desired precision and stability is often a complicated and time-consuming task. That is the reason why many efforts have been made to develop a system that is able to automatically determine the number and the order of the setups for a given workpiece, and construct acceptable fixtures for each setup. Such a system could spare respectable time spent on fixture planning and design. The great majority of such attempts are based on the use of modular fixture elements. If the batch size is small, it is much quicker to build a modular than to produce a dedicated fixture. After the use the modular fixture can be dismantled, and stored in a considerably smaller place than a dedicated fixture. The elements of a modular fixture can be reused at a next fixture. But in some cases, if we use only the standard modular fixture elements found in a modular element set of a manufacturer, it would result in a very complicated or not sufficiently precise fixture.
In this paper the overview of the most known articles published in this field and the short introduction of the system developed by M. Stampfer and A. Rétfalvi will be presented. The system has been developed for box-shaped parts, first of all
cast gearbox housings not bigger than 1000x1000x600 mm. Box-shaped parts are often located with the help of one or two holes, so the problems that can occur during locating a workpiece over an inner cylindrical surface with the help of modular fixture elements will also be examined. In such cases when the problem cannot be acceptably solved with the help of the elements found in a modular element set, the users produce an extra (new) locator element, and complement the modular fixture built from modular fixture elements with that extra element. Thus, the fixture complexity can be considerably reduced or the locating precision can be increased. In modular fixture element sets there are some semi-finished plates (adapter plates) which are modified when some relationship tolerances justify their use. Thanks to this the number of needed setups or the precision requirements toward the fixture can often be reduced. In this paper, a method of automatic generation and modification of some of the above mentioned fixture elements will also be presented. The dimension, shape and relationship tolerances that can be achieved with the fixtures generated this way are in most cases in class IT7.
1.1 Literature Overview
Many researchers have been engaged with fixture design automation, some of them focused on feature recognition, and the conceptual solution of the fixture.
Others focused on finding the optimal layout of the fixture elements. Some dealt with fixture verification, including stability, deformation and accessibility analysis. Some developed such a system that solves more of the above-mentioned problems. Bansal et al. [1], introduce an indirect feature recognition system that - starting from neutral STEP format of the workpiece model determines the removal volume, assuming that the stock is a boxlike hull of the model. It identifies slots, pockets and holes, and then tries to determine the best fixturing points on the workpiece (which ensure minimum tolerance deviations) by using a workpiece slicing technique at different user defined heights. Paris and Brissaud [2], present a process planning system that, after feature recognition assisted by an expert, associates machining processes to machining features and then organizes them into a global machining plan of the workpiece. Finally, it gives recommendations on fixturing features and determines the positioning quality, stability and cutter accessibility indices. Perremans [3], presents an expert system that builds a modular fixture if the fixturing features are given. In order to make the system manufacturer independent, he uses contact, assembly, and tightening features to describe the modular elements. Vichare et al. [4], introduce a model where the manufacturing resources like the machining tool or fixtures are represented in a unified manner for a CAx chain. Alacron et al. [5], developed a fixture planning and design system using the functional design theory. The user interactively prescribes the functional requirements, and the system, after defining the locating, supporting and clamping faces, selects modular elements and puts them on the defined place. Hou and Trappey [6], made a fixture design system, in their article the fixture layout reasoning and fixture element selection is described in detail.
Kumar et al. [7] introduce an interactive fixture design system in which the user defines the fixturing surfaces and the program builds an interference-free fixture.
Mervyn et al. [8], show a fixture design system based on evolutionary (genetic) search algorithm. It is assumed that the imported workpiece model is well oriented according to tool axis, and the software tries to determine the number of required locating, supporting and clamping faces and points. Cecil [9], introduces an automated fixture design system, which groups the features having parallel directions (at planar surfaces their normal is taken into consideration while in case of holes their axis is of primary importance) in the same setup. After defining the number of setups, the system selects the locating and supporting surfaces, and selects the locating and supporting elements - and if it is required selects an ancillary supporting element - for each setup. Finally, the system checks if datum faces (faces connected with a relationship tolerance) are used for locating the workpiece, validates the clamping from the aspects of workpiece stability and from the aspect of collision between the tool and the workpiece. Hu and Rong [10], report a faster interference checking method between fixture elements, and between the fixture elements and the tool. The elements and the tool are substituted with simple geometric forms, and those forms are projected on a plane.
Thus the problem is converted from 3D to 2D. Papastathis et al. [11] propose a fixturing solution, where not all clamps are static, some of them can change their position during machining, and this way increase the workpiece stability in case of thin-walled parts. Wan and Zhang [12], were also occupied with the problem of machining thin-walled parts. They propose that support layout should be determined through maximalization of the fundamental natural frequency of the workpiece – fixture system. An et al. [13], developed a dedicated fixture design system, which uses some standard elements. After the user defines the fixturing surfaces and points, the system selects some standard elements, and automatically adjusts the support height, then assembles all these on a base element. Jonsson and Ossbahr [14], present an overview on different kinds of reconfigurable and flexible fixturing solutions. Boyle et al. [15] give us a comprehensive review on different methods used for setup planning, fixture planning, unit design, and fixture verification. Wang et al. [16], give an overview on manufacturing fixtures and on automatic fixture design methods. Vasundra and Padmanaban [17], review the most recent works on machining fixture configuration planning, with special focus on the limitations of previous works in the determination of the elastic deformation of the workpiece, and the limitations in fixture layout optimization.
Many different approaches to the fixture design and different stages of the fixture design have been introduced in these articles and reviews, and the overwhelming majority of the researchers used modular fixtures in their work. But none of them even mention the adapter plates and cases when the user supplements the modular element set with a locator element produced by the user himself. With the help of such supplementary elements and adapter plates we can often build a simpler fixture, and with the help of a special adapter plate, in some cases, we can even reduce the number of required setups.
2 Systematization of the Fixturing Tasks
This work is focused on the manufacturing of box-shaped parts, especially gearbox housings and their fixturing. The fixturing tasks, for box-shaped parts can be classified into three groups: supporting, locating and clamping.
2.1 Supporting Types at Box-shaped Parts
Gearbox housings are most often machined on horizontal machining centers.
There are three supporting types that are most often used on horizontal machining centers (Figure 1):
a) horizontal supporting (pos_1), where four sides of the workpiece can be machined in one setup
b) vertical supporting (pos_2), where three sides of the workpiece can be machined in one setup
c) special vertical supporting (pos_3), where three sides of the workpiece and the fourth side can partially be machined in one setup
2.2 Locating Types at Box-shaped Parts
There are four types of side locating established (Figure 2):
Figure 2 Types of side locating [18]
Figure 1 Types of the supporting [18]
a) side locating with the help of surfaces adjoining the supporting face (p1), b) side locating with the use of two inside diameters on the supporting face (p2), c) side locating with utilization of one inside diameter laying on the supporting
face and one face adjacent to the supporting face (p3),
d) side locating with application of two threaded joints on the supporting face (p4).
2.3 Clamping Types for Box-shaped Parts
On the base of clamping force direction we can distinguish (Figure 3):
a) perpendicular clamping (s1) – where the clamping force is perpendicular to the supporting surface
b) parallel clamping (s2) – where the clamping force is parallel with the supporting surface
c) clamping by screws and joints on the plane locating face (s3) - in this case the clamping forces are acting perpendicularly on the supporting surface, but the force transmission happens in a different way (in form closed manner).
Figure 3 Types of clamping [18]
The basic type s1, depending on the location of the clamping faces, can be further divided into subtypes s11, s12 and s13. In the case of s11 the clamping surfaces are the closest parallel faces to the plane-locating (supporting) surface. In the case of s12 the clamping surface(s) is on the opposite side of the plane locating face.
By s13 the clamping is carried out using a through hole on the workpiece.
The number of clamping points is also a very important characteristic of clamping.
We distinguish clamping in one, two, three or four points. If we supplement the previous basic types with this information, we get that the possible clamping types are: s11_2, s11_3, s11_4; s12_2, s12_3, s12_4; s13_1, s13_2; s2_1, s2_2; s3_2, s3_3, s3_4. In the enumerated notation the last number denotes the number of clamping points.
3 Modular Element Sets
Process engineers noticed that some fixture elements occur in the same or in a slightly modified form in different fixtures. As it is much cheaper to produce similar elements in great quantities than producing somewhat different parts in piece production, engineers began to unify the most commonly used elements in order to be economical to manufacture them in great series. This led to the development of the modular element sets. The elements in such sets can be classified in three groups: base, functional and adapter elements.
Table 1
Adapter plates of a modular element set [20]
Element Name
Adopting plate (holes for bolts are
machined according to the needs)
Special plates
Base elements establish connection between machine tool table and the rest of the elements of the fixture. This group includes different palettes, grid plates and angled grid plates.
Functional elements are those elements that come in direct contact with the workpiece in order to fulfill a concrete task, such as supporting, locating or clamping; so this group includes different kinds of supports, locators and clamps.
Adapter elements are not used in every fixture, they are utilized when some supporting, locating or clamping surface is too high or too far and the gap between the functional element and the base element should be bridged. Adapter plates (Table 1) are used to make the locating or clamping of the workpiece possible or more simple.
3.1 Deficiencies of Modular Element Sets at Locating Workpieces over an Inner Cylindrical Surface
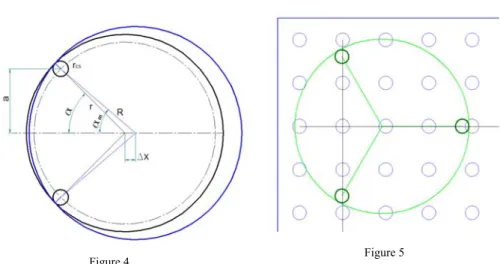
In modular element sets there are straight and flattened pins and bolts (Figure 4) used for positioning the workpieces on inner cylindrical surfaces. When one wants to locate a workpiece with the help of an inner cylindrical surface using modular elements, then he can encounter such difficulties, as there is no such locating element in the set whose diameter fits to the selected inner surface. For example, in the set of Heinrich Kipp Werk there are locating pins Ø8, Ø10, Ø12, Ø13, Ø14, Ø16, Ø18, Ø20, Ø22, Ø25, Ø30, Ø35, Ø40 and Ø50 mm. Thus, when a workpiece is to be located with the help of an inner cylindrical surface whose diameter is Ø28 mm one either has to produce a locator element (e.g. Ø27,95 +0,02mm) or has to use three smaller locating pins from the set to solve the problem. The inner cylindrical surface on the blank part is manufactured with a certain tolerance. As blank parts with lower tolerance limit (the smallest acceptable diameter) as well as blank parts with upper tolerance limit (the biggest acceptable diameter) have to be put on the fixture, the layout of the three pins must be such that matches the diameter of the lower tolerance limit. But if we put a blank part with upper tolerance limit on a fixture with such pin layout, the center of the locating surface can deviate from the ideal position. InFigure 4 the maximal locating error (Δx) can be seen in such cases. The blue circle (with radius R) presents the upper tolerance limit, the bold black line (with radius r) the lower tolerance limit, α is the half of the angle between two neighboring pins, and αm is the half of the angle measured between the center of the blank part with upper tolerance limit and the centers of two neighboring pins, rcs is the radius of the pins.
) cos(
) ( ) cos(
)
(
x R rcs m r rcs (1)
where ( ) sin( ))
arcsin(
cs cs
m R r
r r
(2)
and 2n
360
(3)
(n - is the number of the pins used for defining the location of the workpiece) In order to minimize the locating error Δx the three pins should be put on 120º to each other. It is very rare that every locating pin can be put in a grid hole of the base plate, usually at least one of them has to be moved at an appropriate place with the help of an adjustable support. As adjustable support elements should be screwed at least in two points to the base plate in order to avoid the rotation of these elements, the pins can be moved only along the directions shown in Figure 5, or possibly diagonally, if the adjustable support elements are long enough.
Figure 4
Figure 4 The change of the center point
Figure 5 Adjusting locating pins
The big green circle represents the inner cylindrical locator surface, the three bold little circles illustrate the locating pins, and the little blue circles represent the grid holes on the base plate. With the use of adjustable support elements the precision and rigidity of the fixture are reduced. Due to grid hole step size (which is usually 50±0,01 mm) it is often impossible to put the pins to be ideally 120° to each other;
and at smaller diameters there might not be enough room for the adjustable supports. In certain cases there might even be surfaces on the workpiece that hinder putting the locator elements at the ideal place (the surfaces marked with blue color and letter a, and the missing parts of the b intermittent inner cylindrical surface). For example, if a gray cast iron workpiece made by gravity casting should be positioned over a Ø200 mm inner cylindrical surface, and that surface after casting vary in diameter from 200 to 203 mm then the standard deviation of the position of the center can reach 3 mm if three locator pins are used to define the position of the centre. In this example R=101,5 mm and r=100 mm and we use n=3 pins with radius rcs=10mm, so α=60º, and αm will be 58,41º, and finally Δx will be 2,93 mm. If a cylindrical locator plate Ø is used for the same purpose Δx would not exceed 1,6 mm. The greater the Δx, the greater allowance on the blank part can be required in order to safely remove the so-called harmed layer during the roughing, or in order to ensure the minimal wall thickness after boring some holes. When the locating diameter (not covered by the element set) is smaller, it can easily happen that there is no other alternative than to produce a locator element since there is not enough space for pins and adjustable supports.
There is another option, namely to sacrifice an adapter plate and machine holes in it for the pins thus avoiding the use of adjustable supports. However, the adapter plates, due to their size, are expensive and in many cases it is cheaper to lathe, mill, harden and grind an extra locator element.
Figure 6
Example of hindering surfaces
From the above it can be concluded that, if in some cases the user complements the standard elements found in a modular element set with a locator element made by the user, it can result in a more precise, simpler, and often more rigid yet lighter fixture.
4 Setup and Fixture Design System
In order to speed up the fixture design process a Setup Planning and Fixture Design System (Figure 7) has been developed by the author and his collaborators.
The input to the system is the CAD model of the workpiece saved in neutral IGES file format. The IPPO module with the help of Interface_1 can interpret the content of the textual IGES file, and thanks to the rules built in the CAD model post processor it recognizes the technological features on the workpiece model, and extracts the important geometrical information (like diameter, length, angle, etc.) for each of the features. The user interactively defines which surfaces, surface groups should be machined, gives the dimension, shape and relationship tolerances and the surface roughness to be achieved. The output of the IPPO module is the technological feature based model of the workpiece saved in a text file. The user opens that file with SUPFIX module, which with the help of Interface_2 can interpret the data in the opened file. The SUPFIX module verifies if all the surfaces to be machined can be finished in one setup on a horizontal machining centre. On a horizontal machining centre 4 sides of a workpiece can be machined in one setup, so box-shaped parts generally can be finished in one or in two setups. If the part cannot be finished in one setup, the program verifies if all relationship tolerance connected sides of the workpiece can be machined in the same (main) setup. If not, the program verifies if at least all strictly connected surfaces can be machined in the same (main) setup. If not, the strictly connected
surfaces have to be machined in different setups, but this requires more precise - therefore more expensive – fixtures. SUPFIX module gives recommendations on the supporting type and surfaces, on locating type and surfaces, and on clamping type and surfaces for each setup. All these recommendations – if accepted by the user – are saved in a text file. The user opens that file with the FIXCO module, which with the help of Interface_3 can interpret those saved data.
Figure 7
The Setup Planning and Fixture Design System
The FIXCO module builds a fixture for each setup by taking into consideration the recommendations given by the SUPFIX module. In the function of the proposed supporting, locating and clamping type and surfaces FIXCO selects and puts the needed fixture elements at the appropriate place. As FIXCO builds the fixture models from IGES format modular fixture elements, this module uses also Interface_1 to interpret and extract the needed data of the fixture elements. The final results of this activity are the fixture models for each setup built from IGES format modular fixture elements. The type, location, rotation of each fixture element – and, when necessary, the data required for generating or modifying a new non-standard element – are saved in a text file.
Finally this file is opened by the user with the GLUE module, which builds the CAD model of the fixture in Solid Edge Assembly Environment, and checks if there is interference between the fixture elements or between the fixture elements and the workpiece. If there is, it modifies the non-standard fixture elements to cancel the interference. The assemblies are built from standard modular fixture element models saved in Solid Edge’s natural file format (.par files), but where it is necessary the GLUE generates the model of a new non-standard element, and where interference is to be avoided GLUE modifies the model of the non-standard elements.
The work of each module of the system is introduced in more detail in Stampfer [18], Rétfalvi [19], Rétfalvi and Stampfer [20]. In this paper, the automatic generation and modification of some complementary fixture elements is introduced in more detail.
4.1 Modification of the Fixture Elements
The elements that can be found in a modular element set do not always ensure the possibility of locating the given workpiece in a simple way. This problem most often occurs at positioning the workpiece on an inner cylindrical surface. In such cases the user has to produce an appropriate locator element. In other cases it is enough to modify some semi finished elements found in a modular element set. In modular element sets there are elements that are only partly machined, and their final shape must be made by the user, such elements being the simple and special adapter plates.
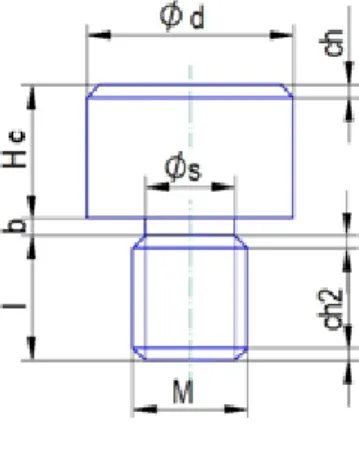
4.1.1 Generation and Modification of the Non-Standard Locator Elements As mentioned, in modular element sets there are straight and flattened pins and bolts used for positioning the workpieces on inner cylindrical surfaces. But only certain diameters are covered with these elements, so if there is a hole with a diameter in-between two covered diameters, or one with bigger diameter than the greatest covered diameter and that hole would be the most appropriate to be used for positioning of a workpiece, sometimes the user must produce an extra (new) locator element. If the height (Hc) (Figure 8) of a such cylindrical locator element, its diameter (d) and the joining dimensions (M) are known the CAD model of that element can easily be generated automatically, and the element can also be put automatically at the appropriate place. The height Hc should be less than the height Hmax (Figure 9) of the “upper” boundary curve of the locating surface, and must be at least 5 mm above the “lower” boundary curve of the locating surface (Hc ≥ Hmin). Diameter d of the locator element is equal to the lower tolerance limit (dmin) of the diameter of the locating surface.
Figure 8 Cylindrical locator element
If the height of a locating element exceeded the double of the diameter, then to decrease the required height of the locator element, an adapter element (EA1, EA2, EA9 or EA10) should be used, and the locator element would be mounted in the adapter element. In this case, the height (Hc = Hmin) of the locator element is of course measured from the upper surface of the adapter element. The generation of a (new) cylindrical locator element begins, when the proposed locating type is p2 or p3 (Figure 2) and the diameter of the proposed locating hole is not covered by the pins and bolts in the modular element set
Figure 9
Height of the cylindrical locator element
The generation process of a cylindrical locator element (as shown in Figure 8) is: a circle with diameter d has to be extruded upward to height Hc, and the upper circular edge has to be chamfered with value ch. From the plane of the bottom surface another cylinder has to be extruded downward with diameter s and height
b, and from the bottom surface of the last extrusion another cylindrical extrusion is needed downward with diameter M on length l. Finally, the upper and lower circular edges of the last extrusion have to be chamfered with ch2. When the diameter of a non-standard locator element exceeds 75 mm, instead of downwardly extruding the cylindrical extension with Øs and ØM, two counterbore holes (where the smaller diameter equals Ø12 mm, and the larger diameter 20 mm) have to be made into it, to ensure the clamping and positioning of the locator plate to the base plate (Figure 10). The distance between the holes in z and y direction (where y and z are parallel to the supporting plane) must be dividable with the value of the grid spacing, and symmetric to the centre of the locator plate.
A further complication can occur, especially at bigger diameters, for example, either a surface on the workpiece can hinder the correct locating (Figure 6) or some fixture elements cannot be placed on their ideal places because of another locator element (Figure 10). In such cases either the height of the locator element (Hc) is limited or one part of the locator element has to be removed. The limitation of the height means that the upper edge of the locator element is less than 5 mm above the lower boundary curve of the workpiece. It must be at least 1mm away from the hindering workpiece surface. In some cases the problem can be solved by reducing the height of the locator element so that it enters only 3 mm into the workpiece. However, before the height of the locator element is reduced, an approval from the user must be obtained. Practically this means that a cylindrical locator element with smaller height is generated – if approved by the user. The automated generation of cylindrical elements is relatively easy, but when the problem cannot be solved (due to some hindering workpiece feature or fixture element) by reducing the height of a locator element, it is a bit more complicated process to achieve the goal, namely to locate the workpiece over the proposed inner cylindrical surface. In such cases the program in the first step tries to find such a layout where there is neither interference between the workpiece and the fixture elements, nor between the fixture elements. If the program cannot find such a layout, it puts the models of all fixture elements and of the workpiece at an appropriate place (where every element can fulfil its task like supporting, locating or clamping) as if there were no interferences. The base concepts of the method are described in Rétfalvi and Stampfer [20]. The interference check verifying the elements which may have an inner point inside the cylindrical locator element is performed in the second step. The interference check is done by Solid Edge in Solid Edge Assembly environment, and is launched automatically by the GLUE module. Solid Edge saves in a textual file the list of the elements that are in interference with the locator element. In the third step the convex hull of the contour lines of the hindering workpiece or fixture elements are projected on the top flat surface of the locator element, and finally that projected forms are cut off with cut off distance Hc. The modification happens in automated way in Solid Edge Part environment, the .par file of the element to be modified is also opened automatically by the GLUE module.
Figure 10
The process of modifying a non-standard locator element
Figure 10 shows an example of modifying a non-standard element; in the first picture the locator plate (generated in the first step) can be seen in interference with the supporting elements; in the second picture the 10 mm enlarged contours of the supporting elements are projected on the upper plane of the locator element;
in the third picture the projected contours are cut off from the locator element.
This process is activated if there is interference between a non-standard locator element and either any other fixture elements or the workpiece. This way (with extra locator element) a greater precision is achieved than with three pin locating.
After cutting off some parts, of the locator element the clamps and supports can be put as close to each other as possible, thus the size and the weight of the whole fixture are smaller.
The flowchart of the automatic generation and modification of the extra locator elements is shown in Figure 11. If the type of the locating is neither p2 nor p3 (Figure 2) then it is either p1 or p4, so the elements used by the method described in this paper will not be used. If the locating type is p2 (and within it p21, p22, p23 or p24) then if there are pins or bolts with diameters that fit to inner cylindrical surfaces proposed (by SUPFIX module) for locating in the modular element set, and the height of these elements is in the range between Hmin and Hmax
(Figure 9), the program selects two from these elements, and puts them to the appropriate places. If there are no appropriate locator elements, the program generates the missing ones with threaded ends (Figure 9). If the locating type is p3 the program examines if the locating can be solved with one standard locator element. It can be solved if there is a locator bolt or pin with the required diameter and height in the modular element set, and there are no such disturbing surfaces on the workpiece that hinder the use of the locator element. For example, in Figure 6, the bearing holder (a) hinders the use of such full cylinder locator elements whose height is greater than 4 mm (if the workpiece is to be located over the b intermittent inner cylindrical surface). Hence, if the locating type is p3, the program in the first step examines if there is such an element in the set whose diameter and height fit to the diameter and height requirements of the locating surface. If such an element is found the program selects and puts it to the
appropriate place. If there is no such an element, the program checks if there are three free grid holes inside the boundary curve of the locating surface. If this search is successful, the program tries to solve the locating with three pins and checks the positioning error (Δx). If Δx is greater than an acceptable value, instead of solving the locating task with three standard pins, the program tries to solve the problem with an extra locator element generated by the program in accordance with the dimensions of the proposed locating surface. The final decision whether the proposed solution is acceptable is made by the user.
Figure 11
The outline of solving the locating problem
In Figure 13 on the left the final fixture (from the Figure 10) can be seen with the workpiece. Indeed the first proposal of the SUPFIX module for the auxiliary setup of this workpiece is to locate the workpiece over the small pink inner cylindrical surface (Figure 13, right), and if the user accepts that proposal, the program builds the fixture shown on the left picture in Figure 13. As there is no locator element in
the modular element set with appropriate diameter and height, the program generates an extra locator element with threaded end. At this case there is no need to cut off any part of the extra locator element. If the user refuses that first proposal, then the conceptual solution shown on the second small picture in Figure 13 is offered. Now the workpiece is to be located over the big red inner cylindrical surface (Pc1). As the locating error (Δx) is too big when the workpiece is located with the help of three bolts, an extra locator element is generated. Since the interference can in no way be avoided, some parts of the extra locator element are cut off automatically (see Figure 10).
Figure 12
The fixture for the first setup from the Figure 11 together with the workpiece, and the adherent conceptual solution
Figure 13
The first recommendation fixture for the first setup, and the adherent conceptual solution
4.1.2 Modification of the Adapter Plates
The modification of the adapter plates most of the time means making several holes on the appropriate places for some locator or clamping elements – for such purpose simple adapter plates are used. In other cases, besides these holes, some
openings have to be made, to enable the machining of some tolerance related features that lie on the supporting side of the workpiece – for such purpose special adapter plates are used. When the supporting type is pos_1 or pos_2, simple adapter plates are used – if required; when the supporting type is pos_3 then special adapter plates are used. Since FIXCO builds the fixture using IGES format workpiece and fixture element models, and these are hard to modify, the program at first makes the assembled model of the fixture with unchanged adapter plate, but stores the connecting dimensions and the locations of the elements (which demands connecting holes to be made). Then, the SE GLUE module is started which opens Solid Edge Assembly environment, and builds the Solid Edge model of the fixture assembly. If an adapter plate has to be placed in the assembly the program opens the CAD model of the adapter plate saved in Solid Edge’s own .par format, and cuts the holes with appropriate dimensions on appropriate places, then saves the modified element under the same name, but with an end extension _MOD added, and just then puts the modified adapter plate to its right position in the CAD model of the fixture. This way the original adapter plate model can be used and modified later when building another fixture. For the automatic generation of the openings the somewhat increased contours of the surfaces, which lie on the supporting side of the workpiece, and should be machined at that setup, have to be projected on the supporting surface of the adapter plate. So if the supporting type is pos_3, the data of the contour curves (Rétfalvi (2011) also have to be forwarded to the SE GLUE module. These curves lie within the inner boundary curve of the supporting surface of the workpiece, so a somewhat enlarged inner boundary curve of the supporting surface is cut out from the adapter plate. Figure 14 illustrates the second setup for the worm-gearbox housing, it is with four screws clamped to the adapter plate, the holes for four screws are to be machined by the user. The position of the holes is automatically determined and cut out from the model of the adapter plate.
Figure 14
Adapter plate with and without the workpiece, and the entire assembled fixture for the second setup with the workpiece
Conclusions
Modular fixtures are built from standard elements found in a given modular element set, but sometimes are complemented with some extra elements, made by the user. In other cases so-called adapter plates, which are part of a modular element set, are modified by the user, and after the modifications are built into the fixture. In this paper, automatic generation and modification of the CAD model of these complementary elements and the automatic modification of the adapter plates is described. With the help of these complementary elements and the adapter plates the fixture configuration can often be simplified, and in some cases even the number of the required setups can be reduced. The method was developed for the setup and fixture design system also briefly introduced in this paper. With the help of this system a work that earlier took several hours can be completed approximately in half an hour’s time. In Table 2 the time needed for problem solving (with AMD Athlon 64 processor, 3200+, 2,01 GHz and 2GB RAM) at different stages of fixture planning and design can be seen.
Table 2
The time needed for different stages of the fixture planning and design Stages of the
fixture planning and design
Gearbox housings
Part A Part B Part C Part D
Regeneration of the model and feature recognition
1 min 8 s 9 s 10 s 7 s
Defining machining
requirements 12 min 9 min 13 min 7 min
Finding the conceptual solution of the fixture
1 min 42 s 1 min 8 s 2 min 10 s 1 min 56 s
Fixture configuration
Auxiliar y setup
56 s
Main setup 32 s
Auxiliar y setup
46 s
Main setup 22 s
Auxiliar y setup
41 s
Main setup 28 s
Auxiliar y setup
30 s
Main setup 24 s
Figure 15 Gearbox housings
As the output of the system is the CAD model of the fixture with the clamped workpiece, the output file can be opened with a CAM module, and the fixture elements can be defined as check bodies before the toolpath generation. For fixture planning and design we must define which surfaces have to be machined with which precision, and for toolpath generation we also have to define which surfaces have to be machined. Taking this into consideration, the next step in the system development could be to ensure a greater level of integration with a CAM module in order to further reduce the technology planning time by eliminating the double intake of the same data (e.g. the surfaces to be machined).
References
[1] S. Bansal, S. Nagarajan, N. Venkata Reddy (2008) An Integrated Fixture Planning System for Minimum Tolerances, International Journal of Advanced Manufacturing Technology 38, 501-513
[2] H. Paris, D. Brissaud (2005) Process Planning Strategy Based on Fixturing Indicator Evaluation, International Journal of Advanced Manufacturing Technology 25, 913-922
[3] P. Perremans (1996) Feature-based Description of Modular Fixturing Elements: the Key to an Expert System for the Automatic Design of the Physical Fixture, Advances in Engineering Software 25, 19-27
[4] P. Vichare, A. Nassehi, S. T. Newman (2011) Unified Representation of Fixtures: Clamping, Locating and Supporting Elements in CNC Manufacture, International Journal of Production Research 49 (16) 5017- 5032
[5] R. H. Alacron, J. R. Chueco, J. M. P. Garcia, A. V. Idiope (2010) Fixture Knowledge Model Development and Implementation Based on a Functional Design Approach, Robotics and Computer Integrated Manufacturing 26, 56-66
[6] J.-L. Hou, A. J. C. Trappey (2001) Computer-aided Fixture Design System for Comprehensive Modular Fixtures, International Journal of Production Research 39 (16) 3703-3725
[7] S. Kumar, J. Y. H. Fuh, T. S. Kow (2000) An Automated Design and Assembly of Interference Free Modular Fixture Setup, Computer-aided Design 32, 583-596
[8] F. Mervyn, A. S. Kumar, A. Y. C. Nee (2005) Automated Synthesis of Modular Fixture Designs using an Evolutionary Search Algorithm, International Journal of Production Research 43 (23) 5047-5070
[9] J. Cecil (2004) TAMIL: an Integrated Fixture Design System for Prismatic Parts, International Journal of Computer Integrated Manufacturing 17 (5) 421-431
[10] W. Hu and Y. Rong (2000) A Fast Interference Checking Algorithm for Automated Fixture Design Verification, International Journal of Advanced Manufacturing Technology 16, 571-581
[11] T. Papastathis, O. Bakker, S. Ratchev, A. Popov (2012) Design Methodology for Mechatronic Active Fixtures with Movable Clamps, 45th CIRP Conference on Manufacturing Systems 2012, Procedia CIRP 3, 323- 328
[12] X.-J. Wan, Y. Zhang (2013) A Novel Approach to Fixture Layout Optimization on Maximizing Dynamic Machinability, International Journal of Machine Tools & Manufacture 70, 32-44
[13] Z. An, S. Huang, Y. Rong, S. Jayaram (1999) Development of Automated Fixture Design Systems with Predefined Fixture Component Types: Part 1, Basic Design, International Journal of Flexible Automat Integrated Manufacturing 7 (3/4) 321-341
[14] M. Jonsson, G. Ossbahr (2010) Aspects of Reconfigurable and Flexible Fixtures, Production, Engineering, Research and Development 4, 333-339 [15] Boyle, Y. Rong , D. C. Brown (2011) A Review and Analysis of Current
Computer-aided Fixture Design Approaches, Robotics and Computer- Integrated Manufacturing 27, 1-12
[16] H. Wang, Y. K. Rong, H. Li, P. Shaun (2010) Computer-aided Fixture Design: Recent Research and Trends, Computer-Aided Design 42, 1085- 1094
[17] M. Vasundra, K. P. Padmanaban (2014) Recent Developments on Machining Fixture Layout Design, Analysis, and Optimization using Finite Element Method and Evolutionary Techniques, International Journal of Advanced Manufacturing Technology 70, 79-96
[18] M. Stampfer (2009) Automated Setup and Fixture Planning System for Box-shaped Parts, International Journal of Advanced Manufacturing Technology 45, 540-552
[19] Rétfalvi (2011) IGES-based CAD Model Post Processing Module of a Setup and Fixture Planning System for Box-shaped Parts, IEEE 9th International Symposium on Intelligent Systems and Informatics (SISY 2011) 247-255
[20] Rétfalvi, M. Stampfer (2013) The Key Steps toward Automation of the Fixture Planning and Design, Acta Polytechnica Hungarica 10 (6), 77-98
![Figure 1 Types of the supporting [18]](https://thumb-eu.123doks.com/thumbv2/9dokorg/1236150.95226/4.748.215.536.652.891/figure-types-of-the-supporting.webp)
![Figure 3 Types of clamping [18]](https://thumb-eu.123doks.com/thumbv2/9dokorg/1236150.95226/5.748.212.531.512.762/figure-types-of-clamping.webp)