Application Development in Web Mapping 6.
Web Application Framework
László Kottyán
Application Development in Web Mapping 6.: Web Application Framework
László Kottyán Lector: Antal Guszlev
This module was created within TÁMOP - 4.1.2-08/1/A-2009-0027 "Tananyagfejlesztéssel a GEO-ért"
("Educational material development for GEO") project. The project was funded by the European Union and the Hungarian Government to the amount of HUF 44,706,488.
v 1.0
Publication date 2010
Copyright © 2010 University of West Hungary Faculty of Geoinformatics Abstract
In Module 6 we will create a simple application to demonstrate the features of Rails.
The right to this intellectual property is protected by the 1999/LXXVI copyright law. Any unauthorized use of this material is prohibited. No part of this product may be reproduced or transmitted in any form or by any means, electronic or mechanical, including photocopying, recording, or by any information storage and retrieval system without express written permission from the author/publisher.
Table of Contents
6. Web Application Framework ... 1
1. 6.1 Introduction ... 1
2. 6.2 Development Principles ... 1
3. 6.3 Installation ... 2
3.1. 6.3.1 On Windows ... 2
3.1.1. 6.3.1.1 Installing Ruby ... 2
3.1.2. 6.3.1.2 Installing SQLite ... 2
3.1.3. 6.3.1.3 Installing Rails ... 2
3.2. 6.3.2 On Ubuntu 10.04 ... 2
3.3. 6.3.3 Tools ... 2
4. 6.4 Exercises ... 3
4.1. 6.4.1 Generating application ... 3
4.1.1. 6.4.1.1 Directory structure of the application ... 3
4.2. 6.4.2 Scaffolding and database migration ... 5
4.2.1. 6.4.2.1 Creating database ... 6
4.2.2. 6.4.2.2 Adding pages to the database ... 8
4.3. 6.4.3 Understanding the application ... 8
4.3.1. 6.4.3.1 Serving a request ... 8
4.3.2. 6.4.3.2 Controller methods ... 9
4.3.3. 6.4.3.3 Routing ... 11
4.3.4. 6.4.3.4 Views ... 11
4.4. 6.4.4 Validating model attributes ... 14
4.5. 6.4.5 Working with two models ... 14
4.5.1. 6.4.5.1 Creating topics table and the relationship ... 15
4.5.2. 6.4.5.2 Setting the associations in model classes ... 15
4.5.3. 6.4.5.3 Accessing objects ... 16
4.6. 6.4.6 Customizing the views ... 18
4.6.1. 6.4.6.1 Adding topic to page ... 18
4.6.2. 6.4.6.2 Styling the views ... 19
4.6.3. 6.4.6.3 Creating menu ... 21
4.6.4. 6.4.6.4 Displaying content and flash messages ... 22
4.6.5. 6.4.6.5 Composing views to work together ... 22
4.7. 6.4.7 Adding JavaScript text editor ... 23
5. 6.5 Summary ... 24
List of Tables
1. ... 9
2. topics ... 16
3. pages ... 16
4. ... 16
Chapter 6. Web Application Framework
1. 6.1 Introduction
Ruby on Rails is a web application framework to develop, deploy and maintain applications. Ruby on Rails (shortened: Rails, RoR) was created in 2003 by a Danish developer David Heinemeier Hansson.
Ruby is an object-oriented, dynamic programming language created by Yukihiro Matsumoto. He started his work in 1993 and published Ruby at first in 1995. Ruby is the language of Rails. This means that RoR is written in Ruby and using the framework for development, the application to be coded in Ruby as well.
In Module 6 we will create a simple application to demonstrate the features of Rails.
To learn Ruby visit http://www.ruby-lang.org/en/documentation/ where you can find several useful contents.
• To get some impressions how Ruby works choose Try Ruby! interactive tutorials.
• Learn to Program by Chris Pine is a great starter book to get familiar with Ruby.
2. 6.2 Development Principles
RoR has some concepts to make development faster and easier.
Model-View-Controller
This framework applies a software architecture named Model-View-Controller (MVC) pattern1 , therefore the main building blocks of a Rails application are models, views and controllers.
In most cases, a model represents one table in the database of your application. One table is one class and one record (or tuple) is one object and one column (or field) is one attribute in your model. This kind of relationship between the relational database world and the object-oriented world is called Object-Relational Mapping (ORM). The model provides methods to create, read, update or delete data in database. Even more, you can define the relationships between your database entities.
Views represent the user interface of your application. In Rails, views are often HTML files with embedded Ruby code that perform tasks related solely to the presentation of the data. Views handle the job of providing data to the web browser or other tool that is used to make requests from your application.
Controllers are responsible for processing the incoming requests from the web browser, get data from models, and passing that data on to the views for presentation.
Convention Over Configuration
Rails follows conventions over configurations. The conventions or rules make it possible to easily use some Rails tools to generate codes, do several tasks automatically. Using conventions the application is more understandable.
DRY
Don't Repeat Yourself is a principle which tells: every piece of knowledge in a system should be expressed in just one place.
This way, if the original behavior of the application needs to change, you need only make modifications in one certain location, rather than in various places throughout your application.
1 Reenskaug, Trygve. "MVC XEROX PARC 1978-79", http://heim.ifi.uio.no/~trygver/themes/mvc/mvc-index.html
3. 6.3 Installation
3.1. 6.3.1 On Windows
3.1.1. 6.3.1.1 Installing Ruby
From http://rubyinstaller.org/ download Ruby 1.8.7 and install it.
RubyInstaller includes RubyGems the packaging system which will be used to install Rails and some additions.
3.1.2. 6.3.1.2 Installing SQLite
To develop database-centric applications you need to have a DBMS installed on your system. You can use PostgreSql, MySql or other popular DBMSs, however for development and testing it is better to use SQLite3.
Rails defaults to using an SQLite database when creating a new project, but you can always change it later.
Using an SQLite3 database for data storage is simple, there is no need for any configuration it just works.
Download two zip files from SqLite site (http://www.sqlite.org/download.html), Precompiled Binaries For Windows:
• the command line shell for accessing SQLite databases
• and DLL of the SQLite library.
Unzip them and copy these files (sqlite3.exe, sqlite3.def, qlite3.dll) to C:\Ruby\bin directory.
Finally in SQLite installation, open a command prompt and type:
gem install sqlite3
This command will install a gem package in order to access SQLite3 database from Ruby codes.
3.1.3. 6.3.1.3 Installing Rails
Open a command prompt with Ruby and type:
gem install rails -v=2.3.5
We will use this Rails version in this Module and Module 7.
3.2. 6.3.2 On Ubuntu 10.04
Open a terminal and execute these commands:
sudo apt-get install build-essential libopenssl-ruby libfcgi-dev sudo apt-get install ruby irb rubygems ruby1.8-dev
sudo apt-get install sqlite3 libsqlite3-dev
Installing Rails and sqlite bindings:
sudo gem install rails -v=2.3.5 sudo gem install sqlite3
3.3. 6.3.3 Tools
To write Ruby codes you need a text editor. Good editors have some useful features like: built-in file browser, syntax highlighting, code snippets management, indentation support, word completion.
On Windows it is a good choice to use Notepad++ which has a plugin manager and several available plugins to extend the capabilities of the editor.
Install Notepad++ with plugin manager and LiteExplorer file browser plugin.
On Ubuntu the default editor is gedit. It can be extended with plugins including Gedit Gmate plugins pack.
To install Gedit Gmate on Ubuntu 10.04 do these steps:
sudo apt-add-repository ppa:ubuntu-on-rails/ppa sudo apt-get update
sudo apt-get install gedit-gmate
It is just an option to use these editors, there are other alternatives2.
Managing SQLite databases is easy from command line, however SQLite has a graphical client program SQLite Manager which works in Firefox. You can get it from here: https://addons.mozilla.org/hu/firefox/addon/sqlite- manager/
4. 6.4 Exercises
In the exercises we will create a sample application with editable content pages. We will extend the basic application step by step with menu, topics, CSS stylesheet, validation rules and text editor.
4.1. 6.4.1 Generating application
Open a command prompt or terminal, change to a working directory and create a Rails application with the next command:
rails mysite
This command generates your application within the mysite folder. Change to this folder and start the server.
cd mysite
ruby script/server
The default port is 3000, so you can see your application on http://localhost:3000 in your browser.
4.1.1. 6.4.1.1 Directory structure of the application
2 Wikipedia, List of text editors: http://en.wikipedia.org/wiki/List_of_text_editors
Check the mysite folder in a file manager. You will see a complex application structure.
Let's take a look on some directories.
app
The codes of the application are stored in app directory. It contains subdirectories which will store the models, views and controllers. It can contain some custom methods related to views in helper directory.
config
Rails has the convention over configuration principle, which minimalizes the needs of configuration. Some settings about the data storage, environment, routing rules, localizations and other options are located in config.
db
db is where the built in SQLite database is stored.
public
public contains static HTML contents, images, JavaScript files, CSS files. The default index.html (Welcome aboard) and some error-message pages can be found here too.
A Rails application can be started with development, test and production environments.
In the development environment, changes to an application’s source code are immediately visible after reloading the corresponding page in a web browser. When an error occurs the developer can read the message and find the line in the source code.
Test environment provides command line tools to debug and test the application.
Production environment can be optimized to focus on performance.
The default environment is the development. Changing to production environment we can use the ruby script/server -e production command.
Rails stores the data for each environment in entirely separate databases. The default database is SQLite. The configuration can be found in config/database.yml file.
These are the default database settings for development mode:
development:
adapter: sqlite3
database: db/development.sqlite3 pool: 5
timeout: 5000
It means that the database will be stored in db folder.
If you generate an application with --database parameter you can get a template configuration for the given database.
rails mysite --database=postgresql
4.2. 6.4.2 Scaffolding and database migration
Now we will create a Page model with the related database background and controller.
To do this we can use generators. Typing ruby script/generate command you will see information about the installed generators.
From command line it is possible to generate models and controllers separately but now we will use the scaffold generator.
Scaffold generator creates models, controllers and default views with scaffold.css style. It also sets routings in config/routes.rb and generate a database migration file in db/migrate.
Type this:
ruby script/generate scaffold page title:string content:text posted:datetime Explanation:
• scaffold - using the scaffold generator
• page - it is the entry name which determines the name of the model, the controller, the database table and the file names in app folder
• title, content, posted - these are the columns in database and attributes of model, each has a type.
The generated files have conventional names and locations.
Note that 'page' in scaffold command determines:
• the controller file name (pages_controller.rb) and the controller class name (PagesController)
• the model file name (page.rb) and model class name (Page)
• the generated view files (views/layouts/pages.html.erb, views/pages)
4.2.1. 6.4.2.1 Creating database
One important generated file is in db/migrate folder. This file name starts with a timestamp. With this time information Rails can always select the appropriate migration files before creating or modifying the database schemas.
The migration file is a schema definition.
class CreatePages < ActiveRecord::Migration def self.up
create_table :pages do |t|
t.string :title t.text :content t.datetime :posted t.timestamps end
end
def self.down drop_table :pages end
end
The types of columns will be converted to the appropriate types of the database management system.
In the migration file the following types can be used:
• binary
• boolean
• date
• datetime
• decimal
• precision
• float
• integer
• primary_key
• string
• text
• time
• timestamp
Before start the migration, we can modify the migration file, adding more columns or deleting, changing columns in the definition.
To start the migration, type:
rake db:migrate
Start SQLite Manager from Firefox and open the database from db folder. Note that the file extension is sqlite3, therefore on Select SQLite Database change File type to All type.
Navigate to the pages table and see Structure tab. At the end of the tab there is a list of columns. Rails created three default columns: id (primary key column), created_at and updated_at.
4.2.2. 6.4.2.2 Adding pages to the database
Start the server (ruby script/server) and navigate to http://localhost:3000/pages
You will see a simple but working application. Click on New page link and create some pages. You can delete or edit pages as well.
The new page has a form which is used to create a page in database. Each columns or attributes are displayed according to their types.
4.3. 6.4.3 Understanding the application
A working Rails application is a well composed communication of its components. In Rails the MVC pattern is performed by ActiveRecord, ActionController and ActionView components.
ActiveRecord is responsible for the model part of MVC pattern, provides object-relation mapping (ORM) mechanism for database communication. Each model class is derived from ActiveRecord.
ActionController is the component that handles browser requests and facilitates communication between the model and the view. Each controller class is derived from ActionController.
ActionView handles the presentation of pages returned to the client. Views inherit from this class.
4.3.1. 6.4.3.1 Serving a request
The next figure displays what happens when you navigate to http://localhost:3000/pages.
1. The browser sends a /pages request to the server which passes it to the routes.rb.
2. In routes.rb there is a rule that says: /pages request has to be handled by the index method of pages controller.
3. The index method calls the Page model's all method.
4. The model gathers all the records from pages table.
5. Pages data passed to controller index method and stored in @pages variable.
6. The @pages variable passed to index.html.erb view template.
7. The view uses Embedded Ruby (ERB)3 to create HTML which is sent to the browser.
4.3.2. 6.4.3.2 Controller methods
Open the app/controllers/pages_controller.rb file to see the methods defined by the scaffolding process.
There are seven methods defined: index, show, new, create, edit, update and destroy. You can create other methods for example a find method. However these seven methods are an implementation of the REST4 (Representational State Transfer) architecture. REST has effects how to deal with resources using HTTP requests and controller methods. The next table contains the HTTP methods, the URL of request and the corresponding controller method.
Table 1.
3 ERB is a templating system wich executes any Ruby codes and substitutes the values in HTML.
4 REST: http://en.wikipedia.org/wiki/Representational_State_Transfer
HTTP method URL Controller method
GET /pages index (returns a list of pages)
GET /pages/1 show (returns the page identified by id 1 )
GET /pages/new new (constructs an empty pages form and passes it to the user to fill in)
GET /pages/1/edit edit (returns the contents of the page identified by id 1 in a form for editing)
POST /pages/create create (creates a new page record from the data in the POST request)
PUT /pages/1 update (updates the contents of the page identified by id 1 with the data in the PUT request)
DELETE /pages/1 destroy (destroys the page identified by id 1)
Methods corresponds with views index
The index method calls the Page class's all method and stores the results in @pages variable.
@pages = Page.all
Finally render the index.html.erb view template to display a list of pages.
show
The show method calls the find method of Page class with the parameter of the GET request.
@page = Page.find(params[:id])
Finally it renders the show.html.erb view template to display one page.
new
The new method creates a new empty Page object and renders the new.html.erb template to display an empty form.
@page = Page.new edit
The edit method calls the find method of Page class with the id parameter of the GET request.
@page = Page.find(params[:id])
Finally it renders the edit.html.erb view template to display a form with page data.
Methods without corresponding views
The purpose of the last three actions (create, update and destroy) is to modify data in the database. On the HTML pages these methods are represented with buttons or links only.
create
On New page HTML page there is a Create button. After the form is filled the user clicks on this button. The data of the form as the parameters of the POST request are sent to the server. After the routing process the create method is called which creates a new Page object using the given data.
@page = Page.new(params[:page])
It tries to save the data calling the model object save method. If the model saved the data, create method redirects to the show page. If something went wrong with data saving, it calls the new action.
update
On Edit page HTML page there is an Update button. After the form content is modified the user clicks on this button. The data of the form as the parameters of the PUT request are sent to the server. After the routing process the update method is called. The update method calls the find method of Page class with the id parameter of the PUT request.
@page = Page.find(params[:id])
It tries to update the record with parameter data calling the model object's update_attributes method. If the model successfully updated the record, the update method redirects to the show page. If something went wrong with updating, it calls the edit action.
delete
On Listing pages HTML page there is a Destroy link. Clicking on this link the id value of the page as parameter of the DELETE request are sent to the server. After the routing process, the delete method is called. The delete method calls the find method of Page class with the id parameter of the DELETE request and calls the page object's destroy method.
@page = Page.find(params[:id])
@page.destroy
Finally the method redirects to the index page.
4.3.3. 6.4.3.3 Routing
Open the config/routes.rb file to see the routing rules.
The first rule means all the seven routing possibilities for pages, maps HTTP requests to controller actions automatically.
map.resources :pages
A regular route rule has a pattern: a controller name and an action name. The action is a method of the controller.
When Rails receive a request it passes the request URL to the routes.rb to find a matching pattern. The parameters will be stored in params hash.
For example if the GET request is http://example.com/products/42 and there is a route rule:
map.connect 'products/:id', :controller => 'catalog', :action => 'view'
The params hash is:
params = {:id => 1, :controller => 'products', :action => 'view'}
To see the available routes in your application use the rake routes command.
4.3.4. 6.4.3.4 Views
The building blocks of views:
• template - it stores the content of a page to be generated, connected to a controller method.
• layout - it gives a global layout to the application, stylesheets and javascripts are referred from here.
• partial - it is a subtemplate, generally contains the common parts of pages, invoked from templates or layouts.
• helpers - methods which are available from templates, can be defined in helpers folder View templates, layouts and partials are HTML files with embedded Ruby codes.
Templates
Pages templates are located in views/pages. It is named like the related controller method.
index.html.erb
The content of index.html.erb template is:
<h1>Listing pages</h1>
<table>
<tr>
<th>Title</th>
<th>Content</th>
<th>Posted</th>
</tr>
<% @pages.each do |page| %>
<tr>
<td><%=h page.title %></td>
<td><%=h page.content %></td>
<td><%=h page.posted %></td>
<td><%= link_to 'Show', page %></td>
<td><%= link_to 'Edit', edit_page_path(page) %></td>
<td><%= link_to 'Destroy', page, :confirm => 'Are you sure?', :method => :delete
%></td>
</tr>
<% end %>
</table>
<br />
<%= link_to 'New page', new_page_path %>
The first part of it is a simple HTML table header definition.
There is an ERB code block here between
<% @pages.each do |page| %>
and
<% end %>
Ruby command between <% and %> won't be displayed on the generated HTML page.
The block has an object which is an enumerable object, created in index method. Using the each iterator method each item is passed to page variable to process in the body of the block.
After the evaluation the values of Ruby codes between <%= and %> will be displayed on the generated HTML page.
This code <%=h page.title %> will display the result of a page object title method. Which is in fact the title of a page record in the pages table. For safety reasons5, using the h method, the results will be HTML escaped before being placed directly into the generated output. The link_to6 helper creates an HTML anchor tag using the given parameters.
For example, this code
<%= link_to 'Edit', edit_page_path(page) %>
5 XSS: http://en.wikipedia.org/wiki/Cross-site_scripting
6 APIdock, link_to: http://apidock.com/rails/ActionView/Helpers/UrlHelper/link_to
provides the next HTML output:
<a href="/pages/1/edit">Edit</a>
edit.html.erb
In edit.html.erb there is a form_for7 helper which creates the edit form using the @page object.
<% form_for(@page) do |f| %>
...
<% end %>
In the body of the block the HTML input element types and the related attributes are given.
From the code:
<p>
<%= f.label :title %><br />
<%= f.text_field :title %>
</p>
the generated HTML output is:
<p>
<label for="page_title">Title</label><br />
<input id="page_title" name="page[title]" size="30" type="text" value="Home" />
</p>
Creating a partial
Edit and new templates have almost the same content, so we can create a partial with the common content.
1. Create a _form.html.erb file in views/pages. Partials always start with _ character.
2. Copy the form_for block from edit or new template and paste it into the partial file.
3. Delete the form_for blocks from edit and new templates.
4. Under the <h1> tags type: <%= render :partial => "form" %>
Check the modification in your browser. You can see the same pages.
The render helper rendered8 the _form.html.erb partial - wich was referred as "form" without underscore - and passed the @page variable to the partial by default. Therefore @page can be used in the partial like in template.
Layout
The views/layouts folder contains the layout files.
The pages.html.erb has a head content in which we generally use:
• stylesheet_link_tag9 helpers to link to CSS files
• javascript_include_tag10 to include JavaScript files (in this layout there is no one)
Using <%= yield %>, Rails automatically substitutes in the page-specific content invoked by a request. If the request is /pages the related view is index.html.erb and its content will be placed in the layout.
A layout can be:
7 APIdock, form_for: http://apidock.com/rails/ActionView/Helpers/FormHelper/form_for
8 APIdock, rendering partials: http://apidock.com/rails/ActionView/Partials
9 APIdock, stylesheet_link_tag: http://apidock.com/rails/ActionView/Helpers/AssetTagHelper/stylesheet_link_tag
10 APIdock, javascript_include_tag: http://apidock.com/rails/ActionView/Helpers/AssetTagHelper/javascript_include_tag
a. global which is related to all templates b. related to one controller and its templates i. related to one controller method, one template Global layout
Creating a global layout we have to create a layout in an application.html.erb file. This will be used in a certain context if there is no other controller related layout.
To use a global layout, rename the pages.html.erb file to application.html.erb. Controller related layout
This is what we had after scaffolding, the pages.html.erb. If we would like to use another layout we have more options.
For example, if we have an admin.html.erb layout, we can refer to this in the controller:
class PagesController < ApplicationController layout "admin"
...
end
Method related layout
It is can be written like this:
def index ...
layout :render => "admin"
end
4.4. 6.4.4 Validating model attributes
You can realize that on New page empty pages can be created. Using validators the model data will be checked before saving. If the data is not valid an error message is displayed.
Open the page.rb file and add the validations:
class Page < ActiveRecord::Base
validates_presence_of :title, :content validates_length_of :title, maximum => 32 end
The validates_presence_of validates title and content attributes if they have values.
The validates_length_of validates title if its length is not longer than 32 character.
Some more validators:
• Validate the format of data with regular expression: validates_format_of :field, :with => /regexp/
• The data should be unique in the table: validates_uniqueness_of :field
• The data should be in a given range of values: validates_inclusion_of :field, in => [value1, value2, ..., valueN]
• The data should be a number: validates_numericality_of :field
4.5. 6.4.5 Working with two models
We would like to add topics table to the database. There would be a one-to-many relationship between topics and pages. In this case one topic can have many pages and a page can belong to one topic.
In Rails, the relationships between database tables are described with Active Record associations. Each model uses an association to describe its role in the relation.11 The association is placed in model classes.
4.5.1. 6.4.5.1 Creating topics table and the relationship
You should take care that the appropriate foreign key is set in the tables. Rails uses a convention for it. A primary key is an id field in a table and its foreign key in a related table is a field with model name (table name in singular) and the _id characters. By default, Rails use integer type for keys.
The next figure displays the topics and pages table with one-to-many relationship.
See the naming conventions in table names and keys. Remember, Rails automatically creates id, created_at and updated_at fields. We have to add topic_id to pages only. Fortunately it can be done with migration.
First create topics codes with the command:
ruby script/generate scaffold topics name:string Check the generated migration file in db/migrate folder.
Add foreign key to pages:
ruby script/generate migration AddTopicIdToPages topic_id:integer
This syntax is a convention also. Between Add and To there is the field name without underscore and each word begins with a capital letter. After the To word there is the table name starting with a capital letter. The command ends with field name and type.
Run the migration:
rake db:migration
4.5.2. 6.4.5.2 Setting the associations in model classes
One page belongs to a topic, therefore in page model we add the belongs_to association:
class Page < ActiveRecord::Base
validates_presence_of :title, :content validates_length_of :title, :maximum => 32 belongs_to :topic
end
The topic expressed with a Ruby symbol, it is in singular.
One topic has many pages, therefore in topic.rb file write a has_many association:
11 Active Record associations: http://apidock.com/rails/ActiveRecord/Associations/ClassMethods
class Topic < ActiveRecord::Base has_many :pages
end
You can complete this association with options. For example:
has_many :pages, :dependent => :destroy
In this case, if you delete a topic, you delete all related (dependent) pages too.
Rails provides more associations to handle one-to-one and many-to-many relationships. Read more about associations here: http://apidock.com/rails/ActiveRecord/Associations/ClassMethods
4.5.3. 6.4.5.3 Accessing objects
Using the associations you can access objects and methods in a really great way.
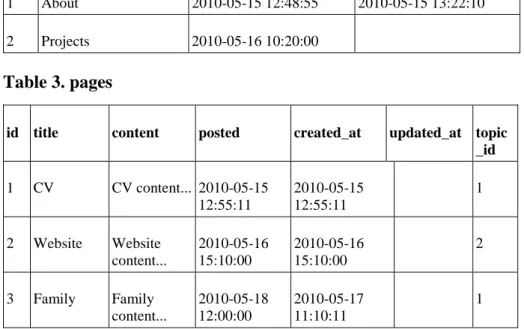
Supposing topics and pages tables are filled with these data:
Table 2. topics
id name created_at updated_at
1 About 2010-05-15 12:48:55 2010-05-15 13:22:10
2 Projects 2010-05-16 10:20:00
Table 3. pages
id title content posted created_at updated_at topic _id
1 CV CV content... 2010-05-15 12:55:11
2010-05-15 12:55:11
1
2 Website Website content...
2010-05-16 15:10:00
2010-05-16 15:10:00
2
3 Family Family
content...
2010-05-18 12:00:00
2010-05-17 11:10:11
1
In the application (in a controller or helper) we create these objects:
@topics = Topic.all
@topic = Topic.find(:first)
@topics contains the whole topics table, and @topic contains the first record.
@pages = Page.all
@page = Page.find(2)
@pages contains the whole pages table, and @page contains the record with id 2.
Some examples how to get record values using @topic and @page :
Table 4.
Method call Resulted value
@topic.id 1
@topic.name About
@page.id 2
@page.title Website
@page.posted 2010-05-16 15:10:00
Each ActiveRecord object has methods to set, get attributes and get information about the presence of values.
For example:
• @topic.name - the name method gets the value of name attribute of a the object, which is the value of name field in database table.
• @topic.name= "Ruby" - the name= method sets the name attribute of the object to "Ruby". It is stored in database after the save method calling: @topic.save
• @topic.name? - the name? method results true if the object attribute has a value.
@topics and @pages are arrays of objects. Iterating on arrays you can get the objects, for example:
def titles
@pages.each do |page|
concat "<p>"
concat page.title concat "</p>"
end end
This code is a method definition. If you write it into app/helpers/aplication.html.erb, you can call this method from a view with this syntax:
<% titles %>
It results:
CV Website Family
The concat12 method works like a print method but the output displays on HTML page.
Each page object was stored in page local variable during the iteration.
You can call a method of page object with the array syntax too, like:
@pages[0].content
The first element of @pages array referred with index 0 which is the page with id 1 in the example.
The has_many and belongs_to associations gives new methods to objects.
@page has topic method which gets the related Topic object:
@page.topic.name
The result is:
12 APIdock, concat: http://apidock.com/rails/ActionView/Helpers/TextHelper/concat
Projects
@topic has a pages method to get the related Page objects:
def titles_of_pages
@topic.pages.each do |page|
concat "<p>"
concat page.title concat "</p>"
end end
The result is:
CV Website Family
4.6. 6.4.6 Customizing the views
On model side we finished the steps. On view side we have to:
• edit views/pages/_form.html.erb for adding topic to page
• styling the views with CSS
• create menu with custom helper method
• compose views to work together
4.6.1. 6.4.6.1 Adding topic to page
One page belongs to a topic therefore on page form we should select a topic from the list of topics. This can be coded easily using the Formtastic13 gem. Formtastic is able to add the form elements to HTML page according to relationships.
Install formtastic gem (version 1.1.0):
gem install formtastic -v=1.1.0
Open config/environment.rb and set the gem to work together with the application:
Rails::Initializer.run do |config|
...
gem 'formtastic', '~> 1.1.0' ...
end
Generate some codes with:
ruby script/generate formtastic
In config/initializers/formtastic.rb you can modify the configuration settings.
The public/stylesheets contains the formtastic CSS files, you can modify it.
To use the CSS open views/layouts/application.html.erb and add the next code to head:
<%= formtastic_stylesheet_link_tag %>
The application will use the application.html.erb layout. Delete the topic.html.erb file from the folder.
13 Formtastic: https://github.com/justinfrench/formtastic
Open views/pages/_form.html and replace its content with:
<% semantic_form_for(@page) do |f| %>
<%= f.inputs %>
<%= f.buttons %>
<% end %>
This short code generates all the necessary input elements.
Change root URL in config/routes.rb: map.root :controller => "topics"
Start the server, create some topics and try to select topics for pages.
4.6.2. 6.4.6.2 Styling the views
Create public/stylesheets/simple.css file with this content14: div.container
{
width:100%;
margin:0px;
border:1px solid gray;
line-height:150%;
}
div.header,div.footer {
padding:0.5em;
color:white;
background-color:gray;
clear:left;
}
h1.header {
padding:0;
margin:0;
}
div.left {
float:left;
width:160px;
margin:0;
padding:1em;
}
div.content {
margin-left:190px;
border-left:1px solid gray;
padding:1em;
min-height: 300px;
14 Style based on: http://www.w3schools.com/css/tryit.asp?filename=trycss_float6
}
div.header ul {
list-style-type:none;
margin: 0;
margin-left: 190px;
padding:0;
overflow:hidden;
}
div.header li {
float:left;
}
div.header a:link, div.header a:visited {
display:block;
width:150px;
font-weight:bold;
color:#FFFFFF;
text-align:center;
padding:4px;
text-decoration:none;
text-transform:uppercase;
}
div.header a:hover, div.header a:active {
background-color:#657893;
}
div.left ul {
list-style-type:none;
margin:0;
margin-top: 15px;
padding:0;
}
div.left a:link, div.left a:visited {
display:block;
font-weight:bold;
color: #657893;
width:120px;
text-align: left;
padding:4px;
text-decoration:none;
}
.breadcrumb {
color: gray;
font-weight:bold;
}
Change stylesheet_link_tag in views/layouts/application.html.erb:
<%= stylesheet_link_tag 'simple' %>
The page structure is:
<body>
<div class="container">
<div class="header">
</div>
<div class="left">
</div>
<div class="content">
</div>
<div class="footer">
</div>
</div>
</body>
4.6.3. 6.4.6.3 Creating menu
The topics will display on the top of the page.
A menu is a simple list element. The HTML output what we want to create:
<div class="header">
<ul>
<li><a href="/topics/1">Projects</a></li>
<li><a href="/topics/2">Hobbies</a></li>
<li><a href="/topics/3">Pictures</a></li>
<li><a href="/topics/4">Maps</a></li>
<li><a href="/topics/5">About</a></li>
</ul>
</div>
Where the links refer to show pages and link texts are from the topics table. The menu always has to be on the top of the site, so the best place to put it in the layout. The menu content depends on database topics table. It can be modified, so we can't hard code it into the layout, it is a dynamic content. To generate it dynamically a custom helper method will be created.
Put this code into helpers/application.html.erb: def menu
@topics = Topic.all concat "<ul>"
@topics.each do |topic|
if topic
concat "<li>"
concat link_to("#{topic.name}", "#{topics_path}/#{topic.id}") concat "</li>"
end end end
The menu method creates a @topics object. Iterating on the object it creates the HTML list.
Finally add the method call to the layout:
<div class="header">
<% menu %>
</div>
4.6.4. 6.4.6.4 Displaying content and flash messages
The layout has a structure which should be filled with different contents.
Displaying content from views we need to call yield from the layout.
Add <%= yield %> to <div class="content">.
Displaying content on the left side we can use the content_for helper15 in templates. Placing a content_for block in a template, the displaying its content can be controlled in the layout.
<% content_for :left do %>
...
<% end %>
This content_for placed in a template or partial file can be called from layout with the identifier symbol :left.
<div class="left">
<%= yield :left %>
</div>
With flash messages (notice or error) we can inform users about the results of user actions.
For displaying flash messages add the next code to <div class="content">:
<% if flash[:notice]%>
<p style="color: green"><%= flash[:notice] %></p>
<% end %>
<% if flash[:error] %>
<p style="color: red"><%= flash[:error] %></p>
<% end %>
You can set the messages in controllers, for example:
flash[:notice] = 'Page was successfully created.'
4.6.5. 6.4.6.5 Composing views to work together
A topic can have more pages. When the user clicks on a menu element a list of the related pages should be displayed on the left and one page content (e.g. the first page content) in <div class="content">. After that, selecting a page on the left its content should be displayed in <div class="content"> and the page list on the left has to be regenerated.
15 APIdock, content_for: http://apidock.com/rails/ActionView/Helpers/CaptureHelper/content_for
From page show view and topic show view we should refer to the page list of one selected topic. Page list is generated in page index view but it contains all the pages not pages of a certain topic, so we can't use it. We need a partial which creates the page list for one topic.
From templates rendering the partial it is possible to pass objects as local variable. Using the same partial for templates, following DRY principle, passing a local variable partial can work together with the different templates.
Creates a partial - views/pages/_page.html.erb - with this code:
<span class="breadcrumb"><%=h topic.name %><span> » </span><%=
topic.pages.first.title %></span>
<p><%= topic.pages.first.content %></p>
<% content_for :left do %>
<ul>
<% topic.pages.each do |page| %>
<%= link_to page.title, page %>
<% end %>
</ul>
<% end %>
The partial variable is topic. Rendering the partial from topic show view the @topic variable is passed to topic local variable. Rendering the partial from page show view the @page.topic is passed to topic variable.
Add the rendering code to views/pages/show.html.erb:
<%= render :partial => 'page' , :locals => {:topic => @page.topic }%>
Change views/topics/show.html.erb to:
<% unless @topic.pages.length == 0 %>
<%= render :partial => 'pages/page', :locals => {:topic => @topic }%>
<% else %>
<p class="breadcrumb"><%=h @topic.name %></p>
<p> There is no content added, yet. </p>
<% end %>
If a topic has no page the "There is no content added, yet." text displays.
Start the server and see how it works.
4.7. 6.4.7 Adding JavaScript text editor
For editing the contents of pages on forms, we will use a JavaScript text editor, TinyMCE16.
There is a gem which includes TinyMCE and provides an easy way to integrate the editor into Rails applications.
Install the TinyMCE for Rails17 gem:
gem install tiny_mce
Add this to config/environment.rb: config.gem 'tiny_mce'
Open controllers/application_controller.rb and type this into the class definition:
uses_tiny_mce
Open views/layouts/application.html.erb and place this in <head> part:
<%= include_tiny_mce_if_needed %>
Starting the server the gem automatically copies the TinyMCE to the public/javascripts directory.
Replace the content of views/pages/_form.html.erb partial with:
<% semantic_form_for(@page) do |f| %>
<% f.inputs do %>
<%= f.input :topic %>
<%= f.input :title %>
<%= f.input :content, :input_html => { :rows => 20, :class => "mceEditor" } %>
<%= f.input :posted %>
<% end %>
<%= f.buttons %>
<% end %>
Try it out in your browser.
You can read TinyMCE for Rails page for more options and examples.
5. 6.5 Summary
Module 6 gave you a short introduction to Ruby on Rails development, using its Model-View-Controller architecture.
Bibliography
Kottyán, L.: Web alkalmazások fejlesztése, Ruby on Rails segédlet, NymE GEO, Székesfehérvár, 2010 Patrick, L.: Build Your Own Ruby On Rails Web Applications, SitePoint Pty. Ltd., 2007
Ruby, S., Thomas, D., Hansson, D. H.: Agile Web Development with Rails, Fourth Edition, The Pragmatic Programmers LLC., 2011
16 TinyMCE: http://tinymce.moxiecode.com/
17 TinyMCE for Rails: https://github.com/kete/tiny_mce