I./2.: THE PHYSICAL EXAMINATION
I./2.1.: Head Mirror Examination
A perforated concave mirror with the head band is used.
The light reflected from the head mirror leaves the examiner’s both hands free for the examination, and manipulation.
The head mirror is positioned over the physician’s left eye so that it is possible to see the patient and the focused spot of light through the hole in the center of the mirror as well as with the other eye. At the same time the mirror shades both eyes from the direct glare of the light source. The mirror should be as close to the physician’s face as possible to provide a wide angle of view. The examiner then directs the area to be examined into the field of view and avoids repositioning himself. A focusable electric light on a headband may substitute for the described head mirror and light source.
Figure 1.
I./2.2.: Examining the Ear
Examination should begin with inspection and palpation of the auricle, mastoid and tissues around the ear. The external ear canal is examined, initially without a speculum prior to visualization of the tympanic membrane. Remember that the external ear canal is not straight. To straighten it for the examination, the pinna is held with the second and third finger and retracted backward and upward in adults and downward in infants.
Figure 2.: Hand-held aural speculums and lancet
The hand-held aural speculum is used in conjunction with a head mirror
and light source. It is thin-walled and funnel-shaped, and should have a non-reflective surface. It is available in a various sizes and the examiner chooses the largest one which comfortably fits the external ear canal.
( Adam Politzer (1853-1920) was born in Hungary. He was the pioneer of otology and was professor in Vienna.)
Battery-powered otoscopes are commonly used. The most useful of these have fiberoptic illumination, give a magnified view of the tympanic membrane, and are provided with a sealed head and pneumatic bulb attachment.
Pneumatic otoscopy will readily detect the presence of a perforation of the tympanic membrane or fluid in the middle ear. This technique should be part of every pediatric ear examination and is often needed for adults.
Cleansing of the External Ear Canal. The external ear canal may be blocked with cerumen, skin debris or purulent discharge. Cleansing of the ear canal should be done gently, causing the patient minimal pain. Wax may be removed through the aural speculum with a cerumen spoon or with an alligator forceps. If there is moisture in the external ear canal, a suction or cotton-tipped metal applicator may be used for the cleaning. If the tympanic membrane has no perforation, the ear may also be cleaned by irrigation with water which is approximately body temperature. If too cold or too warm is used, vertigo and/or discomfort will be produced.
I./2.3.: The Nose and Sinuses
As in the examination of the ear, the speculum is held in the left hand, leaving the right (dominant) hand free to position the patient’s head and to manipulate instruments.
The nasal speculum should be used without causing discomfort to the patient. Often the nasal speculum will have an undesirable stiff spring built into the handle. It is best to have a very soft spring or no spring at all in order to better judge the pressure being applied to the nose. The
examiner’s right hand is placed on top of the patient’s head so that it can be tilted and moved. The left forefinger is stabilized on the side of the patient’s nose and the speculum opened in an up-and-down direction in the nasal vestibule. The speculum remains in the same hand when inspecting the opposite nasal cavity. The intranasal examination begins with inspection of the nasal vestibule. The floor of the nose should be seen all the way back to the soft palate, if the nasal septum is straight.
(Géza J. Jako (1930- ) Graduate of Semmelweis University in 1954.
Professor of Otolaryngology at Boston University. He was the first to develop the instrumentation and techniques of microsurgery of the larynx in 1962-63. He developed laser surgery in 1965-67 and applied it
clinically on the skin and in the human larynx. )
I./2.4.: Mouth, Pharynx
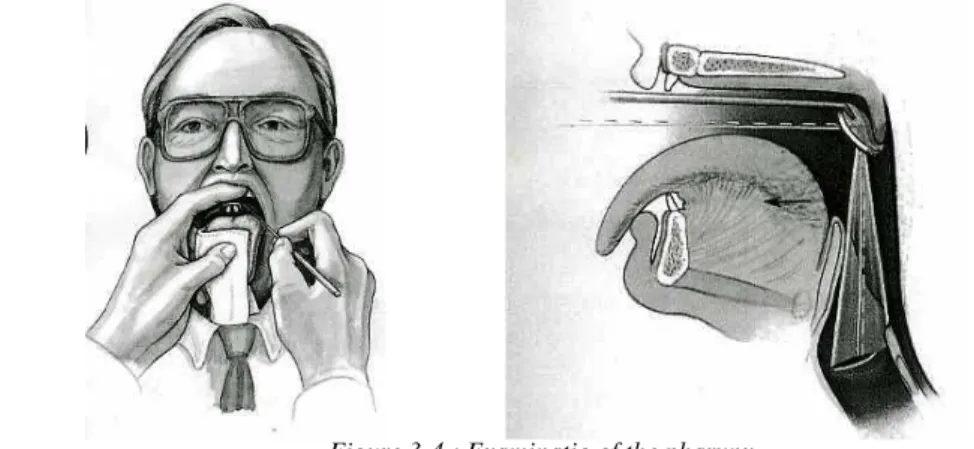
The tongue depressor is grasped near its midportion. The patient is requested not to stick out the tongue for the oral and pharyngeal examination, since this tends only to obscure the view.
The tongue blade is first used to retract the cheek and lips for complete inspection of the buccal mucosa, teeth, and gingiva. The floor of the mouth and associated salivary ducts are then inspected. By drying the mouth with a swab of cotton, saliva can be, expressed from Stensen’s and
Wharton’s ducts. The lateral and posterolateral aspects of the tongue and floor of the mouth are then carefully examined. The tongue must be retracted medially to visualize the trigone areas posterior to the molar teeth.
The tonsils and tonsillar fossa, anterior and posterior pillars, lateral and posterior pharyngeal wall, a portion of the base of the tongue, and occasionally the tip of the epiglottis may be seen directly in this manner.
Figure 3-4.: Examinatio of the pharynx
I./2.5.: Palpation
All areas of the oral cavity and pharynx appearing unusual or producing symptoms must be palpated. Tumors and cysts lying deep within oral tissues can be found only by palpation. Calculi in the submaxillary ducts may frequently be detected in this manner.
The nasopharynx can often partially be seen directly through the nares when the interior of the nose is examined. A more complete examinations of the nasopharynx is done with the nasopharyngeal mirror. The mirror is warmed, usually over an alcohol lamp, so that the patient’s breath will not fog it and obscure the view. The examiner checks the temperature of the mirror by placing it against the back of the hand before inserting it into the patient’s mouth. The tongue is depressed as for the pharyngeal examination, and the mirror is positioned in the pharynx. The posterior third of the tongue should be touched to reduce the likelihood of
stimulating the gag reflex. The posterior pharyngeal wall is less sensitive than the tongue, and the soft palate is least sensitive.
The nasopharynx can also be examined with a nasal endoscope. This is a telescope/like device that gives a magnified view of the nasopharynx. It is introduced through the nose after the area has been anesthetized. The nasopharynx can be directly visualized through the mouth by retracting the soft palate. Adenoid tissue in the nasopharynx can also be palpated.
I./2.6.:The Larynx and Hypopharynx
The patient should be sitting upright and leaning slightly forward, with the neck slightly flexed on the thorax and the head extended on the neck, as if pushing the chin toward the examiner. The patient is then told to open the mouth and stick out the tongue. The tongue is grasped by the fingers of the left hand using a gauze sponge and held in place.
The back of a No. 4. Laryngeal mirror is warmed over the alcohol lamp or other device. Its temperature is checked on the back of the examiner’s
hand prior to use. If the patient is a child or seems worried about the flame and heat, the examiner should place the mirror against the patient’s hand or arm to demonstrate that it won’t burn, first checking the mirror temperature on the back of his own hand. Antifogging liquid, such as liquid soap may be used as an alternative to mirror warming.
The mirror is then placed against the soft palate, which is gently raised upward by the mirror. This allows visualization of the hypopharynx and larynx. Raising the mirror upward will avoid touching the tongue or posterior pharynx and activating a gag reflex. (Fig. 2.)
Besides indirect laryngoscopy with the mirror in recent decades,
fiberoptics scopes are also used, especially when the visualization of the larynx is difficult with the mirror. This is done with or without topical anesthesia. The fiberoptic laryngoscope can be introduced through mouth or nose.
A 70o optical telescope can also be used for indirect laryngoscopy. This can be connected with a video camera and stroboscope for functional examination.
Figure 5.: Examination of the larynx
I./2.7.: Direct and Microscopic Laryngoscopy
While indirect laryngoscopy uses mirror or prism with telescope, direct laryngoscopy is through a straight tube. Direct laryngoscopy has been used over 100 years but it was difficult for the patient. Since 1960, direct laryngoscopies have been performed under general anesthesia. This provided a new possibility to do microscopic and laser surgery.
Palpation Neck and face should be done in a systematic manner. Cervical and metastatic nodes are often located in the anterior triangle of the neck.
This area must be carefully examined, particularly deep to the
sternocleidomastoid muscle and along the course of the carotid sheath.
Structures that normally can and should be palpated are the hyoid bone, the thyroid and crioid cartilages and the thyrohyoid and cricothyroid spaces, tracheal rings, the sternocleidomastoid muscles, the carotid arteries, the clavicles and the supraclavicular spaces. Crepitation of the thyroid cartilage against the cervical vertebrae is normally present. All the soft tissues of the neck can be examined and described by anatomic triangles.
As additional aids, standard radiograph, CT Scans, MRI Scans are used to diagnose diseases of the ear, nose, sinuses, larynx, neck, trachea and esophagus. Ultrasonic imaging is useful to diagnose neck nodes and salivary gland diseases.
Géza J. Jako (1930- ) Graduate of Semmelweis University in 1954.
Professor of Otolaryngology at Boston University. He was the first to develop the instrumentation and techniques of microsurgery of the larynx in 1962-63. He developed laser surgery in 1965-67 and applied it
clinically on the skin and in the human larynx.