Macromolecule design and manipulation - practical
textbook
Barbara Nikolett Borsos Dr., Balázs Vedelek Dr.
Edited by Imre Miklós Boros Prof.
University of Szeged 2018
2
This teaching material has been made at the University of Szeged and supported by the European Union. Project identity number: EFOP- 3.4.3-16-2016-00014
3
Table of contents
Table of contents ... 3
Learning outcomes ... 9
Introduction ... 13
Chapter 1 Before entering the lab ... 16
Learning outcomes ... 17
Basics of pipetting ... 18
Theoretical background ... 19
Steps of pipetting ... 22
Questions ... 29
Chapter 2 Research project in molecular biology 1st practice ... 30
Learning outcomes ... 31
Preparation of competent E. coli cells and transformation of pET-Pfu plasmid into DH5alpha E. coli cells ... 32
Theoretical background ... 33
Introduction of DNA into living cells: transformation ... 38
Practical workflow and protocol ... 49
Materials ... 52
I. Lab report ... 57
Questions ... 60
4
Chapter 3 Research project in molecular biology 2nd practice ... 61
Learning outcomes ... 62
Purification of pET-Pfu plasmid from transformed E. coli bacterial cells ... 63
Theoretical background ... 64
Practical workflow and protocol ... 75
Materials ... 80
II. Lab report ... 81
Questions ... 84
Chapter 4 Research project in molecular biology 3rd practice... 85
Learning outcomes ... 86
Agarose gel electrophoresis ... 88
Part I: Agarose gel electrophoresis ... 89
Theoretical background ... 89
Practical workflow and protocol - Part I - Agarose gel electrophoresis ... 93
Analysis of plasmid preparation quality and plasmid structure by gel electrophoresis ... 97
Part II: Transformation of Rosetta cells Basics of gene expression regulation in bacteria, and systems for foreign protein expression in bacteria ... 101
Practical workflow and protocol - Part II – Transformation of Rosetta cells... 113
5
Materials ... 114
III. Lab report ... 115
Questions ... 119
Chapter 5 Research project in molecular biology 4th practice ... 120
Learning outcomes ... 121
Inoculation of Rosetta (DE3) colonies transformed with pET-Pfu plasmid – Part I ... 122
Theoretical background - Part I. ... 123
Induction of protein expression in Rosetta (DE3) cells transformed with pET-Pfu with IPTG or lactose – Part II ... 127
Theoretical background - Part II ... 127
Practical workflow and protocol - Part II ... 133
Materials - Part II ... 134
IV. Lab report ... 135
Questions ... 138
Chapter 6 Research project in molecular biology 5th practice ... 139
Learning outcomes ... 140
Lysation of Rosetta (DE3) cells by sonication ... 141
Handling biological samples ... 142
Practical workflow and protocol ... 146
Materials ... 149
V. Lab report ... 150
6
Questions ... 152
Chapter 7 Research project in molecular biology 6th practice ... 153
Learning outcomes ... 154
Following the Pfu expression by SDS polyacrylamide gel electrophoresis ... 155
Theoretical background ... 156
Practical workflow and protocol ... 164
Materials ... 176
VI. Lab report ... 178
Additional information ... 184
Questions ... 194
Chapter 8 Research project in molecular biology 7th practice ... 195
Learning outcomes ... 196
Testing the polymerase activity of the extracted Pfu ... 197
Theoretical background ... 198
Practical workflow and protocol ... 211
Materials ... 218
VII. Lab Report ... 219
Additional information about PCR ... 222
Questions ... 226
Chapter 9 Research project in molecular biology 8th practice ... 227
Learning outcomes ... 228
7
Detection of Pfu DNA polymerase activity – Running PCR products
on agarose gel ... 229
Theoretical background ... 230
Practical workflow and protocol ... 231
Materials ... 233
VIII. Lab report ... 234
Additional information about PCR and gels ... 238
Questions ... 245
Chapter 10 Research project in molecular biology 9th practice ... 246
Learning outcomes ... 247
Purification of the Pfu protein ... 248
Theoretical background ... 249
Practical workflow and protocol ... 257
Materials ... 265
IX. Lab report ... 266
Additional information ... 269
Questions ... 271
Chapter 11 Research project in molecular biology 10th practice ... 272
Learning outcomes ... 273
Dialysis and visualizing the steps of Pfu DNA polymerase purification by SDS-PAGE ... 274
Theoretical background ... 275
8
Practical workflow and protocol ... 276
Materials ... 282
X. Lab report ... 284
Questions ... 288
Chapter 12 Technique for protein detection and identification Western blot ... 289
Learning outcomes ... 290
Western blot ... 291
Questions ... 304
9
Learning outcomes
This book and the associated practice are focusing on to provide the following general leaning outcomes. (More specific learning outcomes are listed in each chapter.) Students who complete this course will acquire the following learning outcomes:
Knowledge:
1. They know the structure, function and regulation of biological systems
2. They know how to generate competent bacterial cells in the laboratory.
3. They understand the concept of plasmid preparation.
4. They know the theoretical background of agarose gelelectrophoresis and bacterial transformation.
5. They are aware of the type of inducing agents used for heterologue protein expression.
6. They are aware of the theoretical basis of sonication.
7. They know the theoretical background of PCR and also the materials and equipment required to perform such an experiment.
8. They know the differences between agarose- and polyacrylamide gel electrophoresis and the theoretical basis of them.
9. They know the function of molecular weight markers.
10. They understand the function of the protein purification process based on heat treatment.
11. They know how to do the protein purification with salting out.
12. They know how the dialysis works.
10 Skill:
1. They can use the principles of central dogma.
2. They are capable of generating competent cells and the genetic modification of them.
3. They can perform plasmid DNA preparation from bacterial cells.
4. They can prepare the agarose gel and prove their experience in bacterial transformation.
5. They can use the pET expression system for heterologous protein production in Rosetta cells.
6. They can apply sonication-based cell lysis method.
7. They can measure a PCR reaction and program the PCR machine.
8. They are capable of preparing their samples for the electrophoresis.
9. They can purify the thermostable proteins from bacteria.
10. They are capable of distinguishing the aim of salting out during purification and concentration steps.
11. They can use the salting out method and they can desalt their samples by using dialysis.
11 Attitude:
1. They are motivated for acquiring new information.
2. They pay attention on the importance of sterile work.
3. They make an effort to do the plasmid preparation without chromosomal DNA contamination.
4. They are willing to evaluate the results of agarose gel electrophoresis and perform the transformation on their own.
5. They keep in mind the importance of collecting the samples at the appropriate time point.
6. They make an effort to lyse the cells efficiently and then to take samples precisely.
7. They realize the importance of the use of positive and negative controls.
8. They make an effort to precisely document and present the results of the agarose gel photo.
9. They are critical during the evaluation of the gel photos.
10. They make an effort to work in groups.
11. They evaluate their experiments and are willing to learn their promiscuous mistakes.
12 Responsibility and autonomy:
1. They are responsible for overview the process of the practise based on the information.
2. They can follow the protocol with the help of technical direction.
3. They comply with the appropriate directions to prepare a pure plasmid without any contaminations.
4. They phrase independent suggestions about how to precisely and efficiently evaluate the results from agarose gel electrophoresis.
5. They comply with the accurate time-points of sampling.
6. They lyse the cells and collect the samples with the help of technical direction.
7. They can follow the protocol on their own.
8. They comply with the safety rules, which are necessary for the lab work.
9. They can evaluate the results of the agarose and polyacrylamide gels with the help of technical direction.
10. They can work in contribution to the others.
11. They can evaluate the results of the polyacrylamide gels on their own at the end of the practice.
13
Introduction
This book is written to facilitate the understanding and implementation of the subject area thought in the Biology MSc practical course Macromolecule design and manipulation at the University of Szeged.
We recommend this book to those students, who would like to extend their knowledge in particular by familiarising themselves with methods used in modern molecular biology and biochemistry. This book provides useful information on basic methods through a detailed coverage of experiments by expression and purification of a thermostable DNA polymerase, which will be performed by the participating students.
Basic English language knowledge is required for the successful achievement of the course, which also gives the opportunity for the students to get familiar with some of the basic terminologies used in a molecular biology laboratory.
In the last quarter of the 20th century, the field of molecular biology underwent a rapid and huge development that produced great achievements in several fields, which made the easy and affordable genetic modification of bacteria and yeast possible. The toolkit developed in molecular biology laboratories all over the word made the transfer and expression of foreign genes into bacteria possible, which in turn promote to obtain that the desired proteins can be achieved in unlimited quantities for biochemical studies. Proteins that was hard or nearly impossible to be obtained earlier, such as some proteins of human origin, are nowadays easily accessible for research usage. Besides basic
14
research, healthcare and other industries have also gained great benefits from these developments. For instance, before the revolution of the molecular biology cloning, insulin was purified from Sus scrofa domestica (pig) for the treatment of patients suffering from diabetes.
Following the development of these new approaches human insulin could be produced in yeast or bacteria. Nowadays, much larger proteins, such as coagulation factors and antibodies are also produced by heterologous or homologous protein expression systems.
During this course, you are going to learn basic techniques based on protein expression in bacteria. This will be done by performing experiments intended to produce and purify a thermostable protein from Escherichia coli. Our protein of interest is the Pfu DNA polymerase frequently used in polymerase chain reaction (PCR), which is another basic technique of molecular biology. The enzyme encoding the Pfu gene is derived from the archeon Pyrococcus furiosus, which lives in hot springs. Therefore, it is a thermostable DNA polymerase, it can withstand surprisingly high temperatures (95 °C), but its highest activity is at 72 °C.
This practical description will guide you through the techniques required for expression and purification of the Pfu protein over 10 chapters, each of them corresponds to a laboratory practical session (Chapter 2-11).
The workflow of the practices is summarized on the next figure (Figure 0.1).
15
Figure 1 Thematics
16
Chapter 1
Before entering the lab
Basics of pipetting
17
Learning outcomes
At the end of the practice, students will acquire the following learning outcomes:
Knowledge:
1. They will be familiar with the correct utilisation of pipettes.
Skill:
2. They will be capable of using a pipette.
Attitude:
3. They are willing to follow the rules of pipetting to avoid contaminations or any damages of the instrument.
4. They are willing to work with the pipettes as precisely as they can.
Responsibility and autonomy:
5. They will be able to perform the correct pipetting steps on their own.
18
Basics of pipetting
In a molecular biology laboratory, volumes are measured in microliters and quantities in micrograms or might be only fractions of these.
Therefore, the correct utilisation of the laboratory equipment by which these small quantities of materials can be handled is crucial. This is the reason that from many tools you are about to use, here we consider only one type, the so-called automatic pipettes, which are used to measure small quantities of liquid in the laboratory. The correct usage of pipettes is important because even small changes in the desired volumes could alter the results of experiments and compromise the reproducibility of your work. The inappropriate usage of pipettes also shortens the life- span of these expensive instruments, therefore learning how to use them
In the laboratory you will come to know several different types of equipment, some of them are rather simple, while others are very sophisticated and extremely expensive. However, we will not overview the proper use of all of them, whichever you want to use the same basic rules should be applied: always make sure that you know what you are actually doing on and that what the proper way is to do it! If you have any doubts, make sure to collect the proper information by reading your practical guide, your notes or by asking your laboratory supervisor. You are responsible for every step you take in the laboratory. With irresponsible behaviour you can endanger your own or the other fellow’s health and you cannot risk the chance of destruction of any equipment, reagents or experiments!
19
correctly is one of the first and extremely important steps in the process of learning basic laboratory work techniques.
Theoretical background
Automatic pipettes make the lab work much more comfortable and working with them increases the reproducibility of the experiments. By using automatic pipettes, we can measure fractions of millilitres with great precision allowing the reduction of volumes and by this decreasing the cost of biochemical reactions.
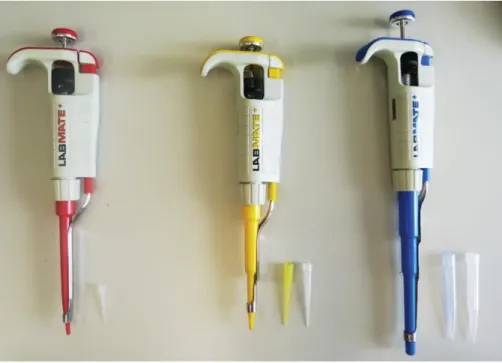
In a standard molecular biology lab, automatic pipettes are used to measure volumes in the range from 0.5 ul to 1 ml. For this, usually a set of three pipettes are needed. For the smallest volumes we use a pipette that can be adjusted from 0.5 to 10 ul. For a little larger volume, we use the pipette, which can measure from 10 to 100 ul. For even larger volumes, we use a pipette that can be set from 100 ul to 1 ml (Figure 1.1). There are also other kinds of pipettes measuring different volumes, although the exact pipetting range is always indicated. Never force a Important notes: Being familiar with the International System of Units and with the meaning of prefixes are also essential for lab work.
nl = nanolitre ul = microlitre ml= millilitre 1 nl = 10-9 l
1/1,000,000.000 l
1 ul = 10-6 l 1/1,000,000 l
1 ml = 10-3 l 1/1,000 l 1,000 nl = 1 ul 1,000 ul = 1 ml 1,000 ml = 1 l
20
pipette to set volumes outside this indicated range since this can result in either inaccuracy or failure of the pipette!
Pipette tips are small disposable plastic cones that contain the liquid during pipetting. Different tips should be used for pipettes measuring at different ranges. Some tips (depending on the manufacturer) are colour- coded in order to help to identify the correct one. 0.5-10 ul ranged pipette tips are transparent white, 10-100 ul (or 20-200 ul) tips are yellow and 100-1,000 ul tips are blue coloured (Figure 1.1).
Important notes:
Pipette tips have to be sterile and clean in order to avoid contamination of the sample being pipetted.
Never touch tips with your naked hand because lipids, proteins and other contaminations from the human skin will attach to the surface of the tip. Later, during pipetting, this contamination could get into the sample and it will ruin the subsequent experiment.
21
Figure 1.1 Example of a set of micropipettes. Each pipette serves to measure in different volume range. For precise measurement, each pipette should be used with
the compatible tip.
Parts of a pipette are shown on Figure 1.2. With the control button at the top of the pipette, the piston located inside the pipette can be moved.
When the piston is moved upwards, vacuum is generated, which makes liquid transfer possible by sucking up the desired volume into the tip.
The amount of liquid is proportional with the dislocation of the piston.
The liquid is released by moving the piston downwards. The movement range of the piston could be regulated by the volume adjustment screw.
The actual volume for what the pipette is set, is indicated on the volume display. The correct tip for the pipette fits perfectly on the tip cone. The removal of a used tip is done with the ejection button.
22
Figure 1.2 Parts of a pipette
Steps of pipetting
1. Setting the volume
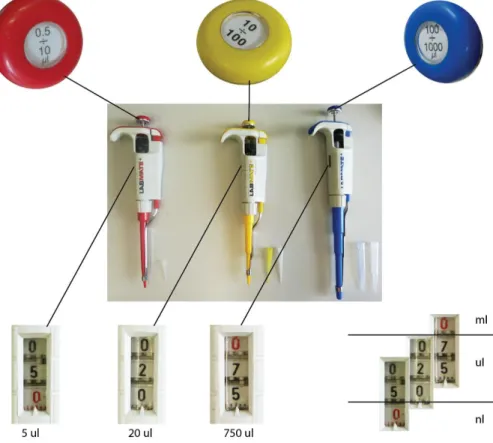
Setting the correct volume starts with the pipette selection. Choose the pipette, which range fits to the desired volume. Set the volume with the adjustment screw, while watching the changes on the volume display of the pipette. NEVER adjust the pipette below or above the measuring range of it! The volume display usually shows three digits, but in case of different pipettes, these numbers represent different actual values. For
23
instance, in case of a 100-1,000 ul pipette, when the first digit is set to 1, it means that it is 1,000 ul in volume. However, in case of a 0.5-10 ul pipette, the first digit represents only 10 ul. Shifts in the scale are usually indicated with red colour as shown on Figure 1.3.
Figure 1.3 Examples of setting volume indicators on pipettes used in different volume ranges. On the left there is a 0.5-10 ul pipette on which the last digit (the lower one) is red coloured. If we set 0, 0, 5 on this pipette (downwards from top to bottom), it means 0.5 ul or in another dimension, it is 500 nl. In case of the 100-1,000
ul pipette, if we set 1, 0, 0, (downwards from top to bottom) it means 1,000 ul or in other word 1 ml. Other examples are indicated on the figure.
24 2. Applying the tip on a pipette
When applying the tip onto a pipette, you should be careful and avoid damaging the tip cone. It must not be bended or scratched. If the tip does not fit perfectly on the cone the volume will change or liquid will be lost during pipetting. To avoid bending the tip cone, always keep the pipette vertically straight as shown on Figure 1.4.
Figure 1.4 Applying tips on the pipette. Hold the pipette vertically and fix the tip on the tip cone.
3. Measuring
After selecting the right pipette, setting the desired volume and applying the tip, pipetting could be performed by using the control button. This button has two stopping points. By pushing the button until the first point of contact, air will be squeezed out from the pistone and the
25
volume of air leaving the pipette will be proportional with the selected volume. The second point of contact is a fixed distance from the first one, which makes possible to eject some more air from the pipette. This is used to remove any residual liquid that may remain in the tip.
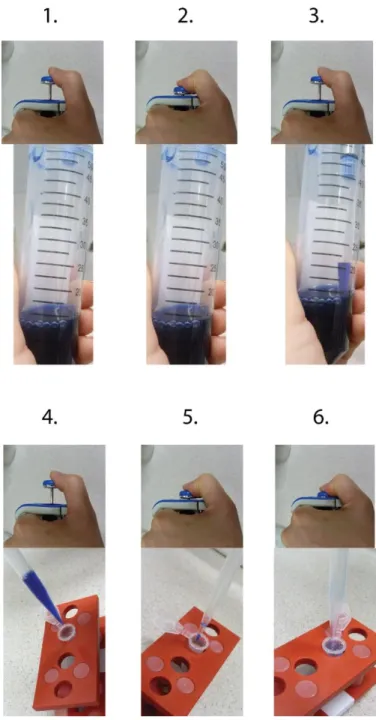
According to the above described directions, pipetting should be carried out as the following steps:
1. push the control button until it reaches the first point of contact 2. submerge the end of the tip into the liquid, while holding down
the control button
3. slowly release the control button upwards, which will fill the tip with liquid
4. position the tip into the other container (e.g. Eppendorf tube), gentle touching the wall of it
5. slowly push the button downwards, until it reaches the first point of contact to empty the tip
6. slowly push the button, until it reaches the second point of contact to empty the residual droplets that may remain in the tip due to adhesion-cohesion.
The steps of the pipetting are also shown on Figure 1.5.
26
Figure 1.5 The steps of pipetting. The control button can be pushed with your thumb.
27
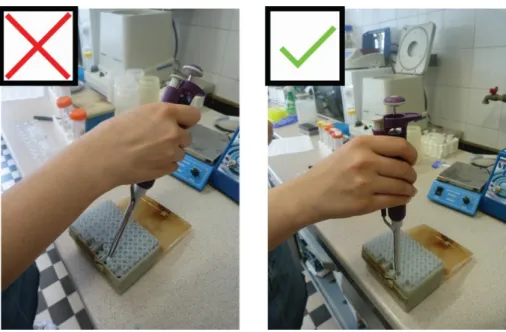
In addition to the proper choice of the pipette and its setting there are several further rules, which should be followed during pipetting of liquids. The most important is that do not move the control button too fast, since it could get the liquid to splash. If the liquid splashes inside the tip towards the pipette, it can contaminate the inner side of the pipette, which can result in corrosion and wrecking of the pipette. A contaminated pipette can contaminate every liquid that is pipetted with it. During pipetting, always hold the pipette vertically to avoid flowing of the liquid into the pipette, thereby preventing corrosion and contamination.
Always push your tip only into the surface area of the liquid you are pipetting and avoid submerging a large part or the whole tip into the solution (Figure 1.6.). A considerable amount of liquid could be attached to the outside surface of the tip, which will result in an inaccurate volume transfer. Be careful to submerge only the end of the tip.
Figure 1.6 Do not submerge large segment or the whole tip into the liquid you are pipetting. Only the end of the tip should be immersed into the liquid.
28 4. Removal of the tip
Use the ejection button to remove the tip. Always change the tip if you pipette different solutions. Remove the tip if you accidentally touch something with it (e.g. the outside wall of a container, workbench surface, tip holder box etc.) to avoid further contaminations.
When you are working in the lab, always keep in mind that you are working with cells and molecules that are from living organisms, therefore biological samples are as sensitive as the organisms themselves, from which they originate. Therefore, in order to slow down disintegration, keep your samples on ice. Additionally, do not forget that the quantities you are handling are often a fraction of a microgram or just several millionth of a litre. Unnoticed and hardly detectable contaminations being present in the environment and on your hands could easily destroy these small quantities of material. Consequently, be careful and keep the rules outlined above, while you are pipetting samples in the laboratory.
29
Questions
List the steps of the pipetting!
_______________________________________________________
_______________________________________________________
What should be avoided during pipetting?
_______________________________________________________
_______________________________________________________
_______________________________________________________
Which are the most often used pipettes in a molecular biology lab?
_______________________________________________________
_______________________________________________________
Why is it important to hold the pipette vertically when taking the tip?
_______________________________________________________
_______________________________________________________
Why is it important to hold the pipette vertically when pipetting?
_______________________________________________________
_______________________________________________________
30
Chapter 2
Research project in molecular biology
1 st practice
Preparation of competent E. coli cells and transformation of pET-Pfu plasmid into
DH5alpha E. coli cells
31
Learning outcomes
At the end of the practice, students will acquire the following learning outcomes:
Knowledge:
1. They will learn the basic experiments which lead to the discovery that DNA is the genetic material.
2. They will understand the method of transformation.
3. They will learn what transformation efficiency means.
Skill:
4. They will be able to use more basic equipment in the laboratory.
5. They will be able to generate competent bacterial cells.
6. They will be able to transform bacterial cells.
7. They will be capable of spreading bacterial cells avoiding any contaminations.
8. They will be able to calculate transformation efficiency.
Attitude:
9. They will be aware of the sterile work in the laboratory.
Responsibility and autonomy:
10. They will learn how to work in small groups during the practice.
11. They will be able to use automatic pipettes on their own.
12. They will learn how to write their lab reports.
13. They respect the deadlines.
32
Preparation of competent E. coli cells and transformation of pET-Pfu plasmid into
DH5alpha E. coli cells
The aim of this chapter is to give a brief summary on some of the basics of recombinant DNA technology.
We will give a short theoretical overview here on:
about the types of the most frequently used vectors in gene technology,
how Escherichia coli (E. coli) cells are made competent to take up plasmid DNA,
how DNA molecules are introduced to cells.
Hands on practice will be:
preparation of competent cells,
transformation of bacterium cells with a recombinant plasmid
33
Theoretical background
Recombinant DNA technology development started in the 1970’s and since then it has been continuously evolving. The efficiency of the developed methods has resulted in the revolution of the modern biology and it makes the generation of genetically modified organisms and generation of a continuous flow of theoretical and practical results possible. One important step in recombinant DNA technology development was the utilization of plasmids as convenient carriers of foreign DNA fragments. Plasmids are small, circular, extrachromosomal DNA molecules that are used to develop vectors that replicate independently of the host chromosome, therefore are present in multiple copies within a bacterium cell. Plasmids can be used as tools for genetic modification of an organism since they can be easily extracted from or introduced into cells and manipulated in test tube (in vitro). Plasmid vectors contain several sequences with well-defined function. One of these is the region responsible for replication, which ensures that the plasmid can be multiplied independently of the DNA replication of the host cell and can be propagated to the daughter cells during cell division. Plasmids should also contain selection markers.
Most frequently these are antibiotic resistance genes, which make possible to follow the presence of the plasmid in the host organism and to select only those cells which contain the plasmid. (Only those bacterium cells can grow on an antibiotic containing selective media that carry the plasmid with the appropriate antibiotic resistance gene.) In plasmids, many specific marker genes, such as resistance, lethal or reporter genes can be present in order to help the researcher to recognise
34
the presence of the inserted foreign DNA and to control its function.
Additionally, plasmids should contain unique restriction sites, which permit to open the circular molecule with an endonuclease cleavage and insertion a piece of foreign DNA into it. In advanced plasmids a collection of unique restriction enzyme recognition sites is localized to a specific region, called multi cloning site (MSC). Restriction enzymes are sequence-specific and many of them produce ‘sticky ends’ with 2-4 nucleotides of complementary overhangs and others generate ‘blunt ends’ with no overhangs at the end of the DNA fragment. Upon digestion with endonucleases, a circular plasmid molecule can be opened up and easily linked with another DNA fragment (insert) that was treated with the same enzyme resulting in the generation of a recombinant plasmid. However, the conveniently inserted fragment size is limited, since molecules larger than 10 kb are hard to be inserted into plasmids and it is also difficult to maintain large recombinant plasmids in bacteria. Nonetheless, there are special types of plasmid vectors (e.g.
plasmids based on the F plasmid of E. coli) that have been especially developed to take up large fragments (even Mb sized) and to maintain them. In the nature, plasmids are present in their specific host organisms, which can be different types of bacteria or yeast cells. However, in recombinant DNA technology specific plasmid vectors, called shuttle vectors, replicating in more than one cell types can be produced. These types of vector contain at least two types of replication regions specific for each host cell, which allow the plasmid to replicate in both of them;
(usually in prokaryotic and eukaryotic cells e.g. bacteria and yeast).
They also contain at least two types of selection markers (e.g. both
35
antibiotic resistance and auxotrophic complementation genes), which allow the selection in both hosts.
Most of the plasmid vectors used in DNA technology can replicate in the host cell independently of the genome. This phenomenon is called relaxed replication, which can result in many copies of the plasmid replicating as extrachromosomal elements. In addition, other plasmids might be present in the cell only in a single copy and some of these can integrate into the chromosomal DNA of the host cell.
Over the last 50 years molecular biology has produced a large number of plasmid types promoting several specific purposes in molecular biology experiments or in industrial usage. For instance, these plasmid types allow the production of specific proteins, regulation of gene functions, testing the activity of regulatory elements. In this course we do not extensively deal with these, except the so-called expression vectors, which can be used to produce foreign proteins in bacterial cells.
More description on these will be given in a later chapter.
In addition to plasmids, other vector types are also frequently used to introduce foreign DNA into bacterial cells. A large group of these have been developed from bacteriophages. The two most common versions of these types of vectors are based on the lambda and M13 phages. The main advantage of lambda-based vectors is that larger DNA fragments can be easily inserted into them. Lambda phage vectors are suitable for 20-25 kb DNA insertions. On the other hand, shorter fragments (1-5 kb) can be incorporated into M13 phage vectors, but they have the unique advantage that they make possible to recover the inserted DNA both in single and in double stranded form. This can be realized because M13
36
phage contains ssDNA in the phage particle, but during its replication, double stranded intermediers are generated in the cells (replicative form). Thus, M13-based vectors can be used both as a phage and as a plasmid and are suitable for ssDNA expression that is often required for specific experiments (e.g. performing in vitro mutagenesis, preparing single stranded hybridization probe, determining nucleotide sequence).
In addition to these two types of vector, cosmids have been generated from the combination of genetic materials of plasmids and lambda phages. Therefore, in cosmids certain advantages of plasmids and bacteriophages are combined. The former feature is that they can be propagated in and extracted from cells as a plasmid, the latter is that they can be introduced to cells similar to a bacteriophage, which is a very effective way of genetic modification. This is important when only a small amount of DNA is available for cloning experiment. A further advantage of cosmid vectors is that these can accept twice larger DNA fragments than lambda-based vectors (approximately 50,000 bp DNA can be inserted into a cosmid).
37
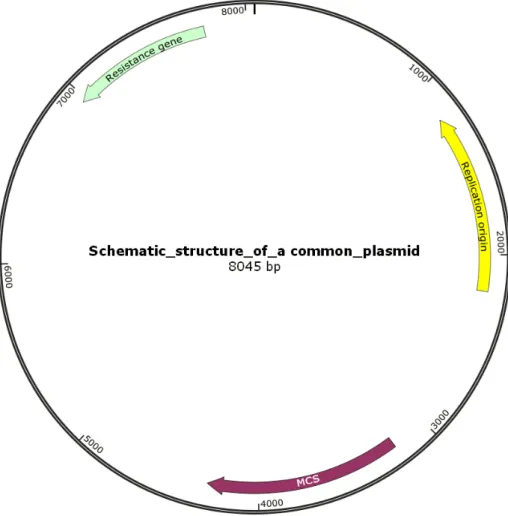
Figure 2.1 Schematic structure of a common plasmid vector. A plasmid vector must contain sequences required for the start of replication, encode selection marker genes and unique restriction sites (multicloning site (MCS)). These three features are the
minimal essential elements required for a plasmid vector.
38
Introduction of DNA into living cells: transformation
There are many different types of techniques by which DNA can be introduced into cells. From these, the most prevalent method is transformation, by which in vitro generated recombinant plasmid DNA can be introduced into bacterium cells. The term transformation is frequently used for slightly different methods in which DNA can be also introduced into other types of cells (fungi, plant, animal). However, in the case of mammalian cells, we use the word “transfection” instead of
“transformation”. To make the nomenclature even more confusing, many other techniques have developed for the same purpose – to ingest DNA into cells – are known and designated by different names (injection, electroporation, lipofection).
Transformation is the most frequently used method to enter DNA into bacterial cells and it is based on the natural phenomenon that was discovered by Frederick Griffith in 1928. It has been known as a key experiment proving that DNA is the carrier of genetic information. In this famous experiment, virulent, type III-S (smooth) and non-virulent, type II-R (rough) strains of Streptococcus pneumoniae were used. The type III-S strain is covered with a polysaccharide capsule, which protects the bacteria from the immune system of the host cell. Therefore, mice treated with the non-virulent strain survived, while mice infected with the virulent strain were killed. When the virulent strain was heat- inactivated, the mice survived. Combined treatment of non-virulent Streptococcus pneumoniae with the heat-inactivated form of the virulent bacterial strain were also performed and it was found that the harmless form of Streptococcus pneumoniae became transformed into a virulent
39
strain, which infected and killed the experimental animals. This phenomenon was called ’transformation’ in which – as later it was proved - the ‘transforming principle’ was the DNA.
Figure 2.2. A summary of the Griffith experiment
In the experiment two types of Streptococcus pneumoniae strains were used to infect mice. The rough strain was non-virulent, while the smooth strain was virulent. After heat treatment the smooth strain lost its virulency. On the other hand, when a mixture
of cells from heat-killed smooth strain and untreated rough strain was injected, the mice died. The only explanation could be that the smooth strain transferred its
genetic material to the rough strain.
https://en.wikipedia.org/wiki/Griffith%27s_experiment
40
In 1944, Avery, MacLeod and McCarty proved by a further elaboration of Griffith’s experiment that the DNA must be the carrier of the genetic information since solely the DNA molecules were able to transform the harmless Pneumococcus strain into a virulent strain.
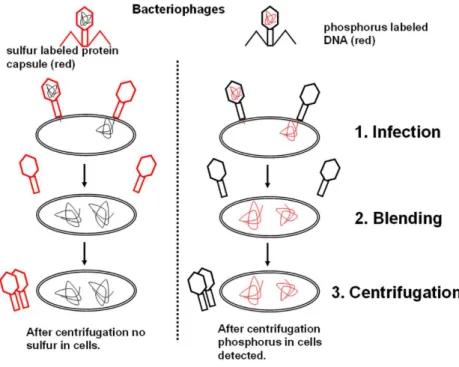
In 1952, another famous experiment performed by Alfred Hershey and Martha Chase confirmed that the genetic material was indeed the DNA.
During their experiment, they infected bacteria with T2 phages and studied whether the DNA or the protein was responsible for the transfer of the genetic information. T2 phage consists of only an external protein shell and an internal DNA content. They used radioactive 35S to label the proteins and radioactive 32P to label the DNA. When they infected bacteria with these labelled bacteriophage samples, they found that the
35S localized in the protein coat remained outside of the bacteria, while the 32P found in the DNA entered the bacterial cells. Since the infected cells produced new bacteriophage particles with protein coat and DNA, the only interpretation of this result could be that the material – the DNA – taken up by bacteria contained all the information required to generate new protein and DNA molecules.
41
Figure 2.3. Schematic draft of the Hershey-Chase experiment. Bacteria were infected with either 32P or 35S radiolabeled bacteriophages. The result of the experiment
confirmed that the genetic material is DNA.
https://commons.wikimedia.org/wiki/File:Hersheychaseexperiment
In summary, two of the most famous experiments that proved the role of DNA are the bases of the techniques by which DNA is introduced into cells in recombinant DNA experiments, in other word by genetic engineering. Transformation is the process by which bacterial cells can take up foreign DNA from their environment. Under natural conditions, transformation is important since taking up foreign genetic material can increase the survival efficiency of a cell (e.g. a plasmid that encodes antibiotic resistance gene helps to protect its host). In the laboratory, we use transformation to introduce in vitro constructed recombinant
42
plasmids into cells. Bacteriophage infection is another effective way by which foreign DNA can enter the cells under natural conditions (however viral infection is not beneficial for the host cell). In the laboratory, we mimic this process by assembling bacteriophage particles in vitro by applying recombinant DNA molecules. In that way recombinant cosmids can be introduced into cells.
Transformation in the laboratory
In recombinant DNA technology bacterial transformation is a widely used process. Bacterial cells can take up exogenous DNA molecules when they are in the competent status. Since DNA can be absorbed to the bacterial cell surface in the presence of bivalent cations, e.g. Ca2+, we treat the cells with them to increase the competency of bacterial cells.
Both the bacterial cell wall and the DNA are negatively charged therefore it is important to shade the negative charges of the cell wall, thereby dissipating the electrostatic repulsion to increase the efficiency of DNA entrance into the cells. By exposing the cells to a sudden temperature increase (heat shock) or a pressure difference between outside and inside of the cell, pores will be formed in the cell wall, which allow the plasmid DNA to enter the cell. After returning the cells to a favourable temperature (for E. coli it is 37 °C), the cell wall will be recovered and by spreading the transformed bacterial cells on agar plates complemented with the proper antibiotics, only the ones containing the resistance gene will grow and form colonies. This process of DNA introduction into the cells is called chemical transformation. Several modified version of this procedure have been developed, such as the
43
method based on the studies of Inoue et al. in 1990 (Gene 96(1): 23-28), which will be used in this course. We can use competent cells that can be either prepared freshly before transformation or previously prepared and freezed. The previously prepared cells were supplemented with an antifreeze agent (e.g. DMSO) then freezed in liquid nitrogen and stored at -80 °C for later usage.
Electroporation is another type of method by which DNA can be introduced to cells. During this technique a sudden change in the potential of the electric field is applied to form pores on the cell wall and by this higher transformation efficiency could be achieved. The electric shock (12.5-15 kV/cm) makes the bacterial cells competent for taking up DNA from the outside environment. Electroporation is more efficient than classical chemical transformation, but it requires more equipment than chemical transformation does.
Whichever protocol is used, the efficiency of the transformation can be determined by calculating the number of plasmid-containing cells obtained from the transformation of 1 ug of DNA (to the same amount of cells). To determine the transformation efficiency, bacterial colonies growing on antibiotic complemented agar plate should be counted. This is generally performed following an overnight incubation of the bacteria containing agar plates in a 37 °C incubator. During this short-time, every single transformed bacterium cell will divide several times and give rise to colonies consisting of millions of cells which all contain the same transformed recombinant plasmid. In other words, clones of the transformed unique cells grow up – this is reflected in the name used occasionally for recombinant DNA technology as DNA cloning.
Depending of the circumstances, the transformation efficiency can reach
44
108, which means obtaining of 100 million of recombinant cells from 1 microgram of DNA.
Transformation methods of different cell types
1. Bacteria:
Generally, they can be easily transformed, since well-developed transformation protocols and suitable selection markers (antibiotic resistance) are available. The most important vectors are: non-integrating plasmids, bacteriophage-based vectors, cosmids, bacterial artificial chromosome (BAC). Methods for DNA introduction into cells are: transformation, electroporation, phage infection.
2. Yeast:
Since yeast cells possess thick cell wall, transformation of them requires specific steps to deal with this. On the other hand, similar to bacteria, yeast cells can be cultured easily and there are good markers available for selection (auxotrophic complementation). The most important vectors are: non- integrating or integrating plasmids, yeast artificial chromosome (YAC). Method for DNA introduction into cells is:
transformation (intact cell or protoplast).
45 3. Plant cells:
Plant cells also have thick cell wall therefore it is hard to transform them. The choice of selection markers is less diverse, nonetheless there are only a few markers which can be used in case of plants. The most important vectors are integrating plasmids. Methods for DNA introduction into cells are:
transformation, infection, gene gun.
4. Animal (mammalian) cells:
Animal cells are very diverse in types and without exception they are very sensitive, therefore handling and culturing them require expensive media and equipment. On the other hand, since many cell cultures are derived from human and other mammalian species, they are the most preferred models in experiments studying the structure and function of human genes.
In recombinant DNA experiments, the most important vectors used for human cell transfection are plasmids, transposons, DNA, RNA viruses and artificial chromosomes. Methods for DNA introduction into mammalian cells are: transfection, lipofection, viral infection, electroporation and microinjection.
46 Bacterial growth curve
As we discussed above bacteria form colonies on the surface of solid media. However, bacteria can be cultured in liquid media as well. In a liquid culture the cells can access all the nutrients more effectively than from a surface of a gel, which increases the yield of the cells. The liquid culture is being continuously shaked, which provides equal distribution of nutrients and bacteria. As the cells are multiplying in the culture the optical density (OD) of the liquid is increasing and at a certain point it becomes turbid.
Bacterial growth curve - that is obtained by determining the change of optical density of a growing bacterial culture and plotting it as the function of time - can be separated to four phases. The graph on Figure 2.4 represents the growth phases of bacterial culture in a test tube, where the nutrients and the space are limited (batch cell culture). Lag phase occurs immediately after inoculation of the bacterial culture and represents a period of time when bacteria have to adapt to a new environment. During the logarithmic/exponential phase, cell divisions occur at a steady-state rate and the optical density of the culture is continuously increasing. When the cell density reaches a critical point and the nutrients become depleted in the media, the culture enters the stationer phase, when the cell division halts. After that the cells are starving and they will die, the metabolic processes will slow down and there will be more and more dead cells.
47
Figure 2.4 Bacterial growth curve. Bacterial growth can be separated into four phases: 1. Lag phase, 2. Log (exponential) phase, 3. Stationary phase, 4. Death (decline) phase. The optical density (OD) of a cell culture is directly proportional
with the number of cells.
Growing conditions and the type of the media are important factors in determining when the bacterial culture reaches the maximal optical density. To determine the actual state of the culture, we use spectrophotometer. For instance, an Escherichia coli cell culture grown in a rich media at 37 °C is surely in the exponential phase of growth, if its optical density is between 0.4 and 0.8 measured at 600 nm. Cells In the “log phase” of the cell culture, we can observe exponential bacterial growth, although it is often represented on a logarithmic scale, therefore it is referred to log phase, which is mathematically incorrect.
48
originated from cultures in the exponential phase, are the most suitable for transformation. It is important to note here that when bacterial cultures are used for other purposes, for example for protein production, as we will do in this course, induction of the protein expression should be done in that phase, too.
49
Practical workflow and protocol
1. Preparation E. coli competent cells
100 ml DH5α E. coli and Rosetta cells were grown overnight at 25 °C until they reached their optimal optical density for transformation. These bacterial cells are the most suitable for transformation at OD=0.5-0.8.
1. The optical density of the bacterial cultures is measured at OD600 by the lab assistant.
2. Each pair gets 15 ml from one culture in a 50 ml tube, which should be incubated on ice for 10 min.
3. Collect the cells by centrifugation (3,000 rpm, 10 min, 4 °C) and discard the supernatant!
4. Resuspend the cells in 2.4 ml ice cold TB buffer and incubate the suspension on ice for 10 min!
5. Centrifuge the samples for 10 min at 3,000 rpm, 4 ºC!
6. Discard supernatant and resuspend the cells in 1.2 ml ice cold TB buffer and incubate them on ice for 10 min. These steps made the bacterial cells competent for taking up the foreign DNA.
7. Transfer 200 ul Rosetta cells to an Eppendorf tube and add 14 ul DMSO to it to protect the cells from disruption during freezing. For fast freezing, put the Eppendorf tube containing Rosetta cells into liquid nitrogen for a few minutes, then store at -80 °C.
50
2. Transformation of DNA into competent cells
1. Transfer 200 ul DH5α competent cells into a sterile Eppendorf tube and add 1 ul pET-Pfu plasmid DNA to the cells.
2. Incubate the samples on ice for 20 min!
3. Heat shock your sample at 42 °C for 90 sec.
4. Immediately after heat shocking, place the tube on ice for 2 min and then add 900 ul LB media.
5. Let the cells recover by incubating them at 37 °C for 30 min. During this incubation, the plasmid starts replicating and the antibiotic resistance genes are expressed.
6. Collect the cells with centrifugation (3,000 rpm, 3 min, RT) remove 1,100 ul supernatant and resuspend the cells in the remaining 100 ul LB.
Competent cells are sensitive to temperature changes, so inappropriate handling will reduce the competency of the cells for DNA uptake. Therefore, it is important to always work on ice during handling competent cells.
51
7. Spread the 100 ul resuspended cells on LB-agar plates complemented with ampicillin antibiotic. After pipetting the cells in the middle of the agar plate, spread the cells with a sterilized glass rod.
Figure 2.5. Spreading bacterial cells on LB plate complemented with antibiotic
8. Incubate the plates at 37 °C, overnight!
9. In the following day, calculate the transformation efficiency. The concentration of the transformed pET-Pfu plasmid DNA is 1500 ng/ul.
52
Materials
15 ml DH5α and Rosetta E. coli bacterial suspension (OD = 0.5-0.8) Inoue-transformation buffer (TB)
55 mM MnCl2 x 4 H2O
15 mM CaCl2 x 2 H2O
250 mM KCl
10 mM PIPES-KOH pH 6.7 SOB medium
LB medium
1 piece of LB+ampicillin agar plate
53
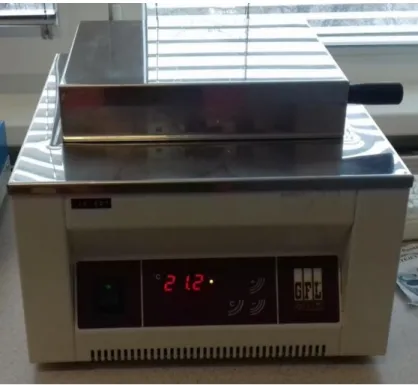
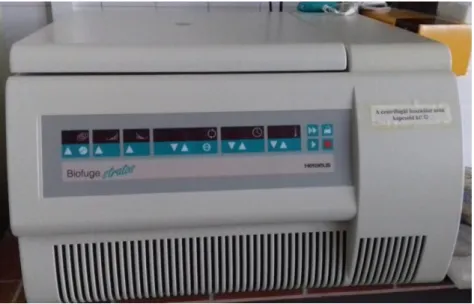
Figure 2.6 Waterbath
Figure 2.7 Thermoblock
54
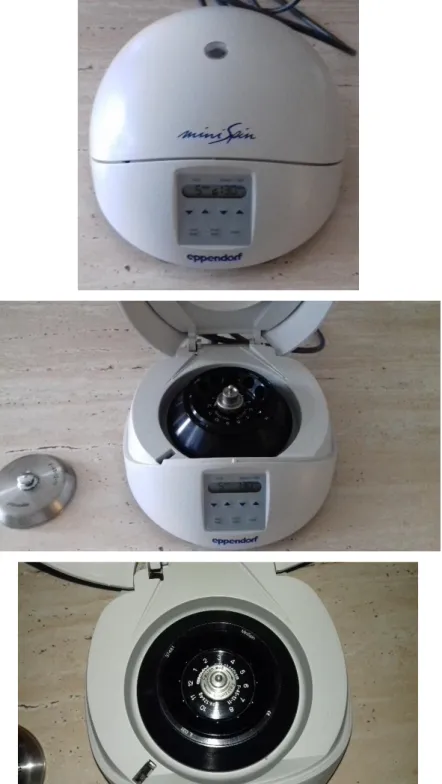
Figure 2.8 Centrifuge
55
Figure 2.9 Refrigerated centrifuge for falcon tubes
Figure 2.10 Refrigerated centrifuge for Eppendorf tubes
56
Figure 2.11 Vortex
Figure 2.12 Beaker
57
I. Lab report
Date: __________________________________
Name: ___________________________________________________
Title: Generation of competent E. coli bacterial cells and transformation of pET-Pfu plasmid into DH5alpha E. coli cells
Aim:
________________________________________________________
________________________________________________________
Short summary (2-3 sentences about the experimental setup): We have prepared competent bacterial cells, which are suitable for taking up the foreign DNA. Then we transformed them according to Inoue’s protocol.
Used materials (We should check all the solutions and materials before we start the experiment. We should know for what and why we use them during the experimental process.):
LB: liquid solution for growing E. coli bacteria
LB-agar:
_______________________________________________________
SOB:
_______________________________________________________
TB:
_______________________________________________________
MnCl2
58 (TB):
_______________________________________________________
CaCl2 (TB):
_______________________________________________________
KCl (TB): ensures the appropriate ion concentration
Pipes pH 6.7 (TB): buffer, which ensures the appropriate pH
Ice: We should take the samples on ice because room temperature decreases the efficiency of the transformation.
pET-Pfu:
_______________________________________________________
DH5-alpha: a type of E. coli strain optimized for DNA transformation
Rosetta: a type of E. coli strain optimized for protein expression
ampicillin:
_______________________________________________________
_______________________________________________________
_______________________________________________________
_______________________________________________________
liquid nitrogen:
_______________________________________________________
DMSO:
_______________________________________________________
Changes in the protocol: (the experiment could be repeated only, if we write down everything):
________________________________________________________
________________________________________________________
59
________________________________________________________
________________________________________________________
________________________________________________________
________________________________________________________
________________________________________________________
________________________________________________________
Observations and Conclusion:
The OD of DH5alpha and Rosetta cells at 600 nm in the beginning of the experiment:
________________________________________________________
________________________________________________________
________________________________________________________
________________________________________________________
Calculation of transformation efficiency:
________________________________________________________
________________________________________________________
________________________________________________________
________________________________________________________
60
Questions
What are the minimal essential elements required for the function of a plasmid vector?
_______________________________________________________
_______________________________________________________
At which stage are the bacterial cells the most suitable for transformation?
_______________________________________________________
What is the difference between DH5 alpha and Rosetta cells?
_______________________________________________________
_______________________________________________________
_______________________________________________________
_______________________________________________________
How could you make bacterial cells competent for DNA uptake?
_______________________________________________________
What kind of transformation did we use in the practice?
_______________________________________________________
Why did we apply DMSO in case of freezing Rosetta cells?
_______________________________________________________
61
Chapter 3
Research project in molecular biology
2 nd practice
Purification of pET-Pfu plasmid from
transformed E. coli bacterial cells
62
Learning outcomes
At the end of the practice, students will acquire the following learning outcomes:
Knowledge:
1. They will be aware of the theoretical background of different DNA isolation and purification methods.
Skill:
2. They will know how to inoculate a bacterium colony into liquid LB media.
3. They will learn how to prepare plasmid from bacterial cells.
4. They will be able to calculate on their own the necessary volume of each component.
Attitude:
5. They will consciously inoculate the bacterial colony and prepare the plasmid DNA from the cells.
Responsibility and autonomy:
6. They will overview the role of each component necessary for plasmid DNA isolation.
7. They will be capable for transforming bacterial cells alone.
63
Purification of pET-Pfu plasmid from transformed E. coli bacterial cells
In the previous chapter plasmids have been introduced as tools of recombinant DNA technology that are frequently used as vectors, which can carry pieces of foreign DNA molecules. In order to use plasmids in the laboratory, as a first step they should be extracted from cells and separated from the other macromolecules of the cell.
In this chapter basic techniques suitable for this will be reviewed briefly.
For this we will give background information on:
Methods used for cell lysis
Methods applied for DNA purification Hand on practice to these will be:
Plasmid isolation from E. coli cells
64
Theoretical background
To start DNA isolation from biological sources, it is important to disrupt the cells to allow access for the desired DNA located inside the cells.
Then all the small and large molecules should be removed since these will not be utilized but might interfere with further procedures. In practice it means that when it comes to plasmid isolation first the cells should be lysed in order to release the DNA then the plasmid molecules should be separated from the chromosomal DNA, RNA molecules and proteins. Many plasmid DNA isolation techniques have been developed, some of these uses specific material with secret composition, while other techniques are much simpler using only common reagents and can be completed in a short-time. Whichever technique is used, some basic rules should be followed and kept in mind.
These are the followings:
(1) The very large linear DNA molecules are sensitive to mechanical forces and can be broken into smaller fragments in case of vigorous handling. Since plasmids are relatively short and circular molecules, these can be hardly broken upon robust handling, but instead of that, the chromosomal DNA will be fragmented, thereby contaminating the plasmid DNA. Based on this, appropriate handling is indispensable during plasmid preparation.
(2) Nucleic acids remain in solution until water molecules surround them and form hydrate shell around them. If the water molecules are removed from this shell, the large polymers of nucleic acids will aggregate and form precipitates that can be sedimented from the solution by centrifugation. In the presence of sodium ions, 96 %
65
cold ethanol will disrupt the hydrate shell and results in the extraction of nucleic acids from the solution.
(3) Macromolecules can be degraded by specific digestive enzymes:
proteins by proteases, DNA by DNases and RNA by RNases. These enzymes might get into samples as contamination from our hand, pipettes, reaction tubes or solutions. This should be avoided by using protease- or nuclease-free tools and reagents. On the other hand, some of these enzymes can be used during purification steps to remove the non-wanted types of macromolecules. In case of DNA preparation, generally Proteinase K is used to digest proteins and pancreatic RNase is used to destroy RNAs. Whenever any of these enzymes is used, it is important to make sure that it does not contain even a trace amount of contamination from the other one (for example DNase) since this might collapse the experiment.
(4) DNA molecules extracted from the cell can be stored in solution at -20 °C for an extended time. Since DNases require Mg2+ ions for their activity the buffer in which DNA is stored should always contain a chelating agent (EDTA) in a small concentration in order to prevent the activation of DNases that may remain in the sample.
Methods used for cell lysis
1. Digestion with enzymes, which degrade the cell wall (e.g.
lysozyme, lyticase, proteinase K, pronase, digestive enzymes from the gut of snails for yeast cell disruption)
2. Treatment with detergents (e.g. SDS, Triton X-100, NP-40), which destroy the lipid membrane structure
66
3. Freezing-thawing cycles (e.g. liquid nitrogen – 37 °C), which produce ice crystals that destroy the cell membrane
4. Alkaline solution and organic solvent, which destroy the cell membrane
5. Osmotic pressure (e.g. high glucose concentration)
6. Mechanical disruption of cells (e.g. ultrasound, French press) – unlike all the above described ones, these techniques are not suitable for DNA preparation
The optimal method for cell lysis depends on the cell type and the purpose of the experiment. It is important to choose the right technique to the particular experiment. For instance, by changing the osmotic pressure mammalian cells can be lysed, but it has no effect on bacterial cells.
During cell lysis, it is important to use chelating agents (e.g. EDTA), which binds bivalent cations by this preventing the activity of the nucleases.
Removal of RNAs and proteins from DNA samples:
1. Several protein degrading enzymes (proteinase K, pronase) and RNA degrading enzymes (pancreatic RNase) can be used to remove these non-wanted macromolecule types from DNA preparations. To ensure their optimal activity the conditions of digestion (buffer, pH, ionic strength and temperature) should be set as required for the specific enzyme.
67
2. Extractions by a 25/24/1 ratio of
phenol/chloroform/isoamylalcohol mixture: This method is based on the diverse solubility of proteins and nucleic acids or partially on the fact that this solution cannot mix with water, therefore it can be easily separated from the DNA containing aqueous solution. Proteins denatured by phenol and chloroform remain in the lower organic phase or form a precipitate in the so- called interphase, while DNA will be present in the upper aqueous phase. The distribution of the DNA between the two phases depends on the pH: under neutral conditions (pH 7), DNA is present in the aqueous phase, while under acidic conditions (pH 4.8), large amount of the DNA is found in the organic phase.
On the contrary, RNA is dissolved in the aqueous phase in both cases. Phenol is generally used in combination with chloroform, because protein elimination is more efficient, when it is performed by two different organic solvents. Isoamylalcohol is added to the mixture of these organic solvents to improve separation of the upper aqueous and the lower organic phase.
After phenol/chloroform/isoamylalcohol extraction a second extraction using only chloroform is recommended, since by this the traces of phenol remained in the aqueous phases can be completely removed. It should be noted here that both phenol and chloroform are highly dangerous solutions, which can cause serious damages if they get contact with the skin. Therefore, whenever it is possible, this type of extraction should be replaced by other much user-friendlier technique.
68
3. SDS extraction in the presence of univalent positive ions:
Sodium dodecil-sulphate is a strong ionic detergent that can be easily dissolved but in case of low temperature, in the presence of potassium ions, it forms precipitate. After the addition of SDS to a cell lysate, in the presence of K+ ions, large molecules of chromosomal DNA and proteins will be precipitated. On the other hand, the smaller plasmids remain in solution.
Precipitation of nucleic acids:
Precipitation with ethanol is the most commonly used method for collecting DNA (or RNA) from an aqueous solution. The precipitation is performed in the presence of monovalent cations, e.g. Na+ or NH3+. Cations neutralize the negative charges of the DNA backbone and ethanol removes the hydrate shell of DNA molecules, which will be therefore aggregated and fallen out of solution. To set the optimal ion concentration for nucleic acid precipitation by ethanol the use of high concentration of ammonium- acetate is preferred, since it helps avoiding precipitation of dNTPs together with the DNA.
In addition, isopropanol can also be used to precipitate nucleic acids.
In practice it is used mostly for RNA and for washing already precipitated DNA samples.
Polyethylene glycol (PEG) in a 10 % solution in the presence of 0.5- 1 M NaCl can be also used to precipitate DNA from the aqueous solution.
69
The above described techniques are based on the removal of water hydrate shell, which promotes the precipitation of the DNA.
However, it does not denature or damage the DNA or RNA structure, therefore after the precipitate has been collected by centrifugation, it can be dried and re-dissolved in the appropriate solution.
Techniques for obtaining highly purified DNA preparations
1. Using chromatographic matrix to bind DNA: Hydroxyapatite (a special form of calcium-phosphate) silica gel and several other types of material can be used to prepare matrixes to which DNA binds with high affinity. In fact, these types of matrixes are commonly used in commercially available DNA purifying kits. During purification, DNA is bound to the matrix that is generally placed into a small column while other contaminating molecules can be washed away. Then DNA can be released from the matrix and eluted by altering the salt concentration or the pH.
2. DNA purification by centrifugation based on CsCl-ethidium bromide density gradient: CsCl salt contains a high molecular mass metal atom (Cs) and can be dissolved in very high concentration. As a result of this similar density with CsCl solution can be prepared to that of DNA. Ethidium bromide is a fluorescent dye, which can intercalate between the DNA bases. Different amount of ethidium bromide can intercalate into linear, circular or superspiralised (supercoiled) DNA. Based on the the different density of the three forms of DNA molecules, they can be easily separated. During a