Research and Development Platform for
Multimedia Streaming of MP3 Audio Content
Andrei Novak*, Mircea Stratulat**, Daniela Stanescu**, Dan Chiciudean**, Bogdan Ciubotaru**, Razvan Cioarga**
* S. C. Nadcomp S. R. L, Oradea, Romania, Phone: +40 722 17 8222, Fax: +40 359 407445, E-mail: novak_andrei@rdslink.ro
** Software and Computer Engineering Department, Politehnica University of Timisoara, 2, V. Parvan Blvd, 1900 Timisoara, Romania, Phone/Fax: +40 256 40 3260, E-mail: {daniela.stanescu, dan.chiciudean, bogdan.ciubotaru, razvan.cioarga}@ac.upt.ro
Abstract: In the recent years, the MPEG Layer III (MP3) music compression format has become an extremely popular choice for digital audio compression. Its high compression ratio, and near CD quality sound make it a natural choice for storing and distributing music - especially over the internet, where space and bandwidth are important considerations. For example, using MPEG Layer-3 compression, 40 MBytes audio files have been compressed to approximately 3.5 MBytes. As a result of the MP3 popularity, a variety of portable MP3 players entered the market. We decided to design and implement a Hard Disk based MP3 player similar to products currently available (e.g. Creative Labs Nomad, Archos Jukebox 6000, Apple Ipod, etc.). Our goal was to design the player with minimal cost and to implement a FM Stereo Radio Transmitter module for ease of connectivity. This module resolves the compatibility problems with the current available car audio systems. In the same time system flexibility and scalability as well as system evolution to more advanced architectures were the main principles that drove the development of this platform. The primary enhancement of the platform will be to switch the communication module from a analogical FM radio transmitter to digital wired or wireless communication solutions.
Keywords: mp3 player, radio transmitter, hard disk, HD-based players, level shifting, i2c communication
1 Introduction
A digital audio player (DAP) is a device that stores, organizes and plays digital music files. It is more commonly referred to as an MP3 player (because of that format's ubiquity), but DAP's often play many additional file formats. Some
formats are proprietary, such as Windows Media Audio (WMA), and Advanced Audio Codec (AAC). Some of these formats also may incorporate restrictive digital rights management (DRM) technology, such as WMA DRM, which are often part of certain paid download sites. Other formats are completely patent-free or otherwise open, such as Ogg Vorbis, FLAC, Speex (all part of the Ogg open multimedia project), and Module file formats.
There are three main types of digital audio players: MP3 CD Players - These kinds of devices play CD's. Often, they play both audio CD's and homemade data CDs containing MP3 or other digital audio files; Flash-based Players - These are solid state devices that hold digital audio files on internal or external media, such as memory cards. These generally have a low storage device, typically ranging from 128 MB – 4 GB, which can often be extended with additional memory; Hard Drive-based Players or Digital Jukeboxes - Devices that read digital audio files from a hard disk. These players have higher capacities, ranging from 1.5 GB to 100 GB, depending on the hard drive technology. At typical encoding rates, this means that thousands of songs, perhaps an entire music collection can be stored in one MP3 player.
In this paper we will present the implementation of a Hard Drive-based player capable of streaming multimedia audio content via wireless communication interface. This system may be used as a stand alone device for playing mp3 files or as a broadcast audio station.
2 Related Work
The precursors to DAP's were portable CD players and Mini disc players. Non- mechanical DAPs were introduced following the popularity of the precursors.
The first Mp3 player in the world was created by SaeHan Information Systems in 1997. The MPMan F10 was later OEMed to the American market through Eiger Labs. The first non-mechanical digital audio player on the American market was the Eiger Labs MPMan F10, a 32 MB portable that appeared in the summer of 1998. It was a very basic unit and wasn't use expandable.
The first Mp3 player to really make a significant impact on the buying population in America was the Diamond multimedia Rio PMP300. Diamond multimedia wisely released the PMP in September of 1988 just prior to the Christmas season.
Sales of the Rio far exceeded the company’s expectations, which led to a number of large companies’ decisions to enter the Mp3 race mp3play.
The first commercially available HD-based Mp3 Player was created by Compaq.
It was created as a prototype personal audio appliance by Compaq's Systems Research Center (SRC) and Palo Alto Advanced Development group (PAAD).
The PJB project started in May 1998, and the PJB-100 product shipped in November 1999. This player was succeeded by a lot of players Creative Nomad Jukebox, Archos Jukebox 6000, Apple Ipod, etc mp3hard.
3 System Overview
Inspired by these HD-based players we decided to design a similar one, with minimal cost. We observed that all these players have compatibility problems with the current available car audio systems. The only way to connect them is via the RCA analog input of the audio systems. This is difficult sometimes, because a dashboard disassemble is needed.
We find a solution for this problem, the wireless technology. We implemented a FM Stereo Radio Transmitter to our MP3 player. With this, the player transmits the analog audio signal on FM frequency between 88 - 108 MHz. The only thing needed to connect the player to the audio system is to tune in the correct frequency on the FM radio receiver of the audio system. In this way there is no more need of a wire connection, only needed to keep the player in a range of three meters from the audio system and the signal is transmitted.
The mp3 player is capable to access and read thousands of mpeg digital audio files from a hard disk using a microcontroller. The microcontroller sends the data extracted from a file to mp3 decoder chip. This chip processing the date and send them to the digital analog audio converter (DAC). The DAC converts the digital date from the input and send analog audio signal to the output. That signal is sent to the loudspeakers and to the FM transmitter. We implemented for the player some push buttons and infra red port. With these we will be able to control the mp3 player.
The push buttons are as following: Play (play melody); Stop (stop playing); Next (next melody); Prev (previous melody); Volume + (volume up); Volume - (volume down); Dir (change directory); Shuffle Mode, Normal Mode.
4 Hardware Design
The basic parts used in this project were: Microcontroller - AT90S8535 (Atmel);
Mp3 Decoder - STA013 (ST MicroElectronics); 18 bit serial DAC - CS4334 (Crystal/Cirrus Logic); FM Stereo Radio Transmitter - BA1404 (frequency 88-108 MHz). We used the ATMEL AT90S8535 microcontroller to control the components and data flow. The AT90S8515 is a low-power CMOS 8-bit microcontroller based on the AVR RISC architecture. By executing powerful
instructions in a single clock cycle, the AT90S8515 achieves throughputs approaching 1 MIPS per MHz allowing the system designer to optimize power consumption versus processing speed.
The AVR core combines a rich instruction set with 32 general purpose working registers. All the 32 registers are directly connected to the Arithmetic Logic Unit (ALU), allowing two independent registers to be accessed in one single instruction executed in one clock cycle. The resulting architecture is more code efficient while achieving throughputs up to ten times faster than conventional CISC microcontrollers.
The AT90S8515 provides the following features: 8 K bytes of In-System Programmable Flash, 512 bytes EEPROM, 512 bytes SRAM, 32 general purpose I/O lines, 32 general purpose working registers, flexible timer/counters with compare modes, internal and external interrupts, a programmable serial UART, programmable Watch-dog Timer with internal oscillator, an SPI serial port and two software selectable power saving modes. The Idle Mode stops the CPU while allowing the SRAM, timer/counters, SPI port and interrupt system to continue functioning. The power down mode saves the register contents but freezes the oscillator, disabling all other chip functions until the next external interrupt or hardware reset.
4.1 Microcontroller Connection
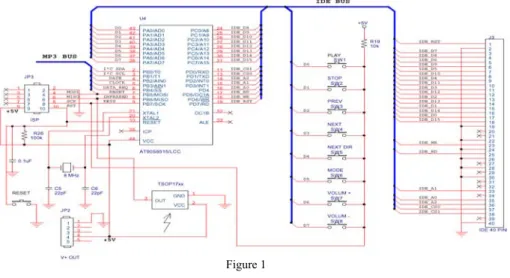
Figure 1 presents, the microcontroller connection circuit. The JP2 connector, labeled V+OUT, connecting the microcontroller Vcc pin to the voltage regulator circuit. This circuit is contains two kind of voltage regulators LM7805 and LM317T.
Figure 1 Microcontroller connections
With the LM7805 we obtained the 5V+ Vcc, necessary the microcontroller and the hard disk. With the LM717T we have the 3V+ for MP3 Decoder, DAC and the FM radio transmitter. We choice for microcontroller a crystal at 8 MHz, this will let as to use the microcontroller at his maximum capacity, 8 MIPS (eight thousands of instruction per second). This crystal is used to give a clock for microcontroller, by giving an oscillation between XTAL1 and XTAL2. To obtain that oscillation we also need a pair of capacitors rated between 10 pF and 100 pF, the value depending only from crystal sensitivity.
To program the microcontroller we need a programmer. We use a serial programmer similar to the STK200 from Kanda Systems that must be connected to the PC parallel port and to the microcontroller. To connect the programmer to microcontroller we used the JP3 connector, labeled ISP.
Five pins of the microcontroller are used for serial programming, MOSI (Master data output, slave data input), MISO (Master data input, slave data output pin), SCK (CLOCK), RESET and of course the GROUND.
Here we had to solve a problem. The normal state of the RESET line is high, then microcontroller executes the instructions from the flash and the programming mode is represented by the Low state of the RESET. Therefore we need to keep the RESET line High until a programming is started. When a programming is started the programmer must have to pull the RESET to LOW. We used a 100KΩ resistor connected with one end to the 5 V+ and the other end to the microcontroller RESET pin to make this pull up and down. When no signal came from the programmer on the RESET line, the RESET is HIGH with the Vcc and when a low is added from the programmer the RESET pin commute to LOW.
The same principle is used for the push buttons, when a button is pushed the pin that correspond to the push button there is HIGH and the 9 pin labeled KEYS is LOW, otherwise KEYS is HIGH and no signal is add on D0-7 pins.
The first eight data lines of the hard disk are connected to Port A (PA0-7) and the second eight lines (D8-15) are connected to Port C (PC0-7).The other lines needed from hard disk is connected to Port D.
For reception of the infrared signal we use a TSOP1738. This chip needs only a 5 V Vcc to pin 2 and it captures all infrared signals and send it to the microcontroller via the pin 2.
4.2 Mp3 Decoder Connection
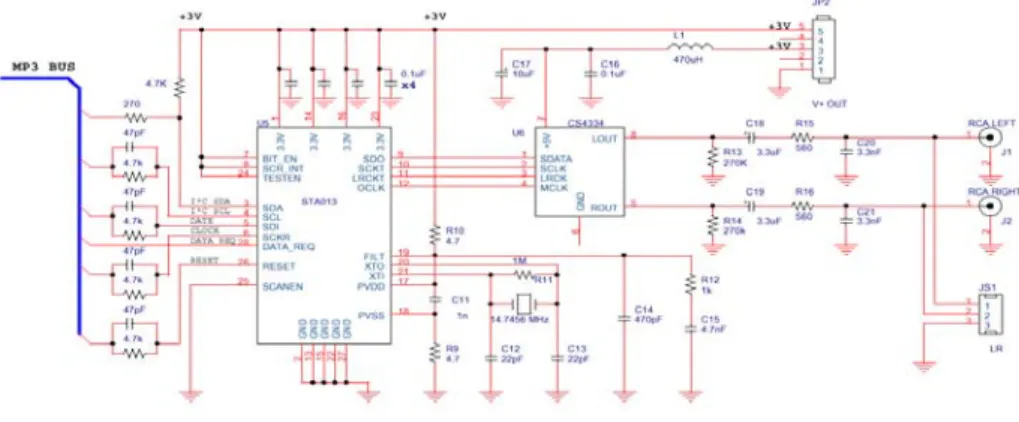
The STA013 is a fully integrated high flexibility MPEG Layer III Audio Decoder, capable of decoding Layer III compressed elementary streams, as specified in MPEG 1 and MPEG 2 ISO standards. The device decodes also elementary streams compressed by using low sampling rates, as specified by MPEG2.5.
STA013 receives the input data through a Serial Input Interface. The decoded signal is a stereo, mono, or dual channel digital output that can be sent directly to a D/A converter, by the PCM Out-put Interface. This interface is software programmable to adapt the STA013 digital output to the most common DAC's architectures used on the market.
Figure 2 represent the connection circuit of the STA013 to the microcontroller and to the DAC. In this project we have two chips that work with different voltages.
The STA013 is a 3 volt chip. The data sheet claims it can run between 2.7 to 3.6 volts. It must not be used at 5 volts. We need a level-shifting to connect the STA013 to the microcontroller.
The communication between the STA013 and the microcontroller is made via the MP3 BUS. This bus incorporates a I²C bus and a serial data bus. The I²C bus has two lines, the DATA line (SDA) and the CLOCK line (SCL), both need level- shifting because the SDA there is a bidirectional line and the SCK there is an input line. The serial bus has four lines DATA, CLOCK, DATE_REQ and RESET. The DATE_REQ is an output line and the other three are input lines, and they need level-shifting.
Figure 2 STA013 connections
4.3 Level-shifting
The outputs from a 5 volt powered chip must not be directly connected to the STA013 input pins. The STA013 inputs are not 5 volt tolerant. Each pin has a pair of input protection diodes. These diodes may conduct a small current. The simplest and easiest way to interface a 5 volt output to the STA013 input pins is with a series resistor, which will limit the current when the 5 volt output is high.
There is some input capacitance (3.5 pF) on the input pins, so adding a small
capacitor in parallel with the resistor will allow the rapid edge to properly drive the input pin. The value of the resistor and capacitor are not critical, Figure 3 shows 4.7 K and 47 pF, which limits the steady-state current to less than 1/2 mA, and has been tested. The capacitor is not really necessary if the pin doesn't need to be driven rapidly, such as the RESET pin.
Connecting the SDA signal from a 5 volt microcontroller to the STA013 is a bit more complex, though a simple circuit can often be used. The SDA line is bidirectional, which either device can pull down, or a resistor provides the pull-up.
Most microcontrollers have TTL thresholds, so a pull-up to the 3 volt supply will easily satisfy the 2.0 volt input high requirement. If the microcontroller will never drive the line high (only pull low or tri-state), then no other parts are probably required. This may be the case if the microcontroller has a dedicated I²C pin. In most cases, the microcontroller can drive the line high, and an additional resistor should be added to prevent damage to the STA013.
This current limiting resistor should be small, as it will form a resistor divider with the pull-up when the microcontroller drives low. If the pin can be put in a tri-state mode, the firmware should be written to use the tri-state for a logical high, or at least tri-state the SDA signal when not transmitting data, to save power.
The connecting of the DAC CS4334 is very simple. We only have to connect the SDATE, SCLK, LRCK, and MCLK to the same pins on the STA013. This DAC does not need a sophisticated output filter, because a filter is integrated in the chip.
4.4 FM Stereo Radio Transmitter
For the FM Stereo transmitter we use a BA1404. This device contains a stereo modulator, an FM modulator, and an RF amplifier. The stereo modulator creates a stereo composite signal, witch consists of a main (L+R), sub (L-R) and pilot signals, from a 38 KHz quartz controlled frequency. The FM modulator oscillates a carrier in the FM broadcast band (76 to 108 MHz) and modulates it with the composite signal. The RF amplifier creates energy to emit the modulated FM signal. It also functions as a buffer for the FM modulator. The schematic of this transmitter is very simple and it is taken from the original date sheet of the BA1404, see Figure 3.
Figure 3
FM Stereo Radio Transmitter
5 Communication and Configuration via I²C
I²C is a 2-wire protocol, created by Philips. One line acts as a clock (SCL) and the other data (SDA). The protocol defines the ability to have multiple masters initiate communication, but here we'll only worry about the simple and common case where the microcontroller is the only device that controls the bus, and all the other chips (like the STA013) respond to queries initiated by the microcontroller.
The STA013 requires initialization by I²C communication. This step can not be avoided. One part of the required initialization is to sent a group of 2007 writes provided by ST in the file p02_0609.bin.
For simple applications like using the STA013, there are four fundamental operations. Only these four operations are needed to build routines that access the STA013 chip:
Start Condition: This is a high-to-low transition of the SDA line, while SCL is high. Normally SDA only changes when SCL is low. When SDA changes while SCL is high, it means either the start or stop of a communication, instead of data transfer.
Send A Byte, Get ACK Bit: Eight bits are sent by the microcontroller, each write to SDA occurs while SCL is low. A ninth clock is given and the microcontroller
receives an ACK bit from the STA013. If the STA013 received the byte, it will send a zero in this bit.
Receive A Byte, Send ACK Bit: The microcontroller gives eight clocks on SCL, and after each low-to-high clock transition, a bit is read from the STA013. During a ninth clock, the microcontroller pulls SDA low to acknowledge that it received the byte.
Stop Condition: This is a low-to-high transition of the SDA line, while SCL is high. After the stop condition, both lines are left high, which is the idle state of the I²C bus.
Using these four basic I²C operations, a function to read from the STA013 can be built as follows:
Start Condition; Send A Byte: The value is 0x86 (134). The seven most significant bits instruct the STA013 to listen (because there may be other chips connected to SDA and SCL). The LSB is clear, telling the STA013 that will be writing an address; Send A Byte: The value is the address where we need to read data. The main program will pass the address to our sta013_read function; Stop Condition; Start Condition; Send A Byte: The value is 0x87 (135). Again, the upper bits select the STA013, and the LSB sets up the next access to read;
Receive A Byte: Read the byte from the STA013. This will be returned to the main program; Stop Condition;
Writing to the STA013 is even easier. Here are the steps: Start Condition; Send A Byte: The value is 0x86 (134). The seven most significant bits instruct the STA013 to listen. The LSB is clear, telling the STA013 that will be writing; Send A Byte: The value is the address within the STA013 where we write the data. The main program will pass the address to our sta013_write function; Send A Byte:
The value is the data passed from the main program to write into the STA013;
Stop Condition;
The first step should be to check that the STA013 is actually present. Just read from address 0x01. If the read routine returns with an error, then no device sent an ACK bit and there is no chip installed. If there is an ACK, the data returned should always be 0xAC. Any other value means that the STA013 isn't working properly.
The next step is to transmit the 'p02_0609.bin' configuration file provided by ST.
This file consists of 2007 address and data pairs. Sending the file is simply, we just write a loop that passes each pair to the 'sta013_write' function. Each ACK should be checked and the process aborted if any write doesn't receive any of its ACK’s.
Once the configuration file is sent, the board specific settings must be sent. These settings are needed to setup the crystal and the CS4331 DAC. To configure the
STA013 for a crystal, in our case a 14, 74568 MHz crystal, we need a little program from ST, named ConfigurPLL version 1.0.
After that only three pairs of bytes are needed, two of them set the STA013 for the DAC. Address 0x84 represents PCMDIVIDER register and it is set to 1 for 256X over sample, 32 bit words (allows 24 bit output).The next address 0x85 represents PCMCONF register and it is set to 33 for I²C format. The last is address 0x24;
witch is used to enable the DATE_REG pin by setting it to 4. Now the STA013 is set up for playing MP3, is only needed a Run Condition (address 0x72, data 0x01) to be ready and a Play Condition (address 0x13, data 0x01) to start playing the mp3. A full register description can be found in the original data sheet for the STA013.
6 System Extension
The system presented above provide a certain degree of flexibility and compatibility based on its FM radio transmitter that can broadcast audio content to FM enabled devices. But this solution has certain limitations and drawbacks in the context of the evolution of digital communications and multimedia broadcast solutions over digital communication link. According to this trend in the field of communication we present a different approach for our multimedia broadcast system. The system will be equipped with digital wired and wireless communication interfaces that will enable this platform to serve as a research and development support system for multimedia applications. This system will be suited for applications requiring mobility not only for the client devices but also for the server module. In the following pictures we will present the architecture of the both implementations, the FM radio transmitter based implementation and the digital communication enabled platform. In Figure 4 the block diagram of the system implemented based on the FM radio transmitter is presented. This solution in simple and can be produced at low costs because of the simplicity and low performance requirements for the components as well as because of the simple design and simple software components. But the drawback of this platform is its communication solution.
Figure 4
FM radio transmitter based solution
In Figure 5 we present the advanced architecture which involves digital communication interfaces that bring more complexity to the system but in the same time make it more flexible and with an enhanced research and application development possibilities. This solution gives more performance and is oriented on the technology trends in the field of multimedia broadcasting. In the same time the solution is more expensive due to the complexity of the communication interface, the performance requirements for the CPU which has to be faster that the one used in the other implementation. The software component is more complex as well because of the control components (drivers) that have to be implemented and the protocol stack.
Figure 5
Digital communication based solution
Conclusions
The system presented in this paper represents the result of a research and development activity. Several similar solutions had to be studied as well as all the devices and circuits used for the development of this system. The challenges encountered by the development team were interfacing with storage devices and wireless communication module. This system be further developed as a commercial product or can be used as experimental test bed for didactic purpose.
As future work, the communication module will be further developed in order to enable more complex wireless connectivity for the system and in the same time the storage module will be developed to permit connectivity with several other media storage systems. These two platforms can be used as experimental platforms for studies in the field of multimedia application involving content broadcast (or unicast) and development platforms for product implementations.
References
[1] Barry B. Brey: Architecture, Programming and Interface, Volume Fifth Edition, 2000
[2] Atmel Corporation: Atmel 8-bit avr risc microcontroller ats908515.
Datasheet from: http://www.atmel.com, 1999
[3] Cirrus Logic Crystal Department: 8 pin stereo d/a converter for digital audio cs4334. Datasheet from: http://www.cirrus.com, 1997
[4] William Kleitz: Digital Electronics, A Practical Approach. 2002
[5] ROHM CO LTD: Fm stereo trasmitter ba1404. Datasheet from:
www.DatasheetCatalog.com, 1997
[6] Muhammed Ali Maziali and Gillispie Maziali: Assembly Language, Design, and Interfacing, Vol. 1&2, 2000
[7] ST Microelectronics: Mpeg 2.5 layer iii audio decoder. Datasheet from:
http://www.st.com/, 1998
[8] ST Microelectronics: Sta configuration file. p02 0609.bin from:
http://www.st.com/, 1998
[9] ST Microelectronics: 1.2v to 37v voltage regulator lm317t. Datasheet from:
http://www.st.com/, 2003
[10] PJRC: How to use the sta013 mp3 decoder chip.
http://www.pjrc.com/tech/mp3/sta013.html, 2003
[11] The Rockbox: The history of hd-based mp3 players.
http://www.rockbox.org/playerhistory/, 2004
[12] Vishay Telefunken Semiconductor: Photo modules for pcm remote control systems tsop1738. Datasheet from: www.DatasheetCatalog.com, 2001
[13] Kanda Systems: Stk-200 avr programmer.
http://www.kanda.com/index.php3?cs=1&bc=direct&bw=%2Fstk200.html, 2998
[14] Unisonic Technologies: 3-terminal 1a positive voltage regulator lm7805.
Datasheet from: www.datasheetcatalog.com, 2001
[15] John F. Wakerly: Digital Design Principles and Practices. 2000
[16] The Free Encyclopedia Wikipedia: Digital audio player.
http://en.wikipedia.org/wiki/Digital audio player, Jan 2006