Measurement and data acquisition English supplement
Mingesz Róbert, Gingl Zoltán
2014
A tananyag a TÁMOP-4.1.2.A/1-11/1-2011-0104 “A felsőfokú informatikai oktatás minőségének fejlesztése, modernizációja” c. projekt keretében a Pannon Egyetem és a Szegedi Tudományegyetem együttműködésében készült.
1
Measurement and data acquisition – English supplement
Written by:
Dr Róbert Mingesz and Dr Zoltán Gingl
Keywords: measurement basics, instruments, virtual instrument, LabVIEW
Summary:
This book is a brief introduction to the basics of measurement and instrumentation. The first chapter introduces the concept of measurement error and how it can be handled. The second chapter advises on the usage of multimeters and the third chapter shows the basics of oscilloscope operation. The forth chapter is a short introduction to the LabVIEW programming environment, while the last chapter introduces the usage of DAQmx-based instruments.
Introduction
This short book introduces is a guide to the basics of measurements and instrumentation.
The most important parts of the lecture Measurement and data acquisition are briefly presented. The aim is to assist foreign students and to help lecturers who present the material in English. Domestic students can also use this short book to learn the terms used in the field.
A compact LabVIEW tutorial is also included to allow beginners to learn the most important features in a short time and to aid the rapid development of simple measurement applications.
The end of the book contains a brief list of references that are highly recommended for those who would like to perform the exercises of the Measurement and data acquisition course.
This work was supported by project no. TÁMOP-4.1.2.A/1-11/1-2011-0104.
2 Table of contents
Introduction ... 1
Table of contents ... 2
1. Introduction to metrology ... 3
Uncertainty of measurement ... 4
Propagation of uncertainty ... 4
Exercises ... 5
2. Digital multimeter basics ... 5
Measuring voltages ... 6
Measuring current ... 6
Measuring resistance with a multimeter ... 7
Exercises ... 7
3. Oscilloscope basics ... 8
Measurements with digital oscilloscopes ... 10
Exercises ...12
4. Virtual instrumentation with LabVIEW ...12
Introduction to the LabVIEW programming environment ...12
Simple example programs ... 15
5. Data acquisition and digital data processing ... 18
Using NI-DAQmx instruments ... 18
Importing and exporting data ...21
Basic data processing ... 22
Exercises ... 23
References ... 24
3 1. Introduction to metrology
Metrology is the science of measurement. It deals with the definitions of units of measurements and their realisation, linking the measurement results to internationally accepted standards, scientific and industrial applications of measurement science, as well as legal concepts of metrology.
There can be many definitions of measurement depending on the field of application. The simplest definition is that measurement is the assignment of numbers to objects or events, which is usually performed comparing a quantity with a standard unit. The result of a measurement normally consists of two parts: the number and the unit of measurement [1].
The most commonly used system of units is the SI system, which contains seven fundamental units: metre, kilogram, second, ampere, kelvin, candela and mole.
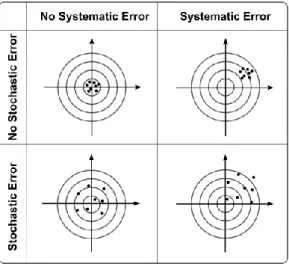
A measurement is not usually a perfect reflection of reality and it almost always contains errors. The measurement error is the difference between the measured value and the true value of the quantity. We distinguish between two types of error:
Systematic error (or bias): this error does not change from measurement to measurement. Since it is deterministic, it can and should be compensated for. It cannot be handled by statistical methods.
Random error: the value of the error varies from observation to observation. It cannot be predicted and cannot be compensated for. It can be handled by statistical methods.
Fig. 1. The effect of systematic errors and stochastic errors
To describe the error of a measurement, we use absolute and relative error values. The absolute error is the magnitude of the difference between the real value 〈𝑥〉 and the measured value 𝑥𝑖:
𝜖 = 𝑥𝑖− 〈𝑥〉.
The relative error is the absolute error divided by the real value:
𝜂 = 𝜖
|〈𝑥〉|.
In most applications, the absolute value of the errors is used.
4 Uncertainty of measurement
Since a random error is always present in measurements, we need to quantify this uncertainty. This is usually done by specifying the confidence interval for a measurement, thus the result of a measurement is given in the following form:
⟨𝑥⟩ = 𝑥̅ ± ∆𝑥,
where ⟨𝑥⟩ is considered to be the real value, 𝑥̅ is the result of the measurement and ∆𝑥 is the confidence interval. The real value is assumed to be in the given interval with a given probability (𝑝) or significance level (𝛼 = 1 − 𝑝). The size of the confidence interval depends on the required significance level, the spread of the measurement and the number of statistically independent measurement results. In most cases, we assume that the distribution of the error is Gaussian, and we distinguish between three cases when giving the result of the measurement.
Case 1: a single measurement with known standard deviation:
⟨𝑥⟩ = 𝑥̅ ± 𝜆 ∙ 𝜎,
where 𝜎 is the standard deviation and 𝜆 = 𝐹−1(𝑝+12 ), with 𝐹−1 being the inverse of the distribution function.
Case 2: 𝑁 measurements with known standard deviation:
⟨𝑥⟩ = 𝑥̅̅̅̅ ±𝑁 𝜆𝜎
√𝑁, where 𝑥̅̅̅̅ is the average value: 𝑥𝑁 ̅̅̅̅ =𝑁 1
𝑁∑𝑁𝑖=1𝑥𝑖. The mean value is an unbiased and consistent estimator of the real value.
Case 3: 𝑁 measurements with unknown standard deviation.
We need an unbiased estimate of the standard deviation:
𝑠 = 𝜎𝑁−1 ∗ = √ 1
𝑁 − 1∑(𝑥𝑖− 𝑥̅̅̅̅)𝑁 2
𝑁
𝑖=1
.
The result is given by the following formula:
⟨𝑥⟩ = 𝑥̅̅̅̅ ±𝑁 𝑡𝑁−1𝜎𝑁−1 ∗
√𝑁 , where 𝑡𝑁−1= 𝐹𝑡,𝑁−1−1 (𝑝+1
2 ), with 𝐹𝑡,𝑁−1−1 being the inverse of the distribution function of the t- distribution.
Propagation of uncertainty
Since the result of a measurement contains random errors described by the confidence interval, any quantity 𝑞 which is calculated from the result of the measurement will also contain a random error (⟨𝑞⟩ = 𝑞̅ ± ∆𝑞). If the result depends on a single measured variable (𝑞 = 𝑞(𝑥)), the confidence interval of the result can be calculated using the following equation:
5
∆𝑞 = |d𝑞 d𝑥|
𝑥=𝑥̅
∙ ∆𝑥.
If the result depends on multiple variables (𝑞 = 𝑞(𝑥, 𝑦, ⋯ )) and the measurement errors of the variables are statistically independent, the confidence interval of the result is:
∆𝑞 = √|∂𝑞
∂𝑥|
𝑥=𝑥̅, 𝑦=𝑦̅
2
(∆𝑥)2+ |∂𝑞
∂𝑦|
𝑥=𝑥̅,𝑦=𝑦̅
2
(∆𝑦)2+ ⋯ .
Exercises
Exercise 1
The standard deviation of a distance measurement is 3.2 mm. Measurement results are assumed to follow a normal distribution. Give the result of the measurement when only a single item of data has been measured, the value is 234 mm and the level of significance is 0.1 %.
How many measurements are needed to reduce the statistical error below 2 mm?
Exercise 2
In a measurement, the following data were obtained:
1.234 V, 1.225 V, 1.239 V, 1.235 V, 1.241 V.
Assuming that the fluctuation of values is random, calculate the standard deviation of the data.
2. Digital multimeter basics
A multimeter is an instrument designed to measure different kinds of electric quantities, such as voltage, current and resistance. While in the past most multimeters were analogue, currently almost all multimeters are digital (DMM).
Fig. 2. Typical multimeters
Main parts of a multimeter:
Display. It is characterised by the number of digits (resolution).
6
Meter dial. It is used to change the function and the measurement range. Some multimeters select the measurement range automatically (autoranging multimeters).
Meter leads/probes. The black lead is always connected to the common port, and is considered negative. The red one is considered to be the positive connection.
Probe connections. There are usually four connections: COM is the common port of all measurements, the mA port is used when we measure low currents and is protected by a fuse, the 20 A port is used for measuring high currents and it is usually not protected at all, V/Ω is used when we measure voltages or resistances or use other functions.
Measuring voltages
When measuring voltages, we connect the input of the multimeter to a voltage divider. The output of the divider is measured by an A/D converter. The impedance of the multimeter during voltage measurement is usually constant and equal to 10 MΩ.
To measure voltage, we connect the meter parallel to the voltage source that we want to measure.
Fig. 3.Measuring the voltage across the resistance R1
Fig. 4. The effect of the internal resistance (RM) of the multimeter when measuring a voltage source with impedance Rb
If the impedance of the source is too high, we need to consider the input impedance of the multimeter. For example: if 𝑅b= 100 kΩ, 𝑅m = 1 MΩ, 𝑈 = 10 V,
𝑈M= 𝐼 ∙ 𝑅M= 𝑈
𝑅b+ 𝑅M∙ 𝑅M= 10 V
100 kΩ+1 MΩ∙ 1 MΩ = 9,09 V.
the relative error of the measurement is: ℎ = 9,09 %.
Measuring current
When measuring current, first the multimeter converts it into voltage, then the internal A/D converter measures it. To measure current in a circuit, first we need to “cut” a wire in the circuit, then can we connect the A-meter serially into the circuit.
7
Fig. 5. Connecting the current meter into a circuit. In the case above, the meter shows a positive value, as its red lead is connected to the positive pole of the voltage source.
When measuring currents, we can observe a voltage drop up to 200-300 mV on the meter, which is caused by the internal impedance of the meter. This impedance depends on the measurement range, so by changing the measurement range, we may change the current flowing through the circuit.
In many cases, it is inconvenient to insert a current meter into the circuit. Instead, we can measure the voltage drop on a known resistance, then calculate the current using Ohm’s law.
Measuring resistance with a multimeter
Fig. 6.Typical setup for measuring a resistance with a multimeter
When measuring resistances, we need to consider the following:
The resistance must be disconnected from the circuit. Otherwise, the measurement current will flow not only through the measured resistance, but also through other components.
When we measure high resistances (over kΩ), holding the resistance in bare hands may cause significant error, since the human body also conducts current.
When we measure low resistances (below kΩ), the resistance of leads and contacts can be significant, thus limiting the precision of the measurement. For precise measurements, one may need to use four-point arrangements, which can be performed by desktop multimeters.
Exercises
Exercise 1
Measure a voltage with a DMM. First, connect the voltage source directly to the DMM inputs, then insert a resistor of 1 MΩ. Discuss the results.
Exercise 2
Find a method to measure the series resistance of a DMM operating in current measurement modes. Measure the series resistance for full-scale values of 200 μA, 2 mA and 20 mA.
8 Exercise 3
Measure the resistance of a resistor with a nominal resistance of 1 MΩ. Using datasheet specifications, give the absolute deterministic error of the measurement. What happens if you touch both terminals with your fingers?
Exercise 4
Measure the value of 100 resistors with nominal resistances of 1 kΩ. Give the result of the measurement according to Chapter 1. Choose resistors with tolerances of 1%. Compare this value to the result of the measurement.
One of these resistors is in a working circuit. The voltage across the resistor is 3.45 V. Give the current flowing through resistor according to Chapter 1.
3. Oscilloscope basics
An oscilloscope is an electronic test instrument that allows the observation of varying signals.
The measured signals are displayed on a 2D graph, where the y-axis is the voltage and the x- axis is the time. The oscilloscope needs a proper trigger condition to start the measurement.
There are mainly two types of oscilloscopes: analogue oscilloscopes and digital oscilloscopes.
This chapter will describe the properties and usage of desktop digital oscilloscopes.
Fig. 7. Simplified block diagram of a digital oscilloscope
A digital oscilloscope contains a high-speed A/D converter (typically with a GHz sampling rate and a resolution of 8 to 10 bits). The sampled input signal is stored in a high-speed memory, then processed by high-speed digital electronics, then displayed on the LCD. Every digital oscilloscope is capable of storing the measured signal as well as sampling the data before the start impulse (trigger) is received (pre-trigger).
9
Fig. 8. Desktop digital oscilloscope (Tektronix TDS2002C)
The main controls of the oscilloscope are:
1. Screen
2. Options buttons. Their function may vary depending on the actual menu and it is displayed on the right side of the screen.
3. Vertical controls, containing the Scale button, the Channel menu button and the Vertical position button for each channel
4. Horizontal controls 5. Trigger controls 6. Menu buttons
7. Multipurpose knob. Its function depends on the actual menu.
8. Input connectors (BNC), for each channel and trigger input 9. USB flash drive port
The signals are connected to the oscilloscope using a BNC cable or a probe. Just like that of multimeters, the input of the oscilloscope is not ideal, and the impedance of the input affects the measured signal. The ohmic member of the input impedance is 1 MΩ (in the case of high- speed scopes, 50 Ω can also be selected). As the frequency of the measured signal increases, the effect of the input capacitance also increases.
Fig. 9. The simplified schematics of an oscilloscope input circuit
10 There are probes that attenuate the input signal. By attenuating the signal, they provide higher input impedance. For example, a 10× attenuation will result in a 10-MΩ input impedance. The bandwidth of a probe is usually greater at higher attenuation. However, in order to achieve proper signal transmission, the probe has to be calibrated to the actual oscilloscope input.
Active probes use internal electronic circuits to provide high input impedance and proper signal propagation. They are equipped with special connectors, which are usually only compatible with the manufacturer’s oscilloscopes.
Measurements with digital oscilloscopes
Fig. 10. Typical screenshot during measurement
During measurements, a lot of information is displayed on the screen. The most important indicators are:
1. Measured signals. The colour corresponds to the selected channel. It is practical to choose a probe with the same marking colour.
2. The zero level of the selected channel
3. The state of the trigger (triggered, waiting for trigger signal, no trigger, paused)
4. Actual trigger voltage. In the case depicted in the figure, the oscilloscope generates a trigger event when this voltage level is passed. The time instant of this event is positioned horizontally in the middle of the screen.
5. Settings for the vertical scale of each channel (the voltage corresponding to one big division is shown).
6. Scale of the time base (corresponds to one big division) 7. Trigger source and settings
8. Local menu, function of the Options buttons
The easiest way to configure the oscilloscope is to press the Auto Set button. The oscilloscope tries to find the best settings for the signals actually measured. However, in some cases this function may not give a result that suits us, and we must fine-tune the settings.
When the menu button that belongs to a channel is pressed, the input menu is displayed and the channel is activated. On the second press, the channel is deactivated. In the vertical menu, one may select the properties of the input.
11
Coupling: the coupling of the input channel. In most cases, DC coupling should be selected, in which case no change is applied to the input signal. In the case of AC coupling, the DC component is removed from the signal, thus small changes superimposed on DC signals can also be examined. However, slow signals may be distorted.
BW limit: by reducing the bandwidth of the signal, we can reduce the input noise.
Volts/div: one can change between the coarse and the fine function of the input scale knob.
Probe: the actual value of the input probe. It should match the real value of the probe.
Otherwise the vertical readings will not be correct.
Invert: multiply the input signal by -1.
In order to capture the events and signals we are interested in, the proper settings of the trigger are crucial. The elements of the trigger menu are:
Type – type of the trigger
o Edge – trigger event when a level is crossed o Video – used for triggering on video signals o Pulse – trigger on pulse event
Source – trigger source, may be any input, external trigger source or line
Slope – whether to trigger on rising or falling edges
Mode – trigger mode
o Auto – if no trigger event is available, an internal timer controls the sampling.
When measuring slow signals, we should switch the oscilloscope to Scan mode, when the trigger circuit is inactive.
o Normal – the measurement is started only when a valid trigger event occurs.
Coupling – the coupling of the trigger source. Besides usual settings, it is possible to filter the input signal.
Some useful trigger features:
Set to 50% – set the trigger level to the middle of the measured signal
Force Trig – manually generate a trigger event and display the measured values
Trig View – display the trigger signal
Holdoff – can be found in the Horizontal menu; specifies how much time the oscilloscope waits between two measurements.
Digital oscilloscopes are capable of performing automated measurements, such as measuring the frequency, the period, the mean, the peak-to-peak value or the phase. These measurements are available in the Measurements menu. Cursors displayed on the screen may also help us to perform measurements. The oscilloscope can save the measured data or the screenshot of the display to a thumb-drive; see the Save/Recall menu and the PRINT Button settings.
When performing measurements with an oscilloscope, we need to pay attention to the following:
The probe needs to be properly grounded. The grounding point needs to be carefully chosen; otherwise we may cause a short circuit.
The inputs of the oscilloscopes are not differential, so we cannot measure potential differences with them.
12
Since the oscilloscope performs sampling on the input signal, violation of the sampling theorem may occur, thus the displayed signal may differ significantly from the original one. We may also miss short peaks. The Peak detect Acquisition mode of the oscilloscope may be useful in this case.
Exercises
Exercise 1
Connect the output of a signal generator to the input of the oscilloscope. Measure the frequency, the period and the peak-to-peak amplitude of the signal.
Exercise 2
Connect the rectangular calibration output signal to the oscilloscope. Observe the change in the signal if a series resistor of 100 kΩ is placed between the output and the input. Explain the results.
4. Virtual instrumentation with LabVIEW
LabVIEW is a programming environment and programming language that is optimised for research, development and engineering tasks. It is easy to learn and most applications can be developed very fast. It provides full programming functionality and also provides a full spectrum of data analysis tools. Furthermore, it allows many instruments to be controlled directly from the computer, and supports several platforms, such as Windows, Unix, OS-X, real-time targets, embedded systems, microcontrollers or FPGAs. The programming language, referred to as the “G language” is a graphical dataflow programming language. The execution is determined by the structure of the block diagram. Data elements propagate through wires and the functions are executed when all input data are available.
The most common applications of the LabVIEW:
Measurement, data acquisition, data analysis and visualisation
Industrial control
Individual systems and prototyping
Complex scientific instrumentation and control systems (Big Physics)
Education
Note: this chapter is a very short introduction to the language; for more information, see the tutorials available online [5]. Constant experimenting is useful when learning LabVIEW, as well as checking the examples provided (the Find Example menu). The Context help window can also provide useful information while we edit or execute a program.
Introduction to the LabVIEW programming environment
In LabVIEW, programs are called virtual instruments (VI). A VI consists of three parts: the front panel, the block diagram and the icon/connector pane.
The front panel is visible to users and contains input fields (controls) and output fields (indicators). The block diagram specifies the code to be executed, and contains structures, nodes and wires to transfer the data among other block diagram objects. The icon/connector pane is used when we create subVIs to modularise and reuse our code. The subVIs correspond to functions or subroutines in other programming languages.
13
Fig. 11. The project window, the front panel and the block diagram. On the front panel there are input fields (controls) and output fields (indicators). All front panel elements have a corresponding terminal on the bock diagram (3). On the block diagram there are
also constants (4), wires (5) nodes (6) and in this case a while structure (7).
Fig. 12. The menu bar and the toolbar
The toolbar contains most tools that can be used for editing programs. The toolbars of the front panel and block diagram are slightly different. The most important buttons are:
1. Run: execute the program a single time. If the program cannot be executed or contains errors, it changes to a broken arrow (List Errors).
2. Run Continuously: continuous execution; restarts automatically when an execution cycle is finished.
3. Abort Execution: abort the execution of a program. It is not recommended to use this function, especially when the program is communicating with external devices.
4. Pause: suspend the execution of the program. Typically used for diagnostic purposes.
5. Highlight Execution: the data flow of the diagram is visualised. Used for debugging purposes.
6. Further debugging tools (such as probes) 7. Formatting tools
8. Tools used for aligning and distributing elements
9. Cleanup Diagram/Selection: used to rearrange all or a single part of the diagram.
The elements of the front panel can be selected from the control palette. The program can be edited only if it is not running. The palette can be reached only if the front panel is active. If not visible, it can be brought up right-clicking over an empty spot on the front panel. The
14 front panel elements are sorted by function. Most elements are available in different styles (Modern, Silver, Classic, System).
Fig. 13. The control palette. The palettes that are not visible can be reached clicking on the down arrow.
Fig. 14. The functions palette
The elements of the block diagram are available on the functions palette. The most important palettes are:
Programming/Structures: structures that influence the execution of programs, such as while and for loops and case structures.
Programming/Numeric: tools for performing operations on numeric data types.
Most functions are overloaded, thus they can accept various data types, and even arrays.
Programming/Boolean: functions for manipulating Boolean data types.
Programming/Array: tools to manipulate arrays
Programming/Cluster: clusters are data structures similar to structs in the C programming language. Tools required for manipulating them are in this palette.
Programming/String: tools to manipulate strings
Programming/Comparison: tools performing numeric comparison. The equality of Booleans, clusters and strings can also be tested.
Programming/File I/O: file access tools
15
Mathematics: several useful mathematical tools, such as elementary functions, linear algebra, curve fitting and statistics
Signal processing: tools to generate conditions and measure different real-life signals
Measurement I/O: sub-VIs required to control instruments
Express: express VIs provide a set of easy-to-use and easy-to-configure functions, such as data acquisition, signal processing, signal filtering and signal measurement.
The functions performed by the mouse pointer depend on the actual position of the cursor.
Sometimes the actual function may depend on mere pixels. The functions can also be selected using the tools palette, if the automatic tool selection is switched off.
Fig. 15. The tools palette
The most important functions of the cursor are:
1. modifying data, manipulating objects 2. selecting and editing
3. modifying text 4. creating a wire
5. inserting a breakpoint: when the execution reaches a breakpoint, it is suspended.
6. probe tool: can be used to check the value of a wire 7. picking a colour and changing the colour of an element
During programming, the context help function provides useful information about the node or object under the cursor. The context help can be accessed from the help menu or by using the CTRL+H shortcut. Most functions will also have a detailed help explaining the usage of that function. When we use new functions in LabVIEW, the “Search for examples…” menu may provide useful examples.
Simple example programs
In the following, we present some simple example programs with short descriptions of the functions used.
Example: solving quadratic equations
The formula for solving quadratic equations is the quadratic formula:
𝑥1,2=−𝑏 ± √𝑏2− 4𝑎𝑐 2𝑎
16
Fig. 16. Front panel of the VI implementing the quadratic formula using 3 numeric controls and 2 numeric indicators
Fig. 17. The code for solving quadratic equations using simple arithmetic functions
Fig. 18. The code for solving quadratic equations using C-like syntax in a formula node.
The inputs and the output of the formula node can be added right-clicking on the edge of the formula node and selecting Add Input/Output.
Brownian motion
Exercise: create a program that simulates one-dimensional Brownian motion.
The motion of a single particle can be calculated using the following formula:
𝑥𝑖+1= 𝑥𝑖+ 𝜉𝑖,
where 𝜉𝑖 is a random value between −1 and +1. Since it is an iterative formula, we will use a while cycle to calculate each point, and a feedback node to get the value of the last iteration.
The result is plotted on a waveform chart. A 50-ms wait period is also inserted to slow down program execution. The code is shown in figure Fig. 19.. The corresponding C-like code is:
while(!stop) {
xi = xi+2*random()-1;
waitms(50);
}
17
Fig. 19. The code for generating one-dimensional Brownian motion (right), and the generated motion plotted on a Waveform chart (left)
Traffic lights
Exercise: create a program that simulates a single traffic light.
Since the traffic light should work forever, we can use an infinite while loop. The sequence of the states is provided by using a flat sequence structure. Note that new frames can be added selecting the Add Frame After local menu. The lights are symbolised by Boolean LEDs and their colour is customised on the front panel by using the Properties menu. Each front panel item is symbolised by a single terminal. In order to edit its value from multiple places in the program, we need to use local variables. The timing is specified by the wait (ms) node.
Fig. 20. The block diagram of the semaphore
Lissajous figures
Exercise: create a program that displays Lissajous figures.
To create Lissajous figures, we need two sinusoidal patterns with different periods or initial phases. These patterns can be generated by using the sine pattern node. The two arrays are combined by using a cluster/bundle node, and the result can be displayed on an XY graph.
18
Fig. 21.The code for generating a Lissajous figure by plotting two sine functions on an XY graph
Fig. 22.The front panel of the program, where we can set the cycles of the sines and the phase difference between them.
5. Data acquisition and digital data processing
Using NI-DAQmx instruments
Most of the instruments manufactured by NI are compatible with NI-DAQmx drivers and tools. One can chose simple USB-powered instruments such as USB 6008, or modular instruments such as compact DAQ or even high-end, real-time PXI systems — they all use similar methods. Using the NI-DAQmx Application Programming Interface (API) and the DAQ Assistant, the development time of measurement control software can be radically reduced.
19
Fig. 23.: Using the DAQ Assistant for the easy configuration of measurement tasks
The DAQ Assistant is an easy-to-use wizard-like interface for the interactive configuration of simple measurement tasks. The DAQ Assistant can also be used to generate DAQmx code, which can be used for greater flexibility or better performance than the DAQ Assistant may provide.
When using the DAQmx driver, first we need to configure and add the physical input or output channels to a task. Then we can configure the task further, and perform the measurement or excitation. In the following figures, a few simple examples of using the DAQmx driver are shown.
Fig. 24.: Measuring voltage using DAQmx programming. A single measured data item is retrieved after the configuration of the physical channel.
Fig. 25. Continuous sampling of a signal. The sampling rate is set to 1 kHz. In each cycle of the while loop, 1000 samples are retrieved and displayed on a waveform graph. When
the application is closed, the DAQmx task is stopped and cleared.
20
Fig. 26. Sample software using synchronous continuous excitation on two output channels and data acquisition on multiple input channels.
Fig. 27. The user interface of the software
Properties of the NI USB 6211 multifunction instrument
The NI USB 6211 is a relatively cheap USB-powered instrument, yet it can perform several measurement and control tasks.
Fig. 28. The NI USB 6211 multifunction instrument
21 Analogue input: the USB 6211 has 16 single-ended or 8 differential inputs. It has a single 16-bit, 250-kS/s ADC, which is shared between the input channels used. For this reason, when one is measuring multiple channels at the same time, the maximum sampling rate is divided by the number of the channels used; moreover, there will be a slight delay between sampling times. The input has a programmable gain amplifier and the available input ranges are ±10 V, ±5 V, ±1 V and ±200 mV. The device supports the following input modes:
differential mode: measure the difference between two input signals (e.g. A0 and A8)
referenced single-ended mode: measures the voltage relative to the AI GND
non-referenced single-ended mode: measures the voltage relative to the AI SENSE input
Analogue output: the device has two 16-bit, 250-kS/s analogue outputs. The output range is between -10 and +10 V. The device supports hardware timing for the output, and signal generation can be synchronised to the analogue input measurement.
Digital I/O: the USB 6211 has 4 digital inputs and 4 digital outputs. This is less than what is usually available, and the lines are only software-timed. Several internal flags can be connected to these I/O lines. These flags include conversion clock, sample clock and acquisition start trigger.
Counters: the device contains two 32-bit counters. These can be used for edge counting, pulse width measurement, period measurement, frequency measurement, quadrature encoders, pulse generation, PWM generation and frequency generation. The input and output lines of the counters can be connected to the digital I/O.
Importing and exporting data
The simplest way to move measurement data between different programs (LabVIEW, Excel, MATLAB and SPSS) is the plain-text spreadsheet file, where the numeric data are organised in columns and rows. The Write to Spreadsheet File and Read From Spreadsheet File are tools to export and import spreadsheets.
Fig. 29. Exporting the content of an XY Graph into a spreadsheet file. The first column will contain the X axis data and the second contains the Y axis data. Note that the format
specifier is set to automatic formatting.
22
Fig. 30. Reading the previously exported data from the file and displaying it in an XY graph.
Basic data processing
One can perform several types of analyses on the measured data, such as calculating statistical parameters, fitting linear or non-linear regression lines and performing correlational and spectral analysis. We present some examples of data processing in the following figures.
Fig. 31. The probability and statistics palette
Fig. 32.Calculating the mean value, standard deviation and variance
23
Fig. 33. A sample of calculating a histogram of a data set and displaying it on a graph
Fig. 34. Fitting a linear regression line on the input data
Fig. 35. Calculating the power spectral density of an input signal (waveform)
Exercises
Exercise 1
Create a system that measures and displays the temperature using a thermistor.
Exercise 2
Create a signal generator using a DAQmx-compatible instrument. The frequency, the amplitude and signal format should be variable on the front panel.
24 References
[1] Stephanie Bell: “A Beginner’s Guide to Uncertainty of Measurement”, available:
http://www.wmo.int/pages/prog/gcos/documents/gruanmanuals/UK_NPL/mgpg11.
[2] Ernest O. Doebelin: “Measurement Systems Application and Design”, McGraw- Hill Publishing Company, 1990
[3] Analog Devices: “The Data Conversion Handbook”, available:
http://www.analog.com/library/analogdialogue/archives/39- 06/data_conversion_handbook.html
[4] National Instruments: “Introduction to NI LabVIEW”, available:
http://www.ni.com/gettingstarted/labviewbasics/
[5] National Instruments: “Instruments driver network”, available:
http://search.ni.com/nisearch/app/main/p/ap/tech/lang/hu/pg/1/sn/ssnav:idr/
[6] National Instruments: “Big physics”, available: http://www.ni.com/physics/
[7] “Digital Multimeter Kit”, available:
http://www.electronickits.com/kit/complete/meas/m-2666k.pdf
[8] Pico Technology: “PicoScope 5000 USB PC Oscilloscopes”, available:
http://www.picotech.com/picoscope5200-pcos.html
[9] Tektronix: “TDS2000C Digital Storage Oscilloscope”, available:
http://www.tek.com/oscilloscope/tds2000-digital-storage-oscilloscope
[10] Rick Bittert et al: “LabVIEW: Advanced Programming Techniques”, CRC Press, 2006
[11] Peter A. Blume: “The LabVIEW Style Book”, Prentice Hall, 2007 [12] Attachments to the supplement:
http://www.noise.inf.u-szeged.hu/Education/malj/